To define default rows to display when you first open a timesheet, see Defining Default Rows. To set preferences that control how the time sheet displays, refer to Setting Preferences. To look up codes, see Lookups and Job Search. To add, delete or sort rows, see Row Functions. For more information about the timesheet, see Timesheet Parts, Icon Definitions, Defaults on Timesheets and topics in Popups.
Note: If a timesheet is in use by another user, the timesheet will be displayed in view only mode, a Padlock icon is displayed for the timesheet week, and an error Popup is displayed informing the user of the lock.
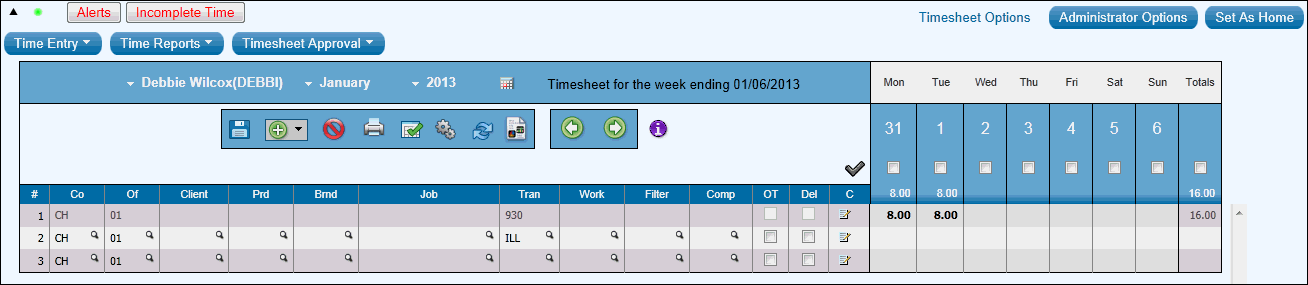
To enter time:
Key codes to which the time is to be charged for the row. Follow the rules of time entry for your agency.
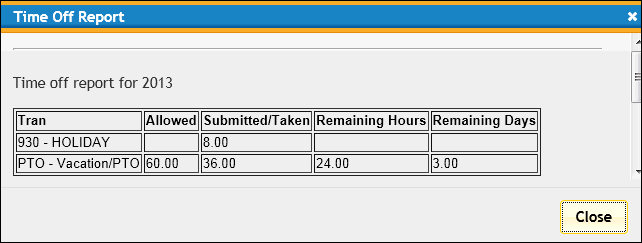
To help you keep track of time off hours, click the Time Off Report icon on the toolbar to display the Time Off Report.
If you enter a job that is not owned by your company/office, key the company and office for the job. To display the company/office columns, refer to Setting Preferences.
To view the description for a client, product, brand or job code, move the mouse pointer over these fields. You may also set your preferences to always show the Client Name, but this may require you to scroll to the right to see all the days on the timesheet.
In the date columns, key the number of hours worked in whole numbers and decimals in quarter hour minimum increments.
If the job requires you to enter a job component, key the component in the Comp column. To display the Comp column select Show Job Component in Preferences.
If you have been instructed to charge time to a client as overtime, key the overtime portion of time on a row by itself and click the OT check box. (The OT column only displays if selected on the Preferences window.)
After you enter time, click the Save/Submit icon to save/submit the timesheet. If any timesheet errors display, correct the errors and click the Save/Submit icon again. If necessary, you may save the timesheet with errors, but only if none of the Submit check boxes are checked. The words "Timesheet was Saved" displays on the top left of the timesheet, beneath the icon bar, if the timesheet saved successfully.
When you have entered all time for the day or week (depending on how your agency is set up), submit the time to your manager for approval. Part time employees with minimum hours must submit at least their minimum weekly hours.
To print the timesheet, refer to Printing a Timesheet. Depending on the Affidavit Text settings in System Setup, affidavit text may display on the Print Timesheet window after you save the timesheet and click the Print icon.