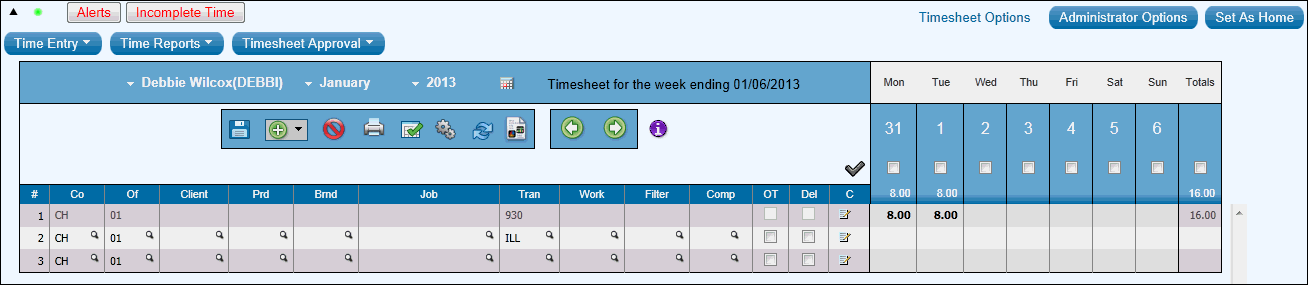
Each timesheet displays header information at the top, then columns and rows for entering information.
Area |
Description |
Header Status Bar |
Displays the current date, the timesheet week ending date, your name and employee type (Daily or Weekly), and your company and office codes. This information cannot be changed in AdClock®. This bar is in a separate frame from the timesheet. |
Hide/Show |
The AdClock Banner and Menus can be displayed or hidden by clicking the triangle that is located in the upper left corner below the AdClock banner. Hiding the Banner/Menus is a temporary feature that allows you to show more information on a page. To hide the AdClock banner and menus, click the triangle. You will notice that a <Log Off> button was provided so you can log out of a session in hide mode. To show the banner and menus, click the triangle again. Note: Keep in mind that in hide mode, you will not have access to the Home, Help, eTicket, and Messages functions. |
Set Auto-Menu On/Off |
The sliding menu feature that automatically displays options when you place your mouse over a menu can be turned off. To turn off the sliding menu feature, click the Green button located to the right of the “Hide/Show Heading/Menu” triangle. The button turns Red to indicate that the sliding menu is turned off. To show options when the sliding menu is turned off, click the menu to show options. Click the menu again to hide options. To turn the sliding menu feature back on, click the Red button. The button turns Green to indicate that the sliding menu is turned on. |
Popups |
Area designated to display messages (<Alerts>, <Incomplete Time>,<Errors>, and <Reject Comments>) pertaining to timesheets. See Popups |
Timesheet Table |
The Timesheet table identifies the name of the employee, employee code, month and year of the displayed timesheet, a Calendar icon for selecting timesheets, and the week ending date. |
Icon Bar |
Displays icons used with timesheet options. |
Columns |
Columns display for the row number and each type of code, for viewing and sorting on code descriptions, and for each day of the week. In addition, there are two columns of check boxes that may be displayed. The Del check box is used to delete the row. The OT check box is used to designate the time on the row as overtime. Use the Comments icon to enter comments for the row. For some columns you have the option to display or hide the column using Preferences. Click the heading for any code or name column to sort the rows by that column. |
Rows |
Rows identify the codes to which the time is to be charged and the amount of time worked. If you set default rows, they display when you create a new timesheet. See also Row Functions. |
Cells |
A cell is a box at the intersection of a column and row where you enter the data indicated by the column heading. Cells on the left side of the timesheet are for entering codes. Cells in the date columns are for entering time. The color of the time cell indicates the status of the time: red for rejected, green for approved, blue for posted, black for saved, and gray for submitted. |