Below the identification section of the timesheet, you will see a toolbar of icons. If you are ever in doubt as to the purpose of an icon, use the mouse-over feature to display the icon’s function.
![]() Save/Submit. Allows you to save and
submit selected time. When navigating away from time entry without saving
changes, a Warning message displays. This warning message allows you to
Save and Continue (save changes and continue), Continue (lose changes
and continue), or Cancel (do not continue). There is also a setting in
Preferences that allows you to automatically save your timesheet every
10 minutes when you haven’t saved it.
Save/Submit. Allows you to save and
submit selected time. When navigating away from time entry without saving
changes, a Warning message displays. This warning message allows you to
Save and Continue (save changes and continue), Continue (lose changes
and continue), or Cancel (do not continue). There is also a setting in
Preferences that allows you to automatically save your timesheet every
10 minutes when you haven’t saved it.
![]() Add Rows. Allows you to add up to 10
blank rows to your timesheet. Just click the drop-down and select
the number of rows you want to add.
Add Rows. Allows you to add up to 10
blank rows to your timesheet. Just click the drop-down and select
the number of rows you want to add.
![]() Unsubmit. Allows you to unsubmit time
that has not yet been approved.
Unsubmit. Allows you to unsubmit time
that has not yet been approved.
![]() Print. Allows you to print your timesheet.
Print. Allows you to print your timesheet.
![]() Set as Default. Allows you to manually
create your own default rows based on the timesheet on which you are currently
working. However, default rows may originate in several other ways such
as through a setting in Preferences, incomplete job tasks in Workflow,
through Time Off Request, or the Blocked Dates option in Workflow. When
the Confirmation popup displays, click yes to set current rows as the
default. Note: When surrogate users are managing time for other
employees, this function allows the surrogate to set default rows on behalf
of the selected employee.
Set as Default. Allows you to manually
create your own default rows based on the timesheet on which you are currently
working. However, default rows may originate in several other ways such
as through a setting in Preferences, incomplete job tasks in Workflow,
through Time Off Request, or the Blocked Dates option in Workflow. When
the Confirmation popup displays, click yes to set current rows as the
default. Note: When surrogate users are managing time for other
employees, this function allows the surrogate to set default rows on behalf
of the selected employee.
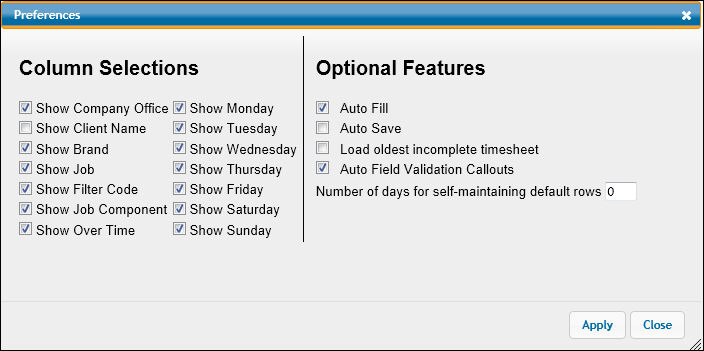
![]() Preferences. Allows you to control information
you want displayed on your timesheet and select features you want to use.
Preferences. Allows you to control information
you want displayed on your timesheet and select features you want to use.
![]() Reload Timesheet. Allows you to reload
your timesheet without saving any changes. A Confirmation popup displays
allowing you to continue or to cancel.
Reload Timesheet. Allows you to reload
your timesheet without saving any changes. A Confirmation popup displays
allowing you to continue or to cancel.
![]() Time Off Report. Displays the Time Off
Report for the current year. This report helps users schedule time off.
It shows users how many hours they are allowed by transaction code, hours
that have been submitted/taken, remaining hours, and remaining days for
the current year. Hours with a status of “New” will not display
on the report. Click <Close> to close the window. Note:
Allowed hours, remaining hours, and remaining days may not apply to all
transaction codes and therefore, will not display in the applicable columns
on the report. Example: Jury Duty
Time Off Report. Displays the Time Off
Report for the current year. This report helps users schedule time off.
It shows users how many hours they are allowed by transaction code, hours
that have been submitted/taken, remaining hours, and remaining days for
the current year. Hours with a status of “New” will not display
on the report. Click <Close> to close the window. Note:
Allowed hours, remaining hours, and remaining days may not apply to all
transaction codes and therefore, will not display in the applicable columns
on the report. Example: Jury Duty
![]() Previous Week/Next Week. Click the left
arrow to display the timesheet for the previous week. Click the right
arrow to display the timesheet for the next week.
Previous Week/Next Week. Click the left
arrow to display the timesheet for the previous week. Click the right
arrow to display the timesheet for the next week.
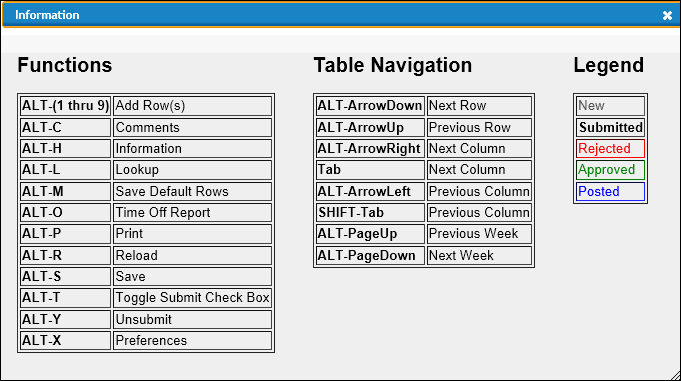
![]() Information. Displays an Information
Window showing all shortcuts and navigational functions. These allow you
to rapidly display information, perform functions, and navigate through
a timesheet without use of your mouse. Also, the Legend provides a color
coded list of timesheet activities. These colors correspond to the color
of the days on the Calendar and Timesheet so you will always know the
status of your time for each day of the week.
Information. Displays an Information
Window showing all shortcuts and navigational functions. These allow you
to rapidly display information, perform functions, and navigate through
a timesheet without use of your mouse. Also, the Legend provides a color
coded list of timesheet activities. These colors correspond to the color
of the days on the Calendar and Timesheet so you will always know the
status of your time for each day of the week.