Access the Preferences option in Timesheet Default Row Setup, Timesheet, Surrogate Entry, Surrogate Adjustment, or in Approve/Reject options to set preferences that control the timesheet display in all options. If you are entering or approving time for another employee, your settings affect how you see the timesheet but do not affect how timesheets display for that employee.
To set preferences:
Click the Preferences icon on any of the timesheet pages to display the Preferences window.
Make selections as needed. Refer to the Preference Options table below for information on each preference.
Click <Apply> to apply selected preference to the timesheet or click <Close> to close the Preferences window without saving your changes.
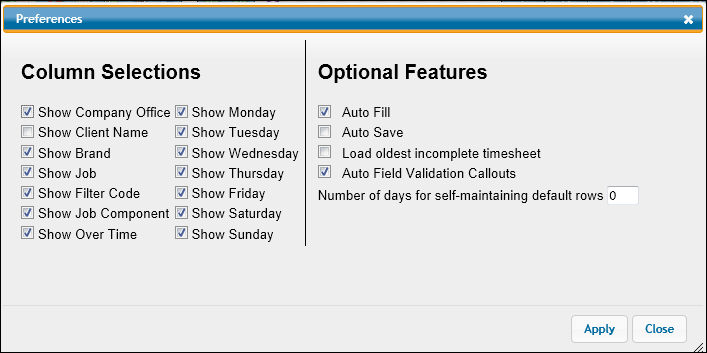
Preferences Options
Show Company Office Show Client Name Show Job Show Product (Brand) Show Filter Code Show Over Time Show (days of the week) |
Each of these settings controls whether the named column displays on your timesheets. None of these columns display when you first start using AdClock®. To display a column, click the check box next to the name of the column to display a check. To hide a column, click the box to remove the check. Depending on your financial system, only one of these hierarchies is used: client/division/product or client/product/brand. The first two levels always display; your option is whether to display the third level. Filter codes are only available if they have been set up for your company in Financials. |
Auto Fill |
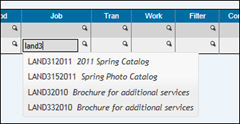
Automatically displays possible field entries based on information you’ve begun to key. If there are multiple choices, click your choice from the displayed list to automatically fill the field without having to key the remainder of information. Auto Fill Feature Auto fill will not include "Closed" jobs. Note: Keep in mind that if you select an item that is not associated with previously entered information on a row, information associated with the selected auto fill item will overwrite previously entered information. Example: If you key Client AAA but the Job you selected from the auto fill list is associated with Client BBB, your Client AAA will be replaced with Client BBB. |
Auto Save |
When selected, causes the open timesheet to be saved every ten minutes if you haven’t saved it. |
Loads Oldest Incomplete Timesheet |
Automatically loads the oldest incomplete timesheet first; otherwise, loads the most current date timesheet. Note: The current timesheet will always load for Part Time and Freelance employees and the Incomplete Time popup will not display. |
Validation Callouts |
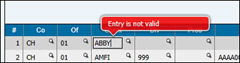
Validates information you key. If you key information that is not valid, a callout displays informing you that the information is not valid for the field. Validation Feature |
Show Job Component |
Controls whether the Comp column displays on your timesheet for entering a job component. If you are required to enter job components for any jobs, click this check box to display a check. |
Number of days for self maintaining default rows |
Use this setting to have your default rows automatically generated based on activity on previous timesheets. Key the number of days of timesheets to be considered in creating the new rows. See Automatically Generating Default Rows for more information. Leave blank to manually create your own default rows in Default Row Setup. See Defaults on Timesheets for more information on default rows. |
Note: On the timesheet, click the heading for any code or name column to sort the rows by that column.