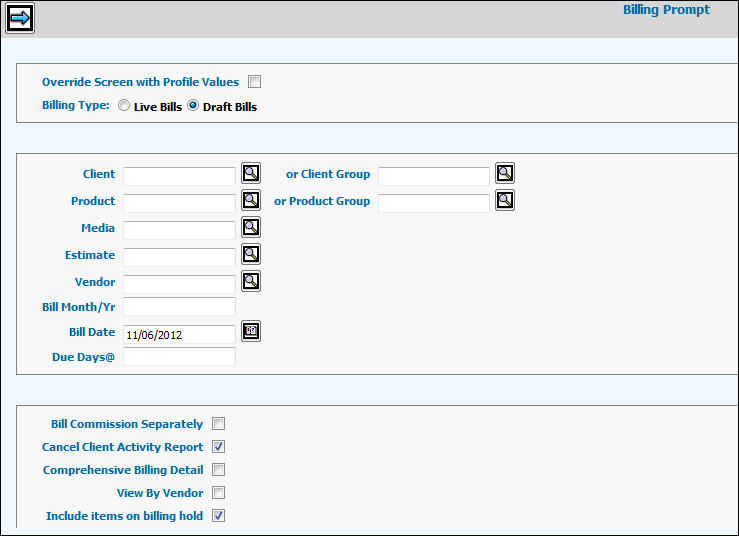
Select Billing | Live/Draft Bills.
If the "Override Screen with Profile Values" field is checked, you must key at least the Client or the Client Group code so that the Client's Billing Profile is used.
If unchecked, fill in the following fields for either Billing type (Draft or Live) .
Use the Billing Type radio buttons to select either Live or Draft bills.
Leave the fields listed below blank to retrieve all activity that has been collected for billing OR key one or more of them to limit (filter) the billing activity that displays on the Billing Selection window.
Client or Client Group or Client/Product
Media
Estimate
Vendor
Bill Month/Year
The date in the Bill Date field appears on the bill as the Bill Date and is used with the Due Days field to calculate the Due Date on the bill. Accept the default of today's date or key a MM/DD/YYYY of up to a month in the past or in the future.
In the Due Days field, key the number of days to be added to the Bill Date to calculate the Payment Due date. Key 00 (zero zero) to print "TOTAL DUE UPON RECEIPT" as the due date.
To print a separate bill for the commission, click the Bill Commission Separately check box to display a check.
To produce a Client Activity Report along with Live billing, click the Cancel Client Activity Report check box to remove the check. This setting can only be used with the Output to Printer selection as described below.
Use the Comprehensive Billing Detail check box to indicate whether to include adjustment detail on this bill.
Checked. Show all adjustment detail since the activity was originally billed. This does not affect the total due on this bill.
Unchecked. Only show activity being billed on this bill.
Click View by Vendor to have the bill selection window group bills by Vendor code.
Click “Include Items on Billing Hold” check box to show items that have been placed on billing hold. Items on Billing Hold cannot be selected for live/draft billing. If you do not want to include items on Billing Hold, remove the check from the checkbox. Depending on installation, Items are automatically placed on Billing Hold during the DFA Import process when reserve is generated from the DFA and stored as a negative amount in Mediaocean’s Interactive Buying for an estimate/vendor with a space code of DFARESERVE or USERESERVE. Note: Items that have been manually placed on Billing Hold in Mediaocean Interactive Buying are also included in the collection and may not be related to the DFA Import
Accept the default Billing Format to print Detail (only) bills or click a radio button to select Combination (both Detail and Summary bills) or Summary (only) bills.
Billing Output:
PDF: (Default). The billing you release on the Detail window generates PDF bills.
Output to Printer: Billing is directed to a billing output queue for printing on a laser printer. This selection is used with the Cancel Client Activity Report setting as described above.
Note: Whichever method you use will be the default the next time you use this option. If billing to printer output, change the Report Formatting Options on the detailed Billing Selection window, if necessary.
Click the Next icon ![]() to display
the Billing Selection window where
you select the insertions to bill and/or items to remove from the
billing collection.
to display
the Billing Selection window where
you select the insertions to bill and/or items to remove from the
billing collection.