Task List by Job

Task lists are set up in the Workflow|Maintenance|Definition. Refer to Job Definition. You may maintain the task list in this option by keying completion dates beside each task as it is completed. This process initiates automatic e-mail which sends a message to the employee(s) assigned to the next available task. Task lists may be maintained also by employee. Refer to Task List by Employee.
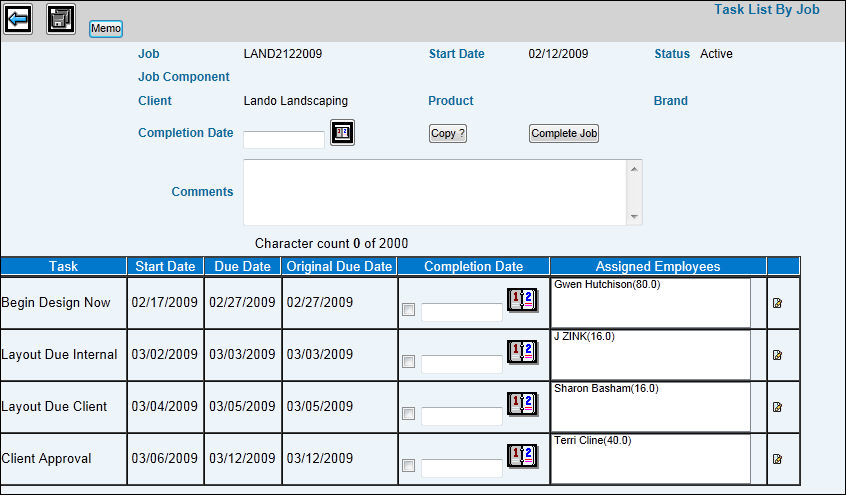
  1. Select Workflow|Maintenance|Task List by Job.

  2. If a user attempts to access a task list that is already open by another user, a message displays informing him/her that the job is in use and locked by the other user. The user's ID is displayed as part of the message. You may view the task list, but you may not make changes. Once the user leaves the task list, it is unlocked and ready for use by another user.

  3. Key the Job Number. If the job has been broken down by job components and you want to maintain task lists at the specified job component's level, key a Job Component code. If a Job Component is not keyed, only the task list set up at the job level displays (only if task lists are not required in Workflow). Refer to Job Component Steps.

  4. Click the Next icon next.gif.

Task List by Job Window

  1. Key a Completion Date and click <Copy?> if you want this date to appear in the Completion Date field for all tasks associated with the job. You may use the Calendar icon calen2.gif to select a date.

  2. Key a Completion Date and click <Complete Job> if you want this date to appear in the Completion Date field for all tasks associated with the job and to mark the Job Header as complete. If no tasks exit, only the Job Header will be marked as complete with the date entered.

  3. Once a task is completed and saved, a Re-Open check box displays in the Completion Date field. If a task has been assigned a completion date in error, click in the Re-Open box to reopen the applicable task. Afterwards, click the Save icon to delete the displayed completed date and show a blank Completion Date field that is now ready for input entry.

Note: A job is not completed until a completion date has been entered for all tasks associated with the job.

  1. Key any Comments you want printed on job forms and status reports.

  2. If you did not use <Copy?>, key a Completion Date as applicable for each task or click the box located beside the Completion Date field to use today's date. If you want to enter any notes pertaining to the task, click the Notes icon note.gif. Key a note, then close the window. Job notes print on job forms and status reports only when requested.

  3. To view an existing memo or to attach a new memo to the job, click <Memo>. Refer to Job Memos.

  4. Click the Save Icon save.gif.