The Job Components Window displays when you click the <Components> button on the Job Maintenance Detail Window in Workflow or the Job Maintenance Detail Window in Production Maintenance.
Job Component Conditions:
If the Job Number you keyed has been used in Co-Op Billing, an error message displays informing you that components cannot be created. To use the Job Number, you must delete it from use in the Co-Op Billing Maintenance option first.
If Job Components are set up and the Time Target field on the Detail Window contains information, an error message displays informing you that component jobs cannot use Time Targets.
If you key a valid Job Component for a preexisting job on the Job Maintenance Header Window, the <Components> button will not display on the Detail Window. Also, the <Billing Address> and the <Client ID> buttons will not display. These override functions are only maintained at a job level not a job component level.
If using the Copy feature to copy job components on the Header Window, the Job Number of the From Job and the Job Number of the To Job can be the same but the From Job Component must be different from the To Job Component. Job Components can be the same only when the From Job Number and To Job Number are different.
Steps:
Open the job by completing all applicable fields on the Job Maintenance Detail Window. When finished, click the <Components> button to set up component authorization, component codes, component descriptions, and component status (active/inactive) for the specified job.
Note: If you key a valid Job Component for a preexisting job on the Job Maintenance Header Window, the <Components> button will not display
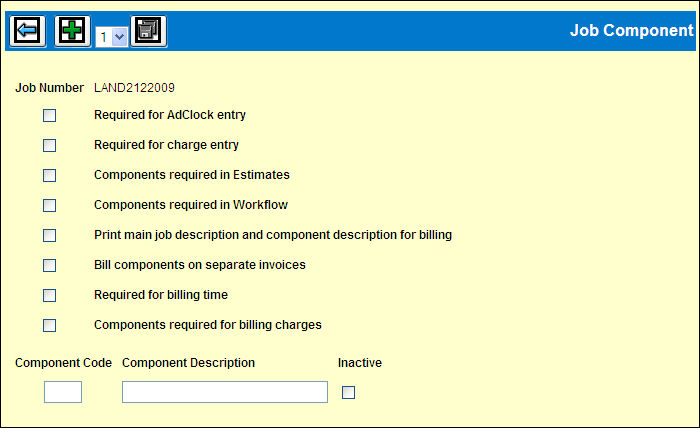
Click in each applicable box below the Job Number to authorize use of components with the selected function. Click the Add icon to add lines for job component entry.
Required for AdClock Entry?: If you check this box, then you must key a component code in applicable fields on the timesheet for the job. If a component is not keyed, an error message displays informing you that a component is required for the job.
Required for Charge Entry?: If you check this box, then you must key a component code in applicable fields on internal and vendor charge entry windows. If a component is not keyed, an error message displays informing you that a component is required for the job
Components Required in Estimates?: If you check this box, then you must key a component code in applicable fields when entering estimates for the job. If a component is not keyed, an error message displays informing you that a component is required for the job
Note: If setting up components for a preexisting job that already has estimates, the checkbox used to Require Components in Estimating is grayed out to disallow entry of a checkmark. You cannot require components in Estimating for a job if the job has preexisting estimates. If you want to Require Components in Estimating for the specified job, you must delete the estimates first.
Components Required in Workflow?: If you check this box, then task lists can only be set up at the job component level. If Job Components are not required in Workflow, then a task list can be defined at the job level and job/job component level.
Note: If setting up components for a preexisting job that already has a task list, the checkbox used to require components in Workflow is grayed out to disallow entry of a checkmark. You cannot require components in Workflow for a job if the job has a preexisting task list. If you want to require components in Workflow for the specified job, you must delete the task list first.
Print Main Job Description and Job Component Description for Billing?: If you check this box, then the main job description as well as the job component description print on live/draft bills.
Bill Components on Separate Invoices?: If this box is checked, then charges automatically split by component when either charges are flagged automatically for billing or when charges are flagged manually for billing (even if the Split button is not used). If you enter splits manually on the Billing Flags Window, then when the job is placed in the billing cycle, the system treats the splits like an auto split function if all of the components within a split are all the same. Information such as taxes, client PO, printing parameters are taken from the Job Component level.
Advance Billing also follows this rule.
If charges are flagged automatically and the job requires components, the charges are not pulled into the billing cycle for that job. An error message prints on the Exception Report when a job is not pulled in for billing.
Required for Billing Time?: If this box is checked, then components are required when billing time charges. This setting allows you to loosen component requirements in AdClock but then apply stricter requirements at billing. You may decide not to require components during AdClock entry if you feel it would slow down your staff in completing timesheets, but then you can catch any missing components at the time of billing.
Required for Billing Charges?: If this box is checked, then components are required when billing non-time charges. If components are not keyed, an error message displays informing you that components are required for the charge. This setting allows you to loosen component requirements in other applications but then apply stricter requirements at billing.
Key a user-defined Component Code. All component codes must be unique. If a duplicate is keyed, an error message displays.
Key a user-defined Description for the keyed Component Code.
Leave the Inactive box blank to activate use of the keyed Job Component. To inactivate the Job Component, click in the Inactive box. An inactive status stops entry of new charges only. You may bill an inactive component.
Click the Save icon. Once job components are saved, you may only change the Component Description.
Note: Before you exit this option, a warning message displays informing you that the component is missing a description. Setting up a description at a job component level is optional. If you want to set up a separate description at a Job/Job Component level, key the Job Number and Job Component on the Prompt Window then click the Next icon. On the Detail Window, key the description of the Job/Job Component in the Description field (this field will be blank). If applicable, you may also change other information at a job component detail level. When you run some reports, the job component level description displays instead of the job description that was entered when the job was opened.
You may set up a separate task list for each defined job component. To set up task lists by job component, key the preexisting Job Number and Job Component on the Prompt Window then click the Next icon. On the Detail Window, click <Task List> to display the Task List Entry Window. If you have accessed this option through Production Maintenance, the <Task List> button does not display. Key applicable information following steps in your on-line Help, then click the Save icon. Repeat this step for each job component for which you want to set up a separate task list.