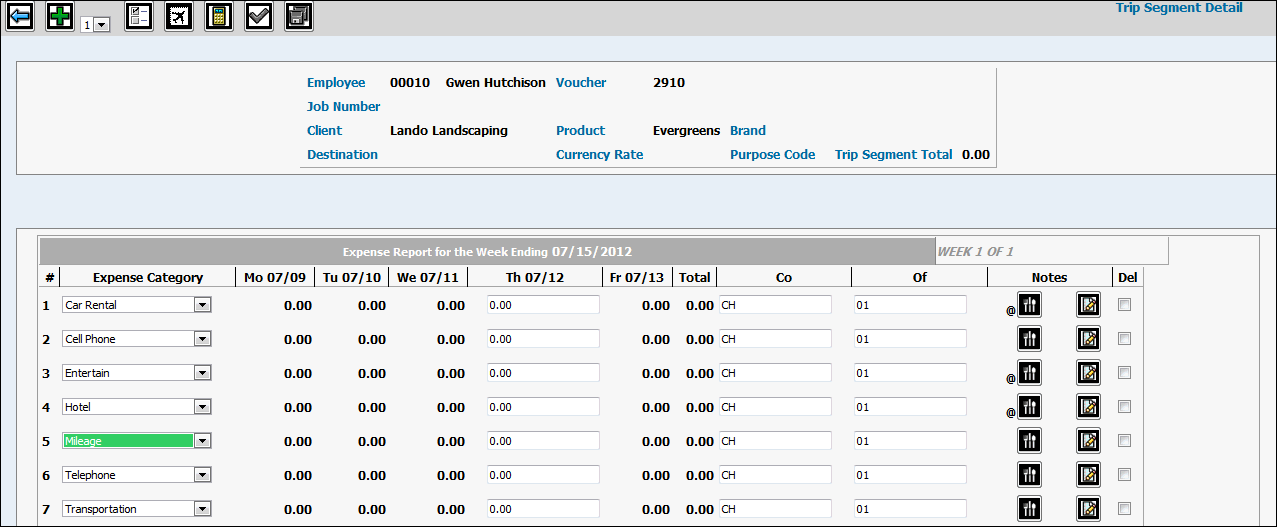
When you click the Next icon ![]() on the Trip
Segment Definition window, this window displays to allow you to enter
the expense amounts for the selected trip segment by category. For any
category set up as a Default in Expense Category Definition, a row displays
with that category selected, but you may select a different category or
delete the row. If you entered a job on the Trip Segment Definition, all
the expenses are billable, otherwise they are all non-billable. You may
have multiple rows with the same category. This allows you, for instance,
to enter a day's meal expenses on three separate rows.
on the Trip
Segment Definition window, this window displays to allow you to enter
the expense amounts for the selected trip segment by category. For any
category set up as a Default in Expense Category Definition, a row displays
with that category selected, but you may select a different category or
delete the row. If you entered a job on the Trip Segment Definition, all
the expenses are billable, otherwise they are all non-billable. You may
have multiple rows with the same category. This allows you, for instance,
to enter a day's meal expenses on three separate rows.
To add a row, click the Add icon ![]() .
.
Select an Expense Category from the drop down list box at the left of the row. Categories are defined in Expense Category Definition on the AdExpenseSM|Database menu. The category definition controls whether Entertainment Analysis information or Expense Notes are required.
Key the amount of the expense for this category on
the day it was incurred. To keep track of totals, click the Recalculate
icon ![]() . Totals for each
expense category display in the Total column. If Entertainment Analysis
is required, you may go directly to the Entertainment Analysis Window
to key amounts. When you click <Save>, amounts automatically
fill the grid on the Trip Segment Detail Window.
. Totals for each
expense category display in the Total column. If Entertainment Analysis
is required, you may go directly to the Entertainment Analysis Window
to key amounts. When you click <Save>, amounts automatically
fill the grid on the Trip Segment Detail Window.
Note: If the selected category is defined as a Mileage category it displays in bright green and you must enter miles driven each day instead of dollars. The total expense is calculated and displayed using the effective mileage rate.
Note: For expenses entered in a foreign currency, the total expense is always calculated and displayed in the employee's local currency.
If the trip segment covers more than one week, click
the Next icon to display the days in the next week. Click the Back
icon ![]() to return to the previous week.
to return to the previous week.
Your default company/office displays for each row if you have chosen to display them in the Preferences function. Key over the displayed codes to charge the expense for that row to a different company and/or office.
A N/B checkbox displays for each row if you have chosen to display it in the Preference function. To specify that a particular expense entry is not billable to the job but is still related to the job, click in the N/B checkbox on the line of the applicable expense. Note: To show this preference, a job number must be keyed on the Trip Segment Definition WIndow.
A CC checkbox displays for each row if you have chosen to display it in the Preference function. This feature allows employees to mark any expenses that were paid by a Corporate Credit Card (Applies only if the company pays the Corporate card. This feature will not work for you if employees pay the Corporate card directly). Before this feature can be used, a suspense account must be set up in the Agency Profile on the DBPRFL Menu. This feature places the payable amount to a suspense account instead of to the A/P account, and a payable record for these amounts is not created. Each time an expense is paid by a corporate credit card, a checkmark must be placed in the CC checkbox.
Note: Credit Card entries may not be applied against an Advance.
To enter an analysis of the activity, click the Entertainment
Analysis icon ![]() and complete
the Entertainment Analysis
information. If a @ displays, the analysis is required.
and complete
the Entertainment Analysis
information. If a @ displays, the analysis is required.
To record the airline, hotel or transportation vendor,
click the Expense Notes icon ![]() and
complete the Expense Notes information.
If the @ displays, expense notes are required.
and
complete the Expense Notes information.
If the @ displays, expense notes are required.
Repeat these steps for each expense category for which you have expenses for this trip segment.
Click the Save icon ![]() to save your entries and return to the Trip Segment Definition window.
You may click the Submit for Approval icon
to save your entries and return to the Trip Segment Definition window.
You may click the Submit for Approval icon ![]() to submit
your expense report from this location if you are finished entering
expenses.
to submit
your expense report from this location if you are finished entering
expenses.
You may also use the Alt Submit icon that allows employees to submit their expenses to an alternate approver when their regularly assigned Approving Manager is out of the office. Click the Alt Submit icon to display a list of employees (following office authority) for selection. (Note: The employee or the surrogate employee cannot be an alternate approver.) Select the appropriate alternate employee then click <Done>. If security requires notification, an email along with a link to the expense is forwarded to the specified alternate employee for approval. Before you can use this new function, a setting to allow alternate approvers must be set up in the System Setting option in the Administration folder.
Note: If the G/L account is set up to require a client, an error message displays stating that "Client Required for Category's Account." A client code must be keyed to use this category.
To delete a row, click the Del check box at the end of the row and click the Back, Next or Trip Segment icon.
To control whether optional fields display
on this window, click the Preferences icon ![]() and follow the steps in Expense Preferences.
and follow the steps in Expense Preferences.