The Trip Segment Definition window displays after you click the Add
New Trip Segment icon ![]() on the
Expense Entry detail window. Use this
window and the Trip Segment Detail window to enter expense detail. You
may define multiple trip segments for a voucher to charge expenses to
more than one job, etc on the same voucher. You must define separate trip
segments for billable and non-billable expenses.
on the
Expense Entry detail window. Use this
window and the Trip Segment Detail window to enter expense detail. You
may define multiple trip segments for a voucher to charge expenses to
more than one job, etc on the same voucher. You must define separate trip
segments for billable and non-billable expenses.
For each trip segment, follow these steps:
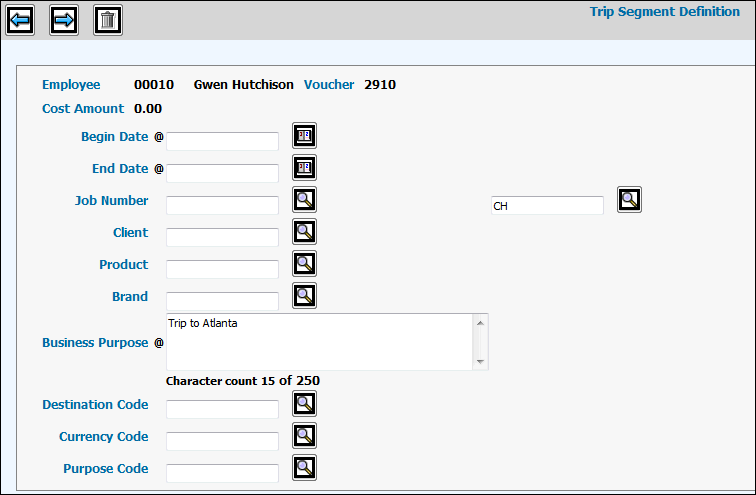
Trip Segment Definition Window
Indicate the date range for the expenses included on this trip segment by keying or selecting a Begin Date and End Date.
Accept the default of the signon company, or key or select a different company to which this expense should be charged.
If the expenses on this trip segment are billable, key or select the Job Number to which they should be charged. If you key a job number, the entire trip segment is billable. If you do not key a job number, the entire trip segment is non-billable.
Note: The following reminder displays on the Trip Segment Definition Window when you do not key a Client or Job Number: "Client or job not entered. Press OK to continue." If client or job is not applicable, click OK. If client or job is applicable, click <Cancel> then key the client code and job number.
If applicable, key or select a Client, Division, and Product to which this expense should be charged.
The business purpose displays as keyed on the previous window, but may be changed for the trip segment.
Key or select a Destination Code for the destination of the trip, if applicable.
Key or select the Currency Code for the expenses being entered on this trip segment, if not your local currency. While the individual expense amounts display as entered, totals are always calculated and displayed in your local currency.
If applicable, key a Purpose Code to identify the reason for the expense on reports. Purpose codes are set up in the AdExpense Database.
Click the Next icon ![]() to advance to the Trip Segment Detail
window. Follow the instructions for defining the trip segment details
and returning to this window.
to advance to the Trip Segment Detail
window. Follow the instructions for defining the trip segment details
and returning to this window.
Click the Back icon ![]() to save all your entries and return to the Expense Entry detail window.
to save all your entries and return to the Expense Entry detail window.
You may not change the date range if there
is any trip segment detail. However, you may delete the trip segment detail,
then change the date. To delete the entire trip segment and return to
the Expense Entry detail window, click the Delete icon ![]() .
When you click the Delete icon, a message displays informing you that
the entire trip segment, including all related detail, will be deleted.
.
When you click the Delete icon, a message displays informing you that
the entire trip segment, including all related detail, will be deleted.