It is not necessary to collect billable activity to generate a special amount bill. See Billing Address for an explanation of how the address is retrieved for a bill.
Special Amount Bills default to PDF output. Click Output to Printer to use traditional billing output methods.
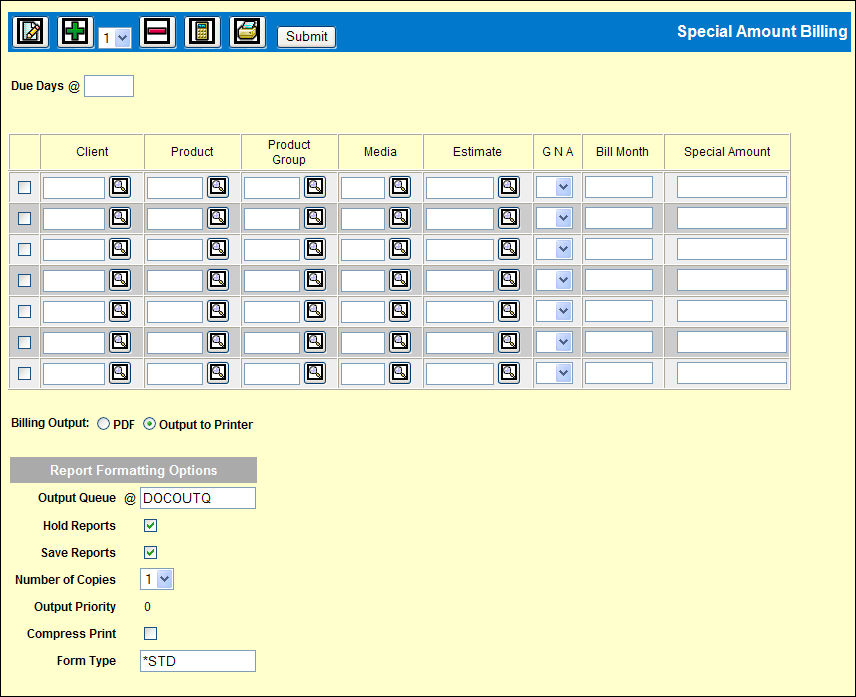
To print one or more Special Amount bills:
Select Billing | Special Amount Billing.
Key the Due Days to be added to the Bill Date (today's date) in calculating the Payment Due date to print on the bill. Key 00 (zero zero) to make the bill due Upon Receipt.
For each bill being requested, key the Client, Product
or Product Group, Media and Estimate. Use the Add icon ![]() to add more rows, if needed.
to add more rows, if needed.
For each bill being requested, select Gross, Net or As Entered from the GNA drop down list to indicate how the Special Amount you key should be identified on the Special Amount bill. Click the <Fields> button at the bottom of this help page for more information on each field.
In the Bill Month field, key the month/year activity
against which this bill is to be reconciled. To retrieve the current
month/year as the Bill Month, leave this field blank and click the
Recalc icon ![]() after keying
the Special Amount.
after keying
the Special Amount.
Key the Special Amount to be billed. This is the exact amount that will appear on the bill.
To enter comments to print on the bill, select each
bill for which you are entering comments then click the Notes icon
![]() . Key the comments and click the Save icon.
. Key the comments and click the Save icon.
Billing Output: PDF billing is the default. Click Output to Printer to use this method. The next time you request a Special Amount Bill, your choice of billing here, will display (persist) from this choice. Click to change output preferences.
If billing to printer output, change the Report Formatting Options, if necessary.
Click <Submit> to submit the billing request.
The PDF bill will display to your screen. Use the Envelope icon to send by e-mail.
![]()