Task List Entry
The Job Maintenance Detail Window must be completed before you can assign
tasks to the job. Refer to Workflow|Maintenance|Job
Definition|Job Definition.
Click <Task List> from the Job Maintenance Detail
Window to display all tasks based on the Task List Defaults defined
in the Database for the specified jobtype. To add more tasks, click
the Add icon then select task(s). If more than one task was selected,
click the radio button located beside the task then use the Up/Down
icons 
 to move tasks into the correct position. To delete a task, click in
the Del box on the same row of the task you want to delete then click
the Save icon.
to move tasks into the correct position. To delete a task, click in
the Del box on the same row of the task you want to delete then click
the Save icon.
Task List
Entry
If this is a preexisting job, you may copy a task
list from another job. Click the Copy Task List icon  to display
the Copy Window. Key the job from which you want to copy information
in the Job to Copy field then if you want to copy employees assigned
to the task list in the From job, click in the Copy Assigned Employees
box. Click <OK> to copy the task list and if applicable, the
employees to the job you currently have open. If a default task list
displays for the preexisting job, it will be overridden with the task
list of the job you are copying.
to display
the Copy Window. Key the job from which you want to copy information
in the Job to Copy field then if you want to copy employees assigned
to the task list in the From job, click in the Copy Assigned Employees
box. Click <OK> to copy the task list and if applicable, the
employees to the job you currently have open. If a default task list
displays for the preexisting job, it will be overridden with the task
list of the job you are copying.
Note:
If the preexisting job already has a task list, the Copy Task List icon
does not display. You must delete the task list first before the copy
icon will appear. To delete tasks, click in the Del box next to each task
then click the Save icon  .
.
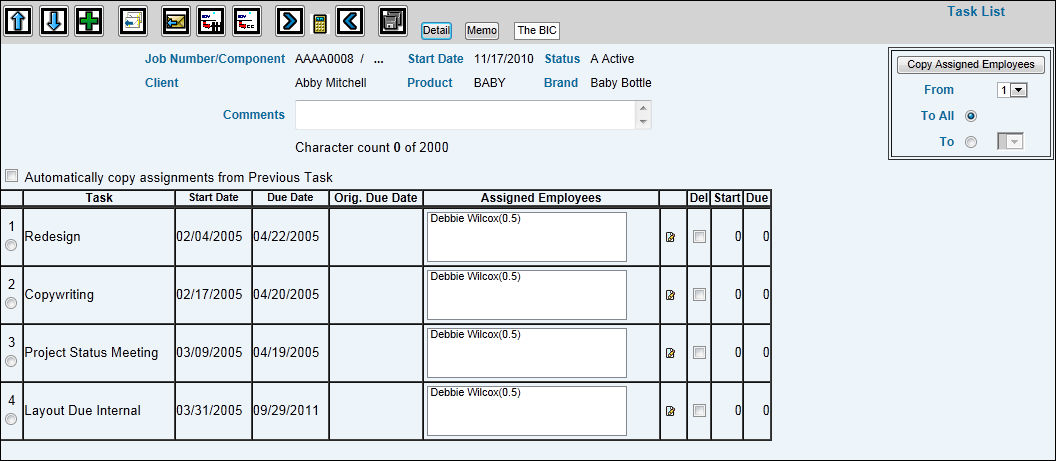
The Job Number/Component, Start Date, Status, Client,
Division, and Product display from the Detail Window. To see the description
of the job, move your cursor over the ellipses located beside the
Job Number/Component field.
Key any Comments, then key Start Dates and Due Dates
for each task. To automatically figure Start Dates and Due Dates,
see Automated Scheduling. To
arrange tasks in start date or due date order, just click the Start
Date heading or the Due Date heading.
Note:
The system checks for any company level or employee level blocked dates
when start dates and due dates are entered and saved. If an employee is
assigned a task on a date that has been blocked, an error message displays
and the employee can not be used for that task.
When adding new tasks, if you want employees assigned
to the prevous task copied to the newly added task, click in the "Automatically
Copy Assignments From Previous Task" checkbox.
Assign employees and hours to each task using the
Assign Employee icon  . When the Assign Employee
Window displays, click the Add icon to display a list of employees.
Select employees you want to add to the task then click <Select>
to return to the Assign Employees Window. The selected employee(s)
displays along with a field to enter the hours that it will take to
complete the task. Key the hours in the Hours field. When finished,
click the Save icon to return to the Task List Window. The employee(s)
you added to the task displays along with the specified hours. Repeat
these steps for each task.
. When the Assign Employee
Window displays, click the Add icon to display a list of employees.
Select employees you want to add to the task then click <Select>
to return to the Assign Employees Window. The selected employee(s)
displays along with a field to enter the hours that it will take to
complete the task. Key the hours in the Hours field. When finished,
click the Save icon to return to the Task List Window. The employee(s)
you added to the task displays along with the specified hours. Repeat
these steps for each task.
Note:
If estimated hours were keyed for an employee when setting up the task
list for the job, then these hours will be included in the email to employees.
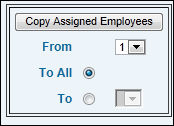
If desired, use the Copy Assigned Employee feature
to copy employees that have been set up for one task to another task.
If you want to copy employees from the first task to the second task,
select 1 from the From drop-down list then select 2 from the To drop-down
list and click <Copy Assigned Employees>. To copy employees
from any one task to all tasks, click the To All radio button then
click <Copy Assigned Employees>.
Copy Assigned
Employees
Note:
When sequencing tasks, keep in mind that when an employee marks a task
as complete, the employee who has the next open task is notified.
If you want to attach any notes to the job, click
the Notes icon  .
.
Click the Notify First Open Task icon  to notify
team members assigned to the first task. Afterwards, each time a task
is marked completed, an e-mail message is automatically sent to the
team members who have the next available task to complete.
to notify
team members assigned to the first task. Afterwards, each time a task
is marked completed, an e-mail message is automatically sent to the
team members who have the next available task to complete.
Or
If you want to notify all team members, click the Notify All icon
 . However, employees who have already completed
their tasks are not notified. To copy other team members, click the
Create CC List icon
. However, employees who have already completed
their tasks are not notified. To copy other team members, click the
Create CC List icon  . Select employee from the
Workflow Resources list then click the Right Arrow button to add the
name to the CCed Resources list. Click <Save>. To notify workflow
resources on the CCed Resources list, you must click the Notify CCList
icon
. Select employee from the
Workflow Resources list then click the Right Arrow button to add the
name to the CCed Resources list. Click <Save>. To notify workflow
resources on the CCed Resources list, you must click the Notify CCList
icon  .
.
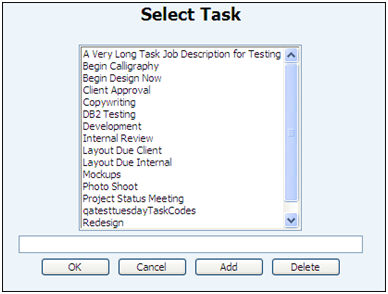
To add tasks which may not be used regularly, click
the Add icon on the Task List Entry Window to display a list of tasks.
Select a task or key the task in the field provided below the list
of tasks then click <Add>. To delete a task, select the
task then click <Delete>. This feature eliminates the need to
set the task up first in the database. However, once a task
is added using this feature, it is automatically added to the Task
List Database.
Select Tasks Window
See
Automated
Scheduling for a discussion on the Start and Due fields.
To
return to the Detail Window, click <Detail>.
Click <Memo>
to set up memos. Click <Task
Codes> to display the Task Codes Window where you may add a
new task code to apply to the job on which you are currently working.
When finished, click the Back icon  to return to the Task List Window.
Click
the Save icon.
Note:
When a job is completed, a Reactivate button appears on the title bar.
As with all jobs, all tasks must be completed before the job is marked
as completed again.