Expense Approval
This option allows managers to approve submitted expenses when manager
approval is required by the System
Settings, or because the maximum amount in any expense
category has been exceeded. Managers are assigned to employees in
Data Base Maintenance|Employee Administration
in the Central Data Base.
If the No Receipts box was checked when the employee entered Entertainment
Analysis or Expense
Notes in Expense Entry, a warning messages displays that identifies
the subject of the warning as well as the week in which the expense was
entered and the row number.
Note: AdExpense
Administrators can approve, post approve, and post expenses and advances
for employees across multiple offices as long as authority has been setup
to each company/office in which approval and posting is required. If authority
is not set up to an employee’s company/office, then expenses and advances
for that employee cannot be accessed. However, office authority is not
required for users who are set up as Approving Managers only (cannot be
set up as an AdExpense Administrator). Approving Managers can approve,
post approve, and post expenses and advances for employees regardless
of the company/office to which that employee belongs. Exception: If the
expense amount exceeds the maximum amount of an override by a client,
the Approving Manager cannot approve/post expenses.
To review and approve or reject expenses
for payment through the Expense Approval option:
Select AdExpenseSM|Approval|Expense Approval.
Accept the default to view submitted expense vouchers
for all employees assigned to you, or select the Employee field and
key or select a specific Employee Code. As long as users have been
set up as a Surrogate Employee or Approving Manager, they can see
every employee expense regardless of their sign on company/office.
Click the Next icon  to display the submitted vouchers for the selected employee(s).
Expense
Approval Selection Window
Select the voucher to be reviewed and click the Next
icon to advance to the Expense Detail window.
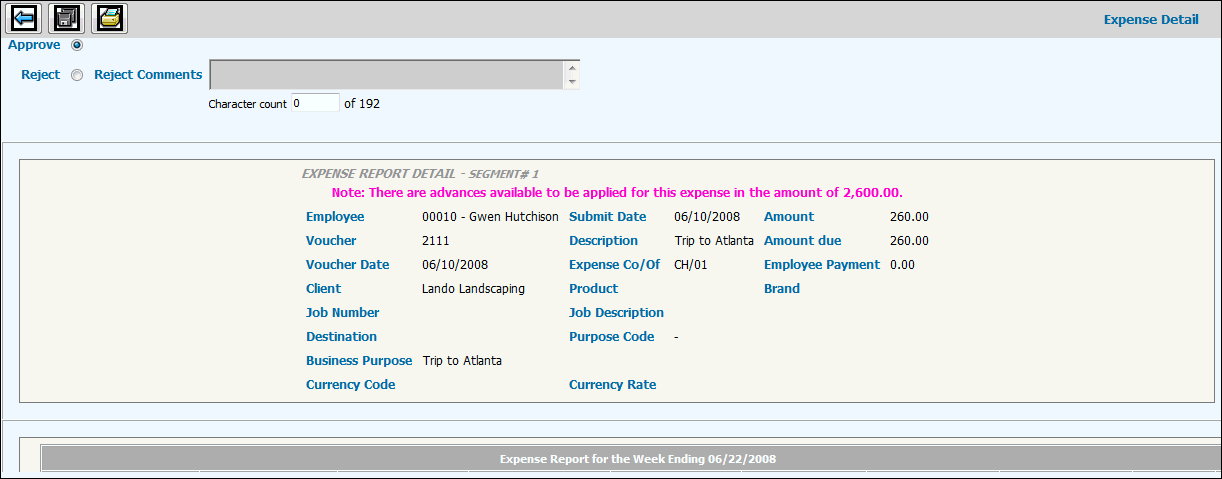
Expense
Approval Detail Window
Use the scroll bars, if necessary, to review all the
voucher details. The N/B column displays beside each expense that
was marked Non-Billable in Expense Entry.
Approve is selected by default. To reject the voucher,
select Reject and key Rejection Comments.
Click the Save icon  to save the approval or rejection. If rejected, an e-mail is automatically
sent to the employee. Rejected vouchers and the rejection comments
display when the employee accesses the Expense Entry option. Approved
vouchers are available for Post Approval.
to save the approval or rejection. If rejected, an e-mail is automatically
sent to the employee. Rejected vouchers and the rejection comments
display when the employee accesses the Expense Entry option. Approved
vouchers are available for Post Approval.
Note: The Currency
Code and Currency Rate indicate the currency in which the expenses were
entered. Individual expense amounts are shown in the currency used in
entering the voucher, but totals are always shown in the employee's local
currency.
Note: The Amount
Due is the amount that will be paid to the employee. If the Amount Due
is a negative number, it displays in red. When an expense is posted with
a negative amount due, a negative payable is created which will be used
to reduce future expense or advance payments to the employee.
For more information about the fields that display,
see the instructions for Expense
Entry.
To review and approve/reject expenses
for payment through the URL Link:
As a convenience, a URL Link is added to the email that is automatically
sent to the approving manager when an employee submits an expense for
approval. This feature applies only when System Settings have been marked
to "Send Email Notification of Submitted Advances/Expenses to Approving
Manager".
To approve/reject expenses upon receipt of the email,
click the displayed URL Link (Example: "Click Here to Visit the
Expense". A Sign On Window is displayed for security.
Complete Sign On information to immediately display
the Expense Detail Window for the listed voucher.
Repeat Steps 5 through 8 above.