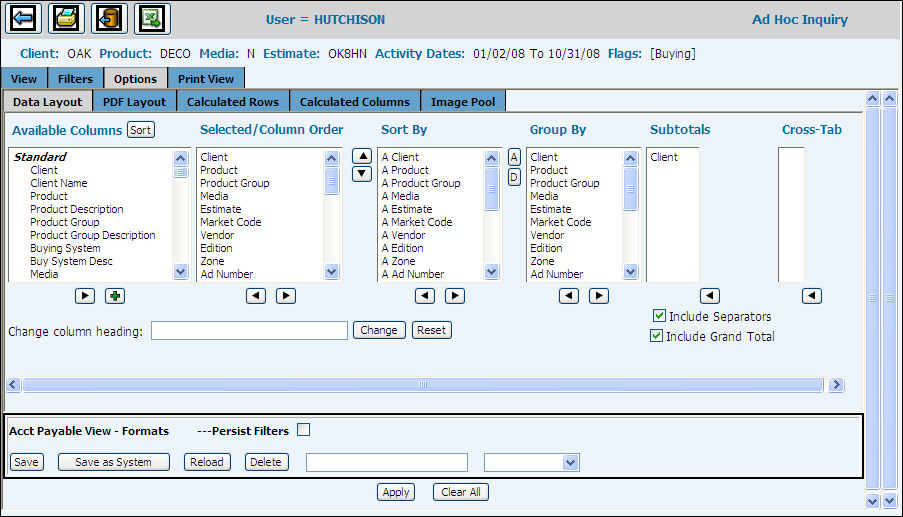
This Data Layout (Options) tab enables you to customize the appearance of your data. You may select from all 96 available columns and measures in the Available Columns list plus 78 statistics for your report.
Use <Ctrl> Click to select from the many Standard and Calculated columns in the Available Columns list. If you or other Authorized users created Calculated Columns, these display at the bottom of this list. Personal Calc columns display as orange, and System Calc columns as yellow. Click the <Sort> button to display the list of available columns in alphabetical order. Once the <Sort> button is clicked, an <Unsort> button displays. To display columns in the default order, click <Unsort>.
Click the Right arrow to move selections from Available Columns to Selected/Column Order list. You may refer to this complete listing of the Buying columns for all Buying modules for reference.
Within Selected Column cluster, use the Up/Down arrows to arrange the order of the columns for the report.
From the Selected columns, select columns and use Right arrow to move those columns to Sort By columns list.
Choose Ascending or Descending order for the sort.
From the Sort By list, select columns for grouping and use Right arrow to move to the Group By columns. The Group By will combine rows with the same data column values.
From Group By list, choose items and use the Right Arrow to select those to subtotal on the report.
To move columns to the Cross Tab list, highlight the data or measure column and use the Plus icon to add it to the list. You may only have one data column (client, product, etc.). Media Accounting recommends using just one or two measures (dollars) to keep the report readable. Any data column (not a measure in selected columns) must be sorted and grouped in order that the Cross Tab on this report to work.
You may change a column heading by clicking to select it in the Available Columns list. This column, when displayed in the Change Column Heading field may be edited.
Click in the Separator box to turn off the separator rows that were applied in the Calculated Row tab. Separator rows allow you to add a line or space before and/or after totals.
To have multiple words in a column heading wrap, key a : where you want the column heading to break to a second line. Click the <Change> button.
Click <Apply> for all report formatting to take effect.
Click Persist Filters if you want Filters and Advanced Filters saved with the format.
You may save this inquiry as a personal format by naming it in the first of the two empty fields and clicking <Save>.
If you are authorized to create System formats, you will see the <Save as System> button at the bottom of the window. To save this format as a System format click the <Save as System> button and the format will display in the yellow tinted System Format area of the format list.
If you keyed a company/office on the Authority window, this System format will display as purple only for users in that company/office.
Users may choose any saved personal or system format for their reporting.
While you are reviewing reports as different formats, you may choose a different format and click <Reload> for that new format to rearrange your data collection.