On the Expense Entry detail window, a message displays in pink if any paid advances are available to apply to expense vouchers. Before applying advances, define at least one trip segment for the expense voucher as described in Trip Segment Definition, then return to the Expense Entry detail window and follow these steps to apply an advance.
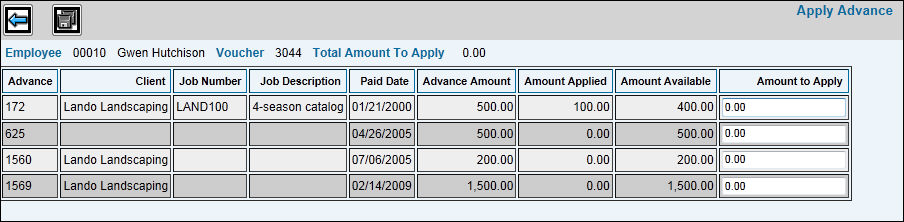
Expense Entry Apply Advances Window
Click <Apply Advance> to display the Apply Advance window. This window displays the total amount of the expense voucher and lists all advances paid to the employee that have unapplied amounts remaining. You may apply all or portions of the unapplied amount (Available Amount) of up to three advance vouchers.
To apply the entire amount of an advance to this expense voucher, select that advance by clicking the check box to the left of the advance Voucher number.
To apply only a portion of an advance, key the amount of the advance to be applied to the expense voucher in the Amount to Apply field.
Click the Save icon ![]() to validate and save your entries and return to the Expense Entry
detail window.
to validate and save your entries and return to the Expense Entry
detail window.
Click the Save icon on the Expense Entry detail window to save the voucher with the advance applied.
You may change or delete the advance amount applied to an expense voucher before submitting it for approval. To change the amount:
Click <Apply Advance> on the Expense Entry detail window.
Change or delete the amount displayed in the Amount to Apply field for any of the displayed advances.
Click the Save icon.