Follow these steps to enter regular client cash that requires no special operation.
Select Accounts Receivable|Cash Receipts Processing|Enter Cash Receipts.
Note: Cash receipts that have been entered but not posted continue to display until they are processed through the Post Cash Receipts option.
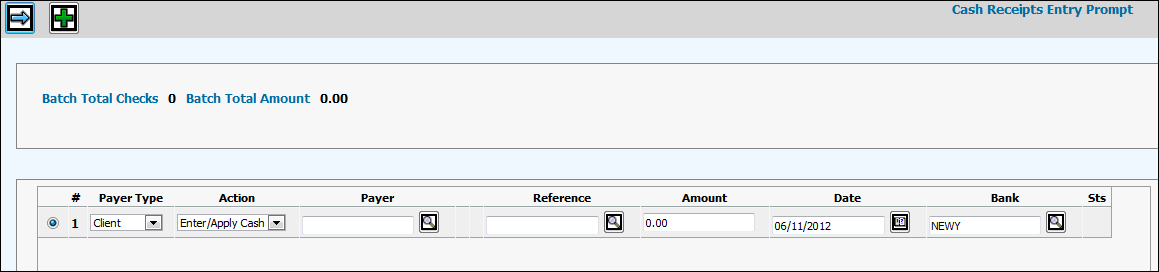
Click the Add icon to open a row for cash receipts entry.
Select Client or A/R Client (client and product codes referenced by the Accounts Receivable), Vendor, or Employee from the Payer Type drop-down list. Do not select Misc Cash. Miscellaneous Cash is described in the Miscellaneous Cash section. Note: If a selected Client has been marked inactive, a warning message displays to help stop cash receipts from being entered for an inactive client.
Select Enter/Apply Cash from the Action drop-down list. Multiple Actions are allowed against the same invoice, where appropriate. For example, you may have a payment against a portion of an invoice and then choose to adjust the remaining invoice amount.
Note: Actions that may be performed are based on security. If you have not been given authority to a particular action, it will not display in applicable drop-down lists. Refer to the A/R Security option.
Key or select a Payer code based on the selected Payer Type. For example, if you selected Client, then only client codes display in the lookup. The functionality is the same for Employees, Vendors, and A/R Clients. Key or select a Client or A/R Client code if you are entering a client receipt and you want all unreconciled items for this client shown in the window.
Key a Reference code for this entry. A Reference may be a Check number if the payment is in the form of a check or a Cash number to identify an internally-defined cash receipt number.
Note: The Reference lookup is not available for this type of entry.
Key the amount received in the Amount.
Key or select the deposit date in the Date field.
Accept the default Bank Code (based on the signon Company/Office) or key the applicable bank code. You can also click the Search icon. When the lookup displays, select the type of bank from the Bank Type drop-down list (All banks, only Depository banks, or only Disbursing banks). To refresh the display of codes, click the Search icon located beside the Bank Code field to show bank codes according you your selection.
The Sts column displays an ”I” (Incomplete) if the cash receipt entry was saved as incomplete or if it contains errors; otherwise a ”C” (Complete) displays.
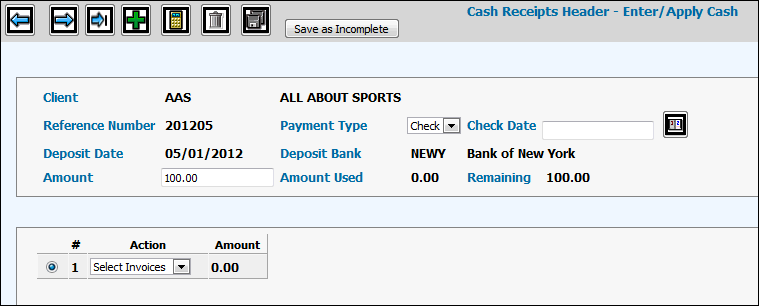
Click the Next icon to display the Cash Receipts Header Window.
Key if applicable the date written on the check.
From the Payment Type drop-down list, accept the default of Check if the payment received is in the form of a check, select Cash if the payment received is in the form of cash, or select Wire if the payment received is in the form of a wire transfer.
Accept the default Amount or if you made a mistake on the Prompt Window, key the correct Amount.
From the Action drop-down list, select the applicable action. Actions that display in this drop-down list are based on the Action selected on the Prompt Window. If an Action does not apply, it will not display. Example: If you select the Match Unapplied Action on the Prompt Window, the Input Unapplied Action will not display on the Header Window.
Note: If you want to save information as incomplete and return at a later time to complete your entry, click <Save as Incomplete>. If you save as incomplete, the letter ”I” displays in the Status (Sts) field on the Prompt Window.
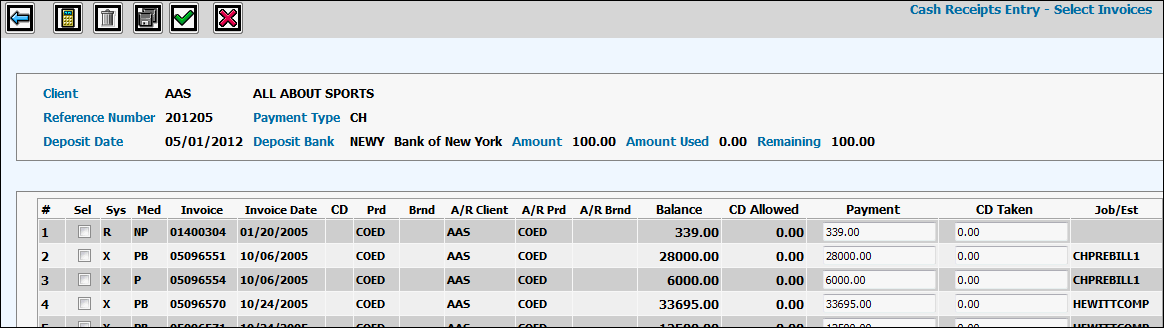
If you select ”Select Invoices”, go to the next step. If you want to bypass the Filters Window that allows you to limit the collection of invoices by specified criteria click the Next Bypass Filter icon.
If you select Input Invoices, refer to Input Invoices.
If you select Input Interoffice, refer to Input Interoffice. Note: Depending on how your company was installed, this action may not be display.
If you select Input Unapplied, refer to Input Unapplied.
Click the Next icon to display the Select Invoices Limiter Window that allows you to limit the collection of invoices by specified criteria.
Invoices Limiter Filter Window
-OR-
Click the Next Bypass Filter icon to advance directly to the Select Invoices Window.
Key information in any of the fields to limit the collection of invoices. When finished, click the Next icon to display the Select Invoices Window listing all open invoices fitting the selection criteria keyed. If you do not want to limit the collection of invoices, then leave all fields blank and click the Next icon.
Note: To sort columns of information, click on the column header to sort in ascending order. Click the column header again to sort in descending order. Click the column heading a third time to return to the original order. A triangle displays besides the column heading to identify the order in which items are displayed.
Click in the Sel box to select the invoice for which you want to pay an amount.
Accept the default Payment Amount and CD Taken or key a partial Payment amount for each invoice. The Summary Invoice column identifies media invoices that are summarized under one invoice umber. When the Summary Invoice is paid, cash is applied to all media bills that are summarized under the applicable summary invoice number.
Click the Recalculate icon to calculate the total of your entries.
Click the Save icon when finished to return to the Cash Receipts Header Window where you can select another Action, if applicable. Although the remaining amount does not have to equal zero at this point, the remaining amount must equal zero to post the cash. Having the ability to Save with a Remaining amount allows you come back at a later time and continue applying cash to invoices.
If finished, click the Save icon again to return to the Cash Receipts Entry Prompt Window where you can select another Action if applicable.
Note: Entries you make will continue to appear (fields grayed out) on the Prompt Window until you post them through the Post Cash Receipts option.
Verify information using the List to Verify option.
Post transactions using the Post Cash Receipts option.