If you need to make changes to the selections, select the Accounts Payable|Payments Processing|Make Changes option. You may repeat this process as many times as necessary until you achieve your desired selection for the check printing process.
If Disbursement Controls have been set up in Production|Admin|Estimate Disbursement Controls and the open payable status equals NN, NY, or YN (”N” indicates the charge is ineligible for payment), then the indicator ”C” will display in the Legend (beside the A and B indicators) as well as the body of the Print ”What If” Review Listing. ”C” indicates that the payment does not meet Disbursement Control criteria and cannot be paid.
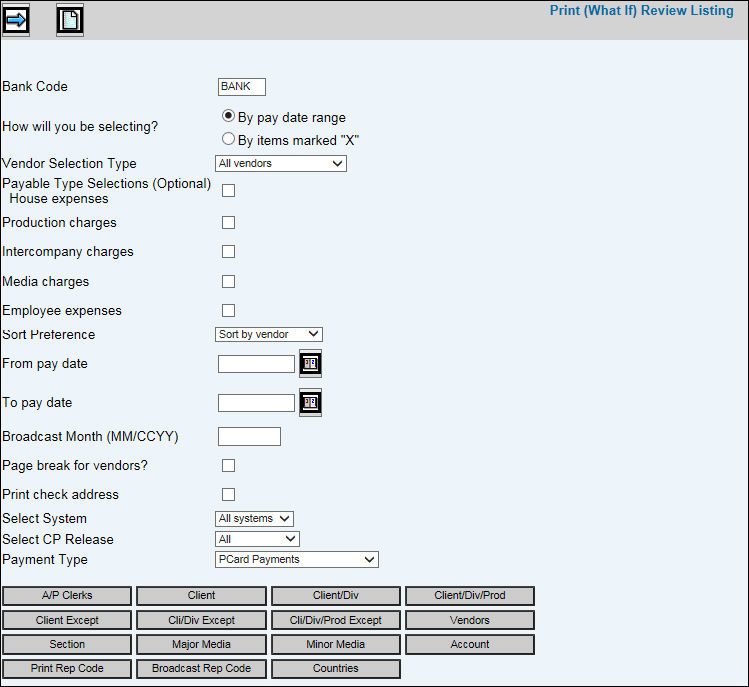
Select Accounts Payable|Payments Processing|Print "What If" Review.
Key the Bank Code from which you want to select invoices for payment.
From the How Will You be Selecting field, click the By Pay Date Range radio button to select invoices within a certain payment due date range or click the By Items Marked X radio button to select invoices marked with an .X' through the Make Changes/Selections option.
From the Selection Type list select one of the following options: Selected Vendors (Allows you to key specific vendors to pay), All Vendors (Pulls all invoices which meet the above criteria), All Vendors Except (Allows you to select the vendors you do not want to pay), Selected Clerks (Allows you to enter the specific billing clerks (employee numbers) you want to include), Selected Sections (Allows you to enter the specific ledger sections you want to include).
From the Selections (Optional) area, click any of the following options to limit information that is collected for the Review Listing: House Expenses, Production Charges, Intercompany Charges, Media Charges, Employee Expenses. The listing displays only items you select.
From the Sort Preferences list, select Sort by Vendor to sort the checks on review listing by vendor code or select Sort by Alpha Sort to sort the checks on review listing by vendor sort code name. This is based on the sort characters in Common Vendor.
In the From Pay Date/To Pay Date fields, key the beginning payment due date in the From field then key the ending payment due date in the To field. Only invoices with payment dates falling within this date range are listed.
Key a Broadcast Month/Year so that the check run can be performed for a specific activity month. This field is only applicable when Broadcast is selected from the System drop-down list.
Click the Page Break For Vendors box to start a new page each time the Vendor changes. Leave the box blank to print continuously without a page break.
Click the Print Check Address box if you want to print the check address set up in Common Vendor. Leave the box blank if you do not want to print the check address
From the Select System list, select the system for which you want to print the Review Listing. Selections include: All Systems, Broadcast, Print, Network, Production.
From the Select CP Release list (Confirmation Pay Users), select one of the following options:
All. All invoices/items (both Released and Not Released) regardless of Confirmation Pay allocation/release status.
Released. Invoices/items are released to be paid without prior confirmation of client payment.
Not Released. Invoices/items cannot be paid until they are allocated to a client payment or are released manually without allocation. When requesting Not Released and all items for a vendor are not released, the Pay Amount is going to be zero. Zero amounts cannot be paid by the system.
From the Payment Type drop-down list, collect information for the folllowing payments:
Regular Checks.
Electronic Payments (ACH). If Electronic Payment (ACH) is selected, only vendors marked with Pay by Electronic Payment in Common Vendor will be collected. Electronic Payment should only be set up for companies who use Piracle software (specializing in laser check printing). Refer to ACH Electronic Payments for steps on paying vendor invoices by an electronic payment system (ACH).
PCard Payments. If PCard Payments is selected, only vendors marked with “Pay by PCard File” in Common Vendor will be collected. If a PCard Cash Clearing account has not been found in the G/L Account Defaults option, the report will show an error in the heading of the report and no payments can be processed until the account has been setup. Also, the payment total limit will be checked and if there is no authorization, then payment cannot be issued. A Bank Code is required when selecting PCard from the Payment Type drop-down list. Bank Codes must be registered as a PCard bank before PCard payments can be made. Contact your Account Manager to register your bank(s) for PCard payments. Note: Bank codes that are registered as a PCard bank cannot be used for Regular Checks payment type. Also, if a Bank Code requires a vendor payment account, a “Vendor Account Missing” error message prints on the What If Review Listing. Vendor payment accounts are set up in CDB|Data Base Maintenance|Common Vendor.
BMG Bank Netting Payments. If BMG Bank Netting Payments is selected, only vendors marked with Other Automated System in Common Vendor will be collected. Refer to Maintain BMG Netting Approvals for an overview of this function.
To limit the collection, a series of Selection buttons are available for use. Click any of these buttons and make selections from the displayed list. Only the items you selected will be included in the collection. If you click a Selection button that includes the word "Except", you may select items that you want to exclude from the collection. If selecting <Countries>, only those vendors that have a matching country code in their address on the Common Vendor Maintenance window in the Central Data Base will be included in the collection.
Click the Next icon ![]() to display the Printing
Selections Window.
to display the Printing
Selections Window.
Note: An error message displays if the vendor check amount limit has been exceeded.