Note: For users of PRINT who also use FINANCIALS/PRODUCTION, Central Pay must be "On" to use this option.
Note: You must have security set up in Payment Processing Security to override bank codes, change third party numbers for employee payables, enter amounts over invoice amounts, perform writeoffs in manual check entry, and override the Confirmation Pay Release status. No one is allowed to insert an employee vendor number into the third party field for a normal vendor payable.
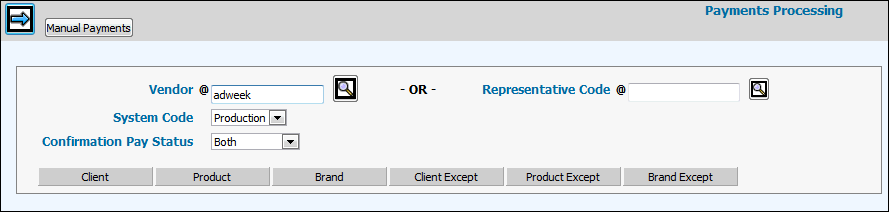
Select Accounts Payable|Payments Processing|Make Changes/Manual Payments.
Key the vendor code for whom you want to pay and/or change vendor invoice line item information or key a Representative Code (companies that represent publications for contract, paying, or trafficking purposes and which are used in PRINT). Codes are set up in Common Vendor in the browser's Central Data Base.
From the System Code drop-down list, select the System for which you are processing/changing vendor invoice line items. A System Code is required when using the Rep Code lookup to distinguish between rep codes used by the different media systems. If you select a System Code of “Media”, only Print Rep Codes display. If you select a System Code of "Broadcast", only Broadcast Rep Codes display. If a System Code other than Media or Broadcast is selected, the Rep Code lookup is not active.
(Confirmation Pay Users Only) The Confirmation Pay Status drop-down list displays only if Confirmation Pay is turned "On". From the Confirmation Pay Status drop-down list, select the type of invoices/items you are processing/changing.
Released = Invoices/items are released to be paid without prior confirmation of client payment.
Not Released = Invoices/items cannot be paid until they are allocated to a client payment or are released manually without allocation.
Both = Both Released and Not Released invoices/items.
To limit the collection of information, click <Client> to select only those clients you want included on the Detail Window. Click <Client Except> to select clients you want excluded on the Detail Window. Click any of the other selection buttons and repeat the selection process.
Click the Next icon ![]() to display the Checks Processing Detail Window
to display the Checks Processing Detail Window
Note: If a voucher has not been billed, a Warning message displays at the top of the window that identifies the row in which the unbilled voucher is located.
Payments Processing Detail Window
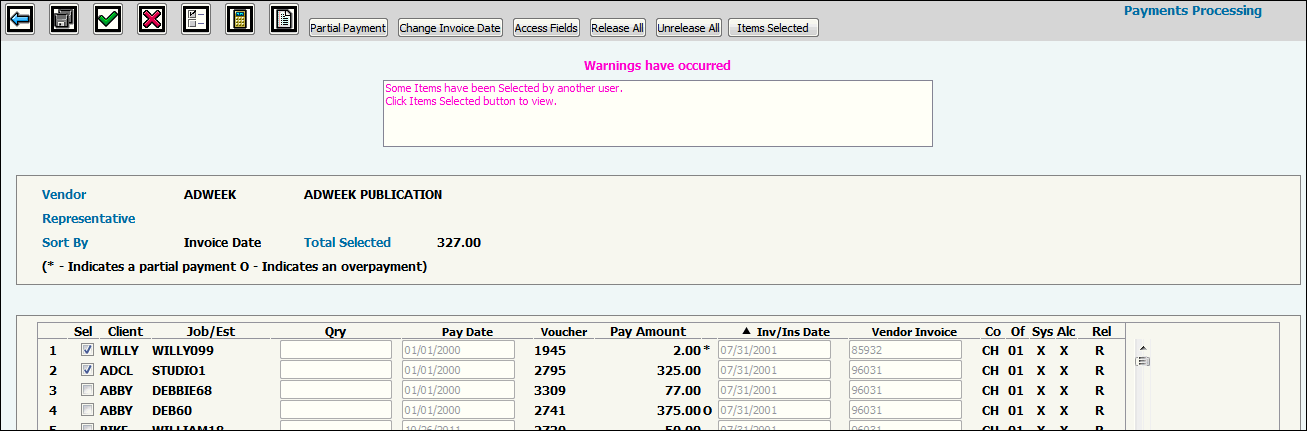
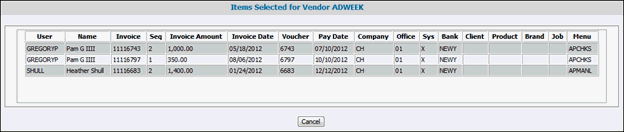
If vouchers have been selected for payment by another user, the following messages displays on the Payments Processing Selection window: “Some Items Have Been Selected by Another User.” “Click Items Selected button to view.” To identify the items that have been selected as well as the user(s) who selected them (to include yourself) click the Items Selected button. Information includes the User ID and Name, Invoices, Invoice Amount and Date, and other information pertaining to the selected payments. To sort columns of information, click the column heading. To close the window, click <Cancel>. Items Selected Window Note: Only items that have been selected for payment using the Payment Selection option will show in the new Items Selected window. If no items have been selected, the Items Selected window displays “No Records Found”.
Click <Access Fields> to access the Query, Pay Date, SX, and Vendor Invoice fields. These fields become input capable so you can make applicable changes. Notice the arrow located in the Pay Date column heading. This arrow indicates that you can arrange the Pay Dates in ascending or descending order. Just click in the heading to rearrange dates.
To display/hide columns of information, click the
Preferences icon ![]() . Place
a check in each box next to the items you want displayed as a column
of information on the Checks Processing Window then click <Save>.
To hide information, leave each applicable check box blank.
. Place
a check in each box next to the items you want displayed as a column
of information on the Checks Processing Window then click <Save>.
To hide information, leave each applicable check box blank.
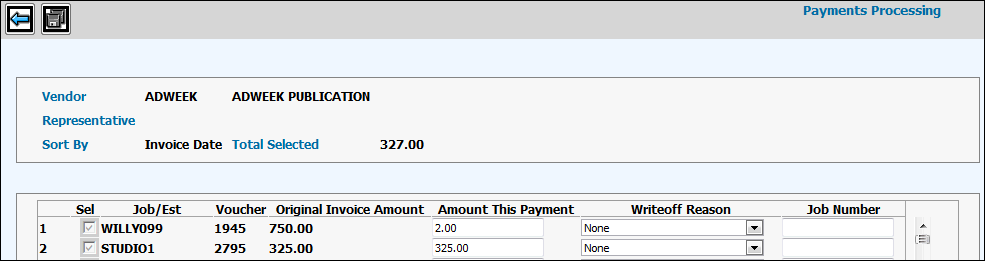
To make a partial payment on an invoice, select the invoice then click <Partial Payment> to display a Payable Amount Window. Key the partial payment amount for each applicable invoice in the Amount This Payment field then click the Save icon.
Note: Depending on how your company was installed, the <Partial Payment> button will not display for cash payments (petty cash/wire transfer) on an employee expense or advance. If paid by wire transfer, a comment (wire transfer number) is attached to the invoice.
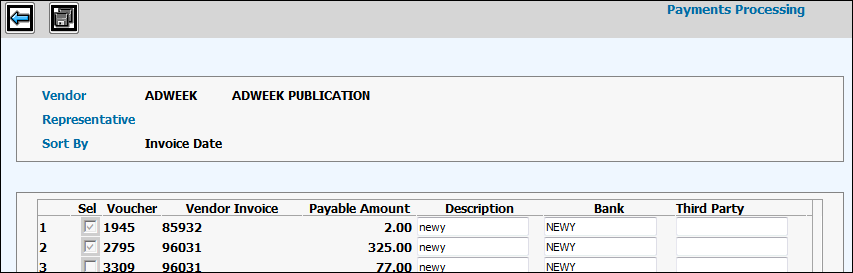
To set up a description and/or third party or bank
number for vouchers, click the Description/Third Party/Bank icon ![]() .
Key the Description, Bank Code, and any Third Party information in
the displayed fields then click the Save icon
.
Key the Description, Bank Code, and any Third Party information in
the displayed fields then click the Save icon ![]() .
If doing a partial payment, you can specify that you want to write
off the difference then you select the reason for the write off from
the Writeoff Reason drop-down list. Selections include Payment Difference,
Bank Charge, and Gain/Loss on Currency Exchange. If the reason is
a gain/loss of exchange difference, then a job number may also be
entered. If a job number is entered, it will create a charge on the
job to pass on the difference to the client if the agreement with
the client allows it.
.
If doing a partial payment, you can specify that you want to write
off the difference then you select the reason for the write off from
the Writeoff Reason drop-down list. Selections include Payment Difference,
Bank Charge, and Gain/Loss on Currency Exchange. If the reason is
a gain/loss of exchange difference, then a job number may also be
entered. If a job number is entered, it will create a charge on the
job to pass on the difference to the client if the agreement with
the client allows it.
Click in the Sel (Select) box next to each invoice
you want to select for payment. To select all invoices, click the
Select All icon ![]() .
.
The Client, Div/Grp, and Med fields display if selected as a Preference. These fields are used for PRINT invoices when Central Pay is turned On.
In the QRY field, you may key a valid query code to stop payment on a particular invoice or prohibit the invoice from being processed. Query codes are set up in the Accounts Payable Records option in the Agency Profile on the (DBPRFL) menu. You must click <Access Fields> to access the QRY field. Afterwards, you can make applicable changes
To select invoices using a payment due date, click <Access Fields> to access the Pay Date field. You may change or remove the payment due dates in this field. Key a date or click the Calendar icon and select a date. Notice the arrow located in the Pay Date column heading. This arrow indicates that you can arrange the Pay Dates in ascending or descending order. Just click in the column heading to rearrange dates.
The Voucher field displays the voucher number associated with the invoice.
The Pay Amount field displays the remaining amount of the invoice to be paid. If an asterisk displays next to the amount, the amount represents a "Partial Payment". If an O displays next to the amount, the amount represents an "Overpayment".
The Inv/Ins Date field displays the supplier's invoice date keyed upon entry of the invoice. To change the Invoice Date if the invoice date was keyed in error, click <Change Inv/Ins Date>. The field becomes input capable so you can change the vendor's invoice date for any invoice. Notice the arrow located in the Invoice Date column heading. This arrow indicates that you can arrange the Invoice Dates in ascending or descending order. Just click in the column heading to rearrange dates.
If suffixes for this vendor have been set up in Common Vendor, you may key/change the suffix that is applicable to the address to which you want to send the check. You must click <Access Fields> to access the SX field.
The Vendor Invoice field displays the invoice number keyed upon entry of the invoice. You must click <Access Fields> to access the Vendor Invoice field. Afterwards, you may change information in this field if the invoice number was keyed in error.
The Company and Office fields identify the Posting Company/Office for the vendor invoice.
The Sys field displays the System code selected on the Prompt Window. The Total Selected field displays the amount of all line items marked with a check mark in the Sel field.
For Confirmation Pay users, <Release All> and <Unrelease All> functions allow you to release all or unrelease all displayed vendor invoices. To selectively override the Release status of vendor invoices, use the override function that is located in the Release column for each vendor invoice. Click <OVR> to override the Release status of the applicable vendor invoice. These function display only if your company and office have been set up to allow release overrides in the Confirmation Pay Profiles and you have been given authority to override Confirmation Pay release status in the Check Entry Security option.
Note: Confirmation Pay Release/Allocation columns will not display on the Detail Window if the vendor is an employee payable.
When finished, click the Save icon.