Refer to the Introduction for a discussion on setting up a Client/Level2/Level3.
Important: If your company uses Mediaocean Financials and Media products, then client information must exist in both the Production Client Profile and the Media Client Profile. To save you time, you can use the Populate Media Cl/Pr From Fin/Pro option to populate the Media Client Profile with information that you have set up in the Production Client Profile. The Production Client Profile must be set up first before you can use this option to populate the Media Client Profile and you must make sure your Production Client Profile includes addresses at every Client and Product level.
Important: To ensure that the “Save” function completes its processing, we have added the following message when information is being saved: “Saving, please wait”. All other functions will be disabled until “Save” is finished processing. After processing, the message disappears and you return to the Prompt. Please do not log off your session or select a different menu option while this message is being displayed. Doing so will stop the processing of your data.
To set up a Production Client Profile, click <Production Profile> from the Client Definition – Media Window to display the Production Client Profile Prompt Window. The client or client/product codes default from the Client Definition – Media Prompt.
Production Client Profile Prompt
Accept or key a Client code to set up the client profile at the Client Level. After information is set up at the Client level then you can set up information at the Client/Level2 level and the Client/Level2/Level3 levels.
Click the Next icon to display the Production Client Profile Window with information showing on the Client Contact Information Tab.
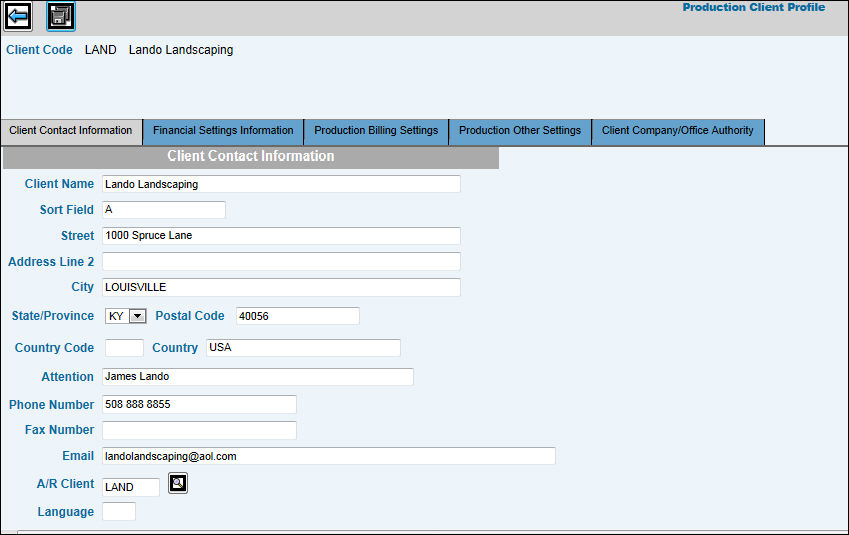
Client Contact Information Tab
Accept or key the Client Name.
Accept or key the Sort/Field code (up to 10 characters) to be used when sorting the clients in alphabetic order on listings and reports. You may also assign a sort code (up to seven characters) in the Level2 record.
Accept or key the Address in the following fields: Street, Address Line 2, City, State/Province, Postal Code, Country Code, and Country.
Accept or key the name of a contact for the client in the Contact field.
Accept or key the client’s Phone Number.
Key the client’s Fax Number
Accept or key the email address of the contact for this client in the Email field.
Accept the default A/R Client code or key a different code if grouping clients for reporting.
If you want to print this client's invoices and statements in a language other than English, key the code corresponding to the language in the Language field.
Click the Save icon.
Repeat Steps 2 and 3 for each Client Level.
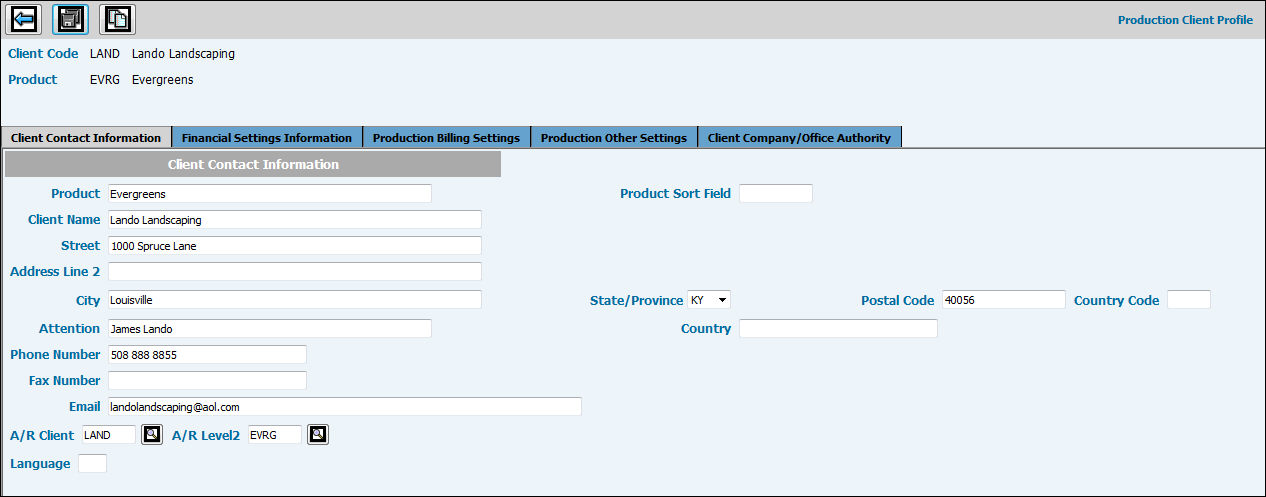
Client Contact Information Tab Level 2
To copy Client Contact Information from the Client Level, click the Copy icon; otherwise, key the applicable Level's information. Note: The Copy function only displays when setting up Level2 and Level3 client information.
Click the Save icon when finished.
Note: The Product Bill function was automated when the Client Profile was moved to the browser; therefore, the Product Bill Code field has been eliminated. Once a Product Code is keyed on the Client Definition -Media Window, the file is automatically updated and error messages will be issued if a media campaign is started without identifying the appropriate Level2/Level3.
Click the Financial Settings Information tab to set up financial system constants for this client.