Requirements:
Spreadsheets must be saved as .xls for Excel versions 97-2003. The import also supports the newer Excel .xlsx extension.
The maximum file size of the spreadsheet is 1.5Mb. Depending on field content of each row, 1.5Mb may equate to a conservative number of approximately 1000 rows/records. If your spreadsheet is in excess of 1000 rows you may need to separate the buys to multiple spreadsheets.
Excel spreadsheets can contain metadata that could increase the size of your spreadsheet. If your spreadsheet exceeds 1.5Mb but the number of rows are well within the approximate 1000 row threshold, you may need to copy ONLY the cell contents of the rows to a new spreadsheet. Cell range (without header rows) will be A1..AL(nnn). Nnn=the last row number of records to be imported.
Note: Imports recognize common date formats that are supported in Excel, including “Custom” cell date formats. This saves you from having to manually reformat potentially numerous excel lines in preparation for importing into Mediaocean. Before you begin, make sure that the Estimate Definitions have been created in the Database|Estimate Definition option PRIOR to importing buys.
See Buy Import Spreadsheet Steps and Buy Import Spreadsheet Format for detailed spreadsheet requirements. When the import process is complete, reports print to your default outqueue to show which records were imported and which were rejected. Once the data is imported, all edits and buyline deletions are done in the Buy Module.
To import buys:
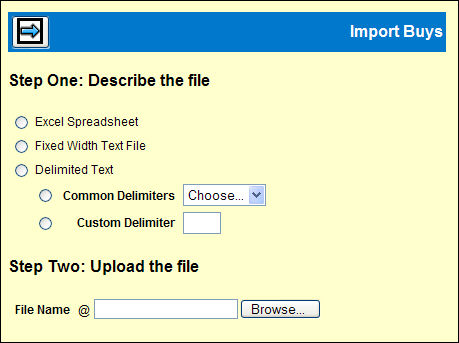
Select System Utilities | Import Buys.
Select Excel Spreadsheet format.
Click <Browse> to find and select the file to be imported. Click <Open> to grab the file.
Click the Next icon ![]() to begin
the process.
to begin
the process.
As the spreadsheet is being imported to display on the window, this message flashes up "Importing and parsing file."
Your imported worksheet displays online with the Import system headings. This is your opportunity to review the codes from the worksheet, correct dates not correctly formatted, ensure that codes are in the appropriate columns. These kinds of errors require your proofreading.
To delete a row that you do not want to import, click the Delete checkbox for each row to be removed for the final import.
Changes you make on this window do not save to the original spreadsheet.
If a revision requires you to leave this option to correct a code/field, when you return, begin at Step 1 again.
If the spreadsheet format is correct, click the Import
icon ![]()
The import process validates and imports the data and displays a message "Import complete. XX records processed. Please check your turn around reports."
These reports are located in your default output queue.
If the spreadsheet format is correct, the import process validates the data and sends two reports to your default outqueue. You can access these reports by clicking the Reports button located on your banner bar to ‘View Spool File’.
The Buy Import Uploaded Buys Report (Spool File R_MP115P) shows the records that were successfully imported. These records can be found on your respective Buy Worksheet (s).
The Rejected Buy Import Records Report (Spool File R_MP100P) shows the records that were not imported and why. Buys that are included on this report are likely to have passed the online validation check (which displays errors to you for correction in the spreadsheet) but might have failed to import for other reasons.