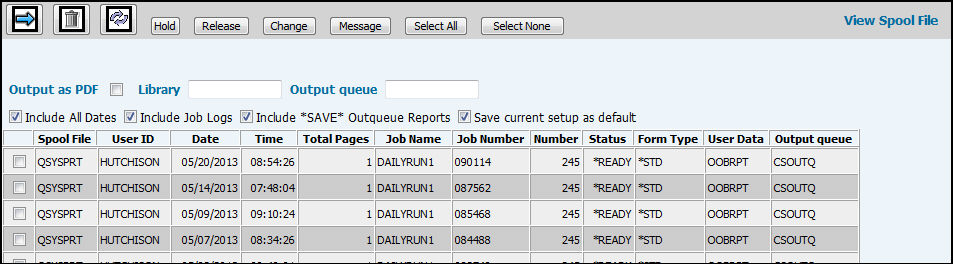
Select Spool File|View Spool File to display a list of all reports generated by you on the System's Server.
You can control the reports that display in your spooled files and output queue. The first time you log on to this option, your default view is a list of the current day’s reports only. To view reports for all dates, click in the ”Include All Dates” check box. To display job log reports, click in the ”Include Job Logs” check box. To display a list of reports that were sent to an output queue that has the word ”Save” in it, click in the ”Include ”SAVE” Output Queue”. To save the selections you have chosen, click in the ”Save Current Setup as Default”. The next time you select either of these options the selections you have saved as the new default display. If you decide you do not want to display a certain type of report, just click in the applicable checkbox to clear the checkmark.
You can sort the list of Spool Files that display by clicking the Spool File column heading. When the sort completes, a solid triangle displays next to the column heading indicating the direction of the sort.
For any file(s) you select by clicking the radio button at the left of the desired row/record, you may:
Click <Hold> to hold a spooled file and keep it from printing.
Click <Release> to release the spool file to print. Some spool files are automatically put on Hold and must be released using this function.
Click <Change> to change the number of copies and/or output queue, to restart printing, and to save the file. If you make multiple selections when using this function, the Restart Printing from a specific page field is disabled since different spool files can have different page numbers. Also, in the Page Range to Print section, key a Starting Page number and an Ending Page number to print only those pages falling between the specified page number range.
Click<Message> to reply to messages associated with certain form types. These messages are the same as the ones you are used to handling in the non-browser environment. Select the applicable Spool File then click <Message> to display the message window showing the message and a reply input field. Key the applicable Reply code then click the Save icon to update the spool file with the current reply status.
Click <Select All> to select all spool files. Click <Select None> to deselect spool files.
Delete a File by clicking the Delete icon ![]() .
.
View the contents of the File by clicking the Next
icon ![]() . When the file displays, you may take two
more actions: Print or export as a text file for import into a spreadsheet
or word processing program.
. When the file displays, you may take two
more actions: Print or export as a text file for import into a spreadsheet
or word processing program.
Note: Before you view the contents of any Spool File, it is important to look at the number of pages the file contains. The more pages, the longer it takes to display information. If a Spool File contains more than 300 pages, it will not be displayed in the web browser due to the memory intensive nature of these large files.
With the report displayed on your screen:
To print the report, click the Print icon ![]() , indicate
the number of copies, then click OK. See Printing
Inquiry Results.
, indicate
the number of copies, then click OK. See Printing
Inquiry Results.
To export the report to a text file, click <Copy Report to Text File>. From the File Download Window, click <Save> to save the file to your computer. When the Save As Window displays, save your file with a new file name and a .spool extension. Click <Save>. When the Download Complete Window displays, click <Close>. You may now import this file into Excel, Word, etc. See Importing Files into Excel.
To Output as a PDF file:
If you selected Output as PDF on the View Spooled File Window and clicked the Next icon, the report is opened as a PDF in Adobe® Acrobat® . As you review the pages in PDF format, you may also print all or selected pages, save it to a folder, or e-mail it to another person.
To forward the PDF, click the Email icon ![]() . Key the
e-mail address(es)(s) in the E-Mail Addresses field. If you want to
send a message along with the PDF, key these messages in the Additional
E-Mail Messages Text field. Key the Subject of the e-mail. When finished,
click <Send E-Mail>.
. Key the
e-mail address(es)(s) in the E-Mail Addresses field. If you want to
send a message along with the PDF, key these messages in the Additional
E-Mail Messages Text field. Key the Subject of the e-mail. When finished,
click <Send E-Mail>.
To return to the View Spool File Window, click the
Back icon ![]() .
.
Working with Libraries:
The Library feature allows you to view reports in all authorized output queues associated with the specified Library. Just key the Library code in the Library field. Also, if keying a specific output queue and that output queue is associated with more than one Library, then reports in the output queue associated with each Library will display.
Working with Output Queues:
To only look at reports for a specified
output queue, key the applicable output queue in the Output Queue field
then click the Refresh icon ![]() .
.
Note: Views in which information is displayed in columns can be rearranged in various successive orders. Example: A column containing numbers can be displayed in ascending or descending order by clicking the column heading. A column containing names can be displayed in alphabetical order from A to Z or Z to A by clicking the column heading. Click the column heading once to display in order. Click the column heading again to display in the opposite order.