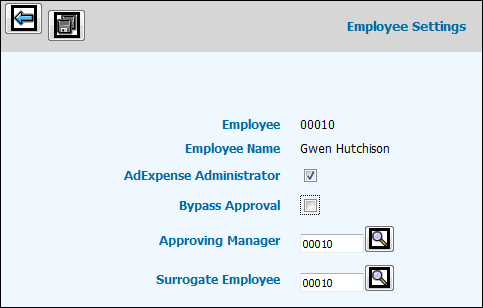
Select AdExpense|Administration|Employee Settings.
Key the code of the employee for whom you are setting up or maintaining settings. Click the Next icon unless you want to print the listing of employee settings. To print a report showing all employee settings/codes that were keyed, click the Listing icon to display the Employee Settings List Window. From the Sort by drop-down list, select to sort by Employee code or Alpha Sort Field. Click <Employees> and select the employees whose setting you want to print. When finished, click the Next icon to display the Printing Selections Window where you submit the report to print.
If you clicked the Next icon in Step 2, the Employee Settings Window displays. Click in the AdExpense Administrator box if you want the selected employee to be able to view any employee's expense entry or approvals as well as enter expenses for any employee. If Office Authority is used, the user must be authorized to the employee's company/office.
Click in the Bypass Approval box to allow the selected employee's expense report to bypass the approval process and go directly to the post approval process. If you check this box, a status of "Submitted to Post" displays on applicable windows in the Advance/Expense Post Approval option as well as the Advance/Expense Inquiry option to reflect that approval was bypassed and the expense was submitted directly to post. The approver code will be blank and "Direct Post" will display in the Approving Manager column. If the Posting Approver rejects the expense, only the employee will be notified.
If this employee will have expenses/advances entered using AdExpenseSM, key the employee code of the Approving Manager. If Office Authority is used, the user must be authorized to the employee's company/office.
If another employee will have authority to enter expenses/advances for this employee using AdExpenseSM, key that employee code in the Surrogate Employee field. If Office Authority is used, the user must be authorized to the employee's company/office.
Click the Save ![]() icon.
icon.
Note: If an employee with an Inactive Status has an associated Termination Date in the Employee Profile, the manager or surrogate employee has 60 days after the Termination date to process expenses in AdExpense. If expenses come in after 60 days, the CDB Administrator must change the status of the employee. TIP: Until any unaccounted for expenses are processed, use the status code of ”T” (terminated/active) in the Status Code field to terminate the employee but continue to use their employee code in AdExpense. After all final entries are made, the Administrator must go back and change the status of the employee back to ”I” (inactive); otherwise, the employee will continue to be reported on delinquent reports and will continue to show up on employee search lists.