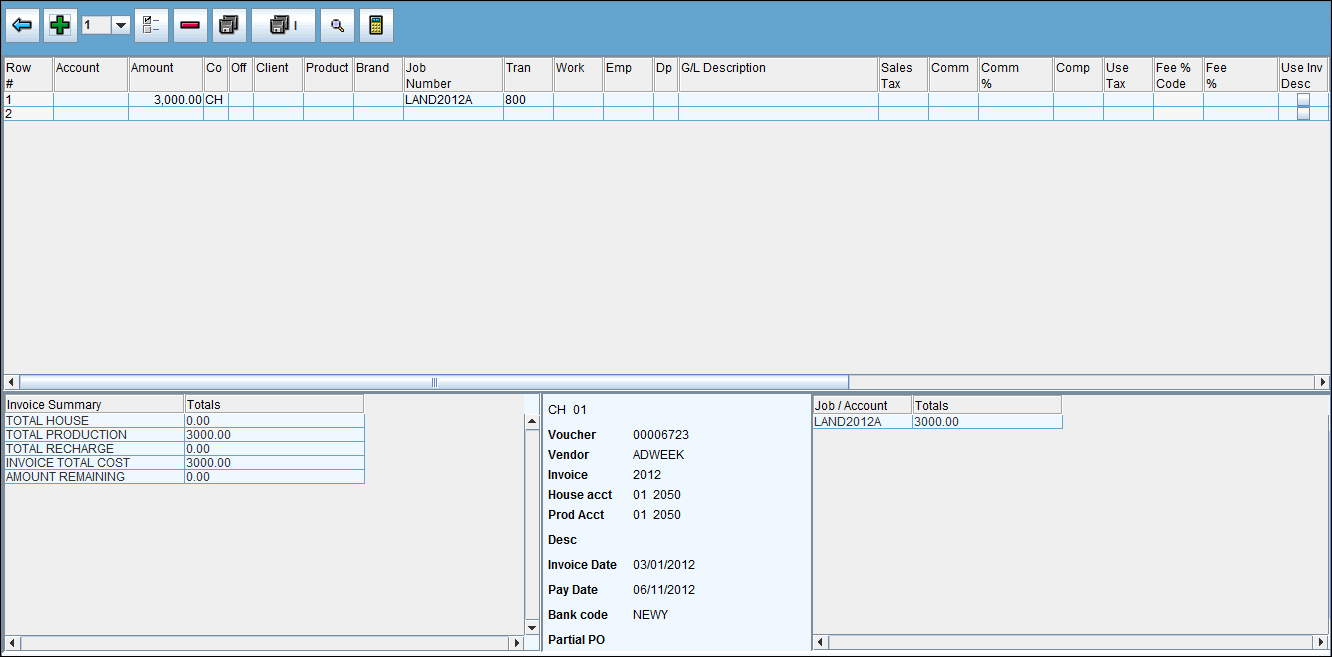
The Vendor Charge Expense Distribution Window displays when you click
the Next icon ![]() on the Vendor
Charge Header Window. It allows you to key invoice amounts to the
related production/house expense accounts. Rows for charge entry are set
up like a spreadsheet. When setting up a new voucher, five blank rows
default onto the Distribution Window. Click in each field to make it active.
Use the Tab key to advance to each field. To rearrange column headings,
click and hold on the column heading then drag the column to the applicable
location. Note: After you rearrange
columns, you must click the Save icon; otherwise, column arrangement reverts
back to the default.
on the Vendor
Charge Header Window. It allows you to key invoice amounts to the
related production/house expense accounts. Rows for charge entry are set
up like a spreadsheet. When setting up a new voucher, five blank rows
default onto the Distribution Window. Click in each field to make it active.
Use the Tab key to advance to each field. To rearrange column headings,
click and hold on the column heading then drag the column to the applicable
location. Note: After you rearrange
columns, you must click the Save icon; otherwise, column arrangement reverts
back to the default.
To add more rows, click the Add icon ![]() .
Note: When setting up a new voucher,
five blank rows automatically default onto the Distribution Window. To
save information that is ready to Post, click the Save icon
.
Note: When setting up a new voucher,
five blank rows automatically default onto the Distribution Window. To
save information that is ready to Post, click the Save icon ![]() , or press
<Ctrl+ S>, or <F9>. To save information as incomplete, click
the Save as Incomplete icon. Any errors that are not resolved are saved
as incomplete. To search for information, click the field in question,
then click the Search icon
, or press
<Ctrl+ S>, or <F9>. To save information as incomplete, click
the Save as Incomplete icon. Any errors that are not resolved are saved
as incomplete. To search for information, click the field in question,
then click the Search icon ![]() , or press <Ctrl+F>,
or <F4>. To copy information from the previous line to a new line,
key an amount on a new line then press <F5>.
Note: Only an amount can be keyed
on the new line to copy the previous line and the amount must be keyed
before you press <F5>. To validate entries, click the Validate icon
, or press <Ctrl+F>,
or <F4>. To copy information from the previous line to a new line,
key an amount on a new line then press <F5>.
Note: Only an amount can be keyed
on the new line to copy the previous line and the amount must be keyed
before you press <F5>. To validate entries, click the Validate icon
![]() .
Error messages display if keyed data is incorrect or missing. Also, the
Commission and Commission Percent will default into applicable cells based
on the keyed Tran/Work codes. Use Tax Amounts and Sales Tax Amounts will
default into applicable cells based on the keyed Use Tax or Sales Tax
codes.
.
Error messages display if keyed data is incorrect or missing. Also, the
Commission and Commission Percent will default into applicable cells based
on the keyed Tran/Work codes. Use Tax Amounts and Sales Tax Amounts will
default into applicable cells based on the keyed Use Tax or Sales Tax
codes.
The lower middle portion of the window gives you a review of the information from the Vendor Charge Header Window. The lower left of the window displays Invoice Summary information. This section keeps track of amounts keyed for both House and Production accounts, the invoice total cost, and the remaining amount. The lower right of the window displays a list of all keyed Jobs or Accounts and the total for each. These two sections are automatically updated each time an amount is keyed.
Note: Depending on installation, the Invoice Number and the Query Code display in the lower middle section of the window. Also, a Total Recharge line displays in the Invoice Summary Total section of the window.
Also, the Error Window containing all errors that exist with the distribution remains displayed while you correct all listed errors. When finished correcting errors, click <OK> to close the Error Box.
Click the Preference icon to add/remove Detail Columns of information. Each item you select will show as a column of information on the distribution window. Click Filter Production Charges to just display Production charges on the distribution window. Click the Filter House Charges to just display House charges on the distribution window.
Note: If you filter charges, you must return to Preferences and select both types before you can save your worksheet. If you do not have authority to enter Production charges, only the House Filter displays; conversely, if you do have authority to enter House charges, only the Production Filter displays.
Key the company to which this expense is to be distributed. To distribute expenses to companies other than the sign-on company, you must have cross-company authorization set up in Cross Company Authorization on the MSMENU.
Note: Depending on installation, this field may be input prohibited.
Key the office to which you want a house expense posted. If left blank, the system defaults to your sign-on office. If there is only one office for this company, that office code displays and cannot be changed. This saves you from rekeying the office code.
Note: An office different from the job owing office can be entered only if you are doing job memo write-offs and only if the job is not billable. This allows you to write off expenses to a different office but continue to use the job to track charges on the job.
Note: Depending on installation, this field may be input prohibited.
(Production Expense) Key the number of the job to which a portion or the total amount of the charge should be allocated.
Key the code of the client to be billed for this job if required by security settings in Vendor Entry Security. If not required, you may leave blank and the client will default in based on the job. The same rules apply to Division or Division/Product.
(House Expense) Key a valid Department code to specify to which department this expense should be posted.
(House Expense) Key a valid Account number to specify to which account this expense should be posted. The system allows you to enter any account; therefore, make sure you are entering an expense account.
Note: Depending on installation, when searching by Account, only accounts for the sign on company and office will be displayed.
Key the amount of the Production or House expense.
(Production Expense) Key the Transaction Code and Work Code associated with the vendor charge. If a default work code is entered in Common Vendor, it displays. This code may be changed.
(House Expense) Key the employee code if this House Account requires an employee code at time of entry. If you do not know the employee code, click in the Employee field then click the Search icon for a listing.
(House Expense) Key text describing this entry in the G/L Description field only if you want the description to differ from that entered on the Header Window. Helpful Hint: To save time in keying text, double-click the description field then retype only the information you want to change. Information keyed in the G/L Description field updates the A/P G/L Detail file. If a G/L Description is not keyed, then the Remittance Comment is used to update the A/P G/L Detail file.
(Production Expense) Key the Sales Tax amount if any, associated with the expense, if you want that portion of the invoice to be reported separately on the client's invoice.
(Production Expense) If applicable, key the Purchase Order number to identify the purchases made for the job. If keyed on the Header, the P.O. number defaults into the Distribution Window.
Note: To split the purchase order amount against the same job but to different tran/work codes, the purchase order number must be keyed on each applicable distribution row.
Note: If purchase order approval is used, an error message displays if you key a purchase order that has not been approved. The error message provides the employee codes of the users who are responsible for approval.
(Production Expense) Commission code and Commission percentage defaults from the Billing Profile (DBPRF2) for the jobtype and related accounting transaction code. These fields may be overridden.
(Production Expense) If your company is using components, key the applicable Component to have different stages of a job broken down for reporting and billing purposes without having to open multiple job number. Components are advantageous in cases where revisions to artwork related to a particular job are necessary. Components are set up in the Job Component Maintenance option in Production.
(Production/House Expense) If Use Tax is applicable, key the Use Tax amount if any, associated with the expense, if you want that portion of the invoice to be reported separately on the client's invoice. Note: When the invoice is posted, an additional journal entry is made for House Expense Use Tax. An additional debit will be made to the expense account for the usetax amount, and a credit will be made to the usetax liability account attached to the usetax code. These usetax charges will also appear on the existing Usetax Report located in the Production|Miscellaneous Reports folder
If your company uses the second level markup for charges, key a Fee Code set up in the Agency Profile and which represents the percentage of markup on the vendor's invoices
Displays the Fee % based on the Fee Code keyed.
Click in the Use Inv Desc checkbox only if you want to use the Invoice description instead of the description entered on the Header Window.
If applicable, key the Corridor code that identifies the business area that is associated with this company/office. Corridor codes are created in the Agency Profile
Displays the Client Name based on the client code.
Displays the Job Name based on the description keyed when the job was opened.
(House Expense Only) Click the Job Memo Writeoff checkbox to enter direct writeoff memos to the job then key the applicable Tran/Work code and Job number. Afterwards, the charge will not go to the job for billing; however, the entry will show up as a normal writeoff on reports and inquiries in Miscellaneous Inquiries but with no invoice number since it was absorbed during a billing. This field is input capable only if security to allow to enter direct writeoff memos to jobs has been set up in Vendor Entry Security. To have a checkmark automatically placed in the Job Memo Writeoff box on new rows and a new voucher, key 1=Yes in the Flag Job Memo Writeoff field in the Security Limits/Miscellaneous option in Accounts Payable Records. If security has not been given to flag job memo writeoffs, the Job Memo Writeoff box will be input prohibited regardless of the 1=Yes setting as previously described.