To request the report:
Select Reports | Payers List.
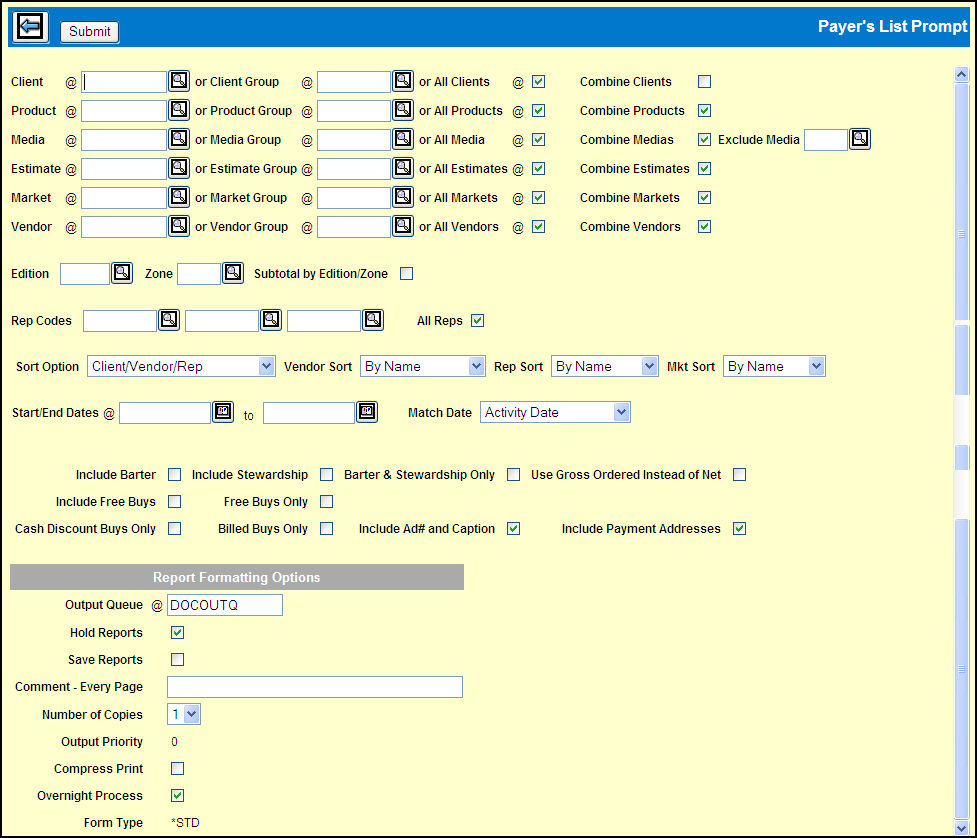
Key a Client or Client Group code and click to uncheck the All Clients and Combine Clients checkboxes. Or leave the first two fields blank and accept the check in the All Clients check box. For a client group or all clients request, accept the check in the Combine Clients check box to have all clients print without page breaks between clients.
Key a Product code or Product Group code and click to uncheck the All Products and Combine Products checkboxes. Or leave the first two fields blank and accept the check in the All Products check box. For an all products request, accept the check in the Combine Products check box to have the product information combined without page breaks between products.
Key a Media or Media Group code, and click the All Media check box to remove the check. For an all products request, leave the first two fields blank and accept the default All Media check. Decide whether to accept the check in the Combine Products check box to combine media information without page breaks between media types. Or, key a media code in Exclude Media field.
Key an Estimate code or Estimate Group and uncheck the All Estimate checkbox. Or leave both fields blank and accept the check in the All Estimates checkbox. Decide whether to uncheck Combine Estimates.
Key a Market or Market Group code and click to uncheck the All Markets and Combine Markets checkboxes. Or, leave the first two fields blank and accept the check in the All Markets check box. For an all markets request, decide whether to leave the check in the Combine Markets check box to combine market information without page breaks between markets.
Key a Vendor or Vendor Group code and click to uncheck the All Vendors and Combine Vendors checkboxes. Or leave the first two fields blank and accept the check in the All Vendors check box. For an all vendors request, click the Combine Vendors check box if you want all vendors printed without page breaks between vendors.
To limit the report, key an Edition and/or Zone.
Click the check box to Subtotal by Edition/Zone.
To include all reps, leave the Rep Codes fields blank and accept the default of checked in the All Reps check box. To limit the report to specific reps, key up to three rep codes and click the All Reps check box to remove the check.
Select the order in which the data is sorted from each Sort Option dropdown list. Refer to Payer's List Fields to see the full list of sort types.
Within the selected sort order, use the Vendor Sort and Rep Sort drop down lists to select how to sort Vendors and Reps, by name or by code.
Note: As you specify the required fields or groups, you will notice that they default as both All and Combine. Depending upon the Sort Option selection you choose below, you may need to click to uncheck certain items in the required fields section.
Each of the ”All” selections means that you are requesting the report to page break by that criterion. But, if you also leave the ”Combined” box checked, then the item will Not page break, but rather combine the related items, based on your sort option (below).
Key the Start/End Dates for the activity to be included, then select the type of Match Date to use with the specified date range. If you provided the Insertion End Date on the Buy Module, both the Insertion Date and Insertion End Date will print on the report.
Choose the Payable Type from the dropdown.
Use the checkboxes to include any of the remaining nine types of buys, including Free Buys, on this report.
Click the <Fields> button below for more detailed field information.
Complete the Report Formatting Options. Then click <Submit> to submit the report request.
![]()