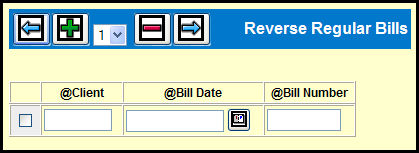
If you chose the Reverse Regular Bills radio button, you'll see the Reverse Regular Bills detail window.
Reverse Regular Bills Detail Window
The Reverse Regular Bills detail window allows you to add rows in order to reverse multiple bills at the same time. To add rows, select the number of rows from the drop down and click the Add icon.
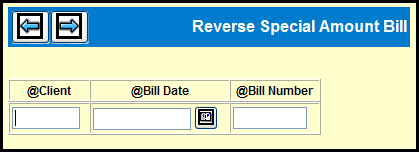
If you chose the Reverse Special Amount Bills radio button, you'll see the Reverse Special Amount Bills detail window.
Reverse Special Amount Bills Detail Window
The Reverse Special Amount Bills detail window only allows you to reverse one bill at a time.
Key the Client code.
Key or use the Broadcast Calendar Lookup to specify the Bill Date. (The date on which the bill was created.)
Key the Bill Number (Invoice Number)
If you are reversing regular Bills, select the check box adjacent to the row.
If you selected the Output to Printer radio button, you'll want to be sure that the correct name appears in the Output Queue field.
Depending on the Billing Output you selected, you'll proceed in one of the following ways:
If you chose to create a PDF of the reverse bill, click the Next icon, and proceed to the PDF Bill topic.
If you chose to print the reverse bill, click the Submit button, and proceed to the Print Bill topic.