Note: Exporting to a spreadsheet limits the number of rows to 65000. If this amount is exceeded, the following error message displays: “Excel file too large. Please use Export to CSV Instead”.
Select Production|Miscellaneous Inquiries|Job Information AdHoc.
The Ad Hoc Inquiry – Authorized window displays based on authorization to create system reports and grant authority to users or revoke authority from users. If you do not have authorization to create system report, you will not see this window. Instead, you will advance to the Job Information Ad Hoc Inquiry Prompt where you can create personal reports or if authority is restricted, view/print reports. Refer to the Authorized Window Security section for detailed information.
Click the Next icon to advance to the Job Information Ad Hoc Inquiry Prompt Window.
Job Information AdHoc Inquiry Prompt
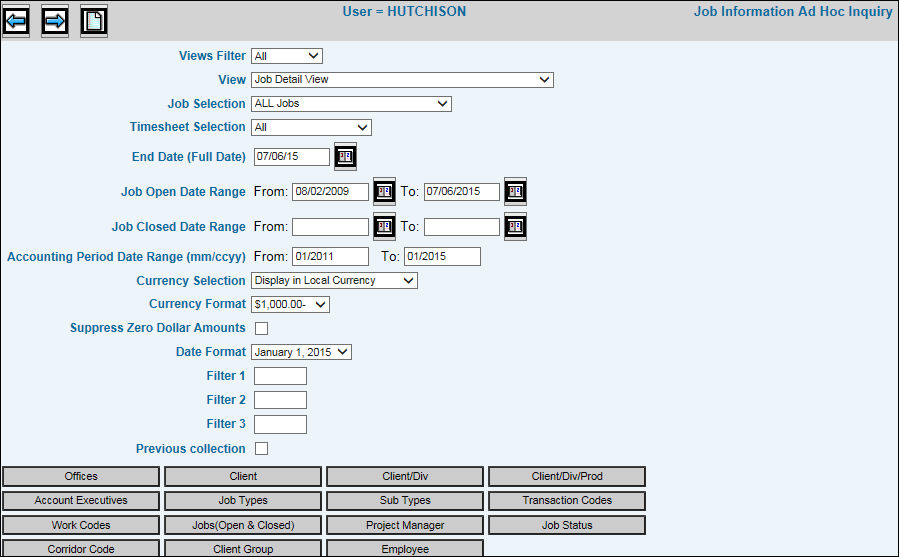
The View drop-down list contains a list of preexisting reports as well as the Default Standard Reports. From the Views drop down list, select the applicable report.
From the Job Selection drop-down, select the type of job information you want to collect. Selections include All Jobs, Open Jobs Only, Closed Jobs Only, All Jobs With Activity (Open or Billed), Open Jobs With Charges, Billed Charges Only.
From the Timesheet Selection drop-down, select All, Exclude Timesheets, or Timesheets Only.
Key or select an End Date (Full Date) which is used in conjunction with the Open at End Date and the Billed at End Date Available Columns. Available Columns are selected in the Data Layout Tab. The report will display only those jobs falling within the date entered.
Select a Job Open Date Range to collect only jobs opened within the specified date. Tip: To display Open and Closed Dates on the Header Row only in the View Tab, use the Group By function on the Options|Data Layout Tab. If you do not group Open and Closed Dates, dates will show on each detail line in the View Tab.
Select a Job Closed Date Range to collect only jobs closed within the specified date. Tip: To display Open and Closed Dates on the Header Row only in the View Tab, use the Group By function on the Options|Data Layout Tab. If you do not group Open and Closed Dates, dates will show on each detail line in the View Tab.
Select an Accounting Period Date Range (mm/ccyy) to collect only jobs falling within the date entered.
From the Currency Selection drop-down list select one of the following options: The report shows the currency the figures are in and shows the job exchange rate and exchange code. If there is another currency, the converted figures are shown.
Display in Local Company Currency. All jobs are reported in the company’s local currency.
Display in Client/Job Currency. If the client or if the job/estimate has a currency code attached, then all figures are converted to the client’s currency. If an estimate was found with a rate for the job, then that rate is used. Otherwise, the most current rate in the exchange rate table is used.
From the Currency Format drop-down list, select the format you want to use to express negative currency amounts on reports.
Click in the Suppress Zero Dollar Amounts check box to exclude zero dollar amount lines on reports; otherwise, leave this checkbox blank to include zero dollar amount lines on reports.
From the Date Format drop-down list, select the format you want to use to express dates on reports.
To limit information that is collected for jobs by a filter code that is assigned when a job is opened, key the applicable filter codes in the Filter 1, Filter 2, and Filter 3 fields.
To display information from the previous collection, click Previous Collection.
To further limit information by specified selections, click any of the Selection buttons and make selections from the displayed list. Information will be collected for only the items you select.
After applying filters, click the View Selections icon to display a list of your selected filters. This feature will help you keep track of applied filters especially when working with multiple selection buttons. As always, once your report is generated, selection will no longer display in the View Selections window.
Click the Next icon to display the Inquiry in the View Tab.