Note: Profiles must be set up in Data Base Maintenance|Transmitted Invoice Profile in the Central Data Base, before you can use this option.
Client Requirements:
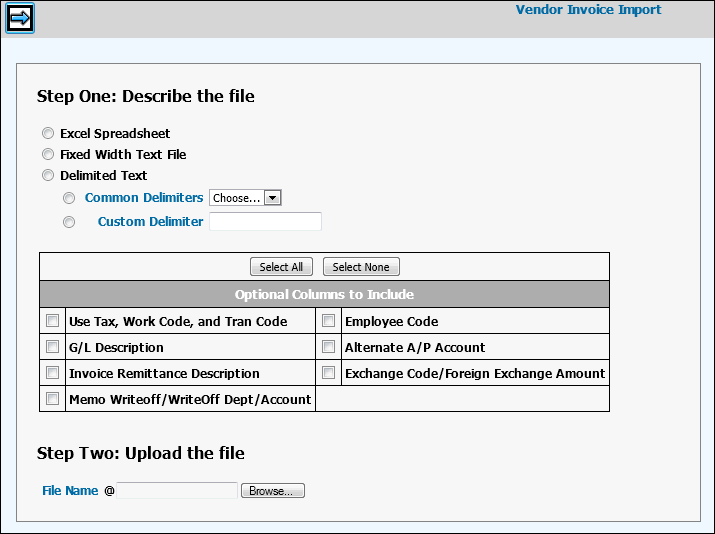
The import file must be in one of the following formats:
Spreadsheet (All cells must be Text Formatted Cells. Text Formatted Cells allow information to be displayed exactly as entered.)
Fixed Width Text File (.CSV file)
Delimited Text.
From the Optional Columns to Include section, click each applicable item as shown in the screen capture below to import these headers as a separate column of information.
The file must contain the following columns for information; however, some columns may be left blank. Columns must be in the following order:
Field |
Required/Optional |
Field Length |
Description |
Company |
Required |
2 |
The Company to which vendor invoices will be imported. |
Office |
Required |
2 |
The Office to which vendor invoices will be imported. If the office code is missing in the file, the office for which the job was opened defaults into the Office field only if the job number is valid. |
Vendor |
Required |
10 |
The code of the vendor who issued the invoice. |
Invoice Number |
Required |
15 |
The Invoice Number issued by the vendor. |
Invoice Date |
Required |
8 |
The date of the invoice in CCYYMMDD format. |
Purchase Order Number |
Optional |
8 |
If a purchase order was set up, the Purchase Order Number. |
Cost |
Required |
11 |
The cost (payment amount) of the invoice. Amounts must be set up to include two decimal places. Example: 34.00. Leading zeros not required. Negative amounts must be set up to include a minus sign as the last position. Example: 100.00- |
Client |
Optional |
5 |
If the charge is not billable and you want to identify a client, import the appropriate client codes. Client codes are not needed if the Job Number is provided. |
Product |
Optional |
4 |
If the Client is set up by Product, import the associated product code. |
Brand |
Optional |
4 |
If the Product is set up by Brand, import the associated brand code. |
Job/EDI Tag |
Required |
12 |
For billable entries with a job number, use the Job Number. The job number is used to pull in the client codes when the charge is uploaded. If a job number is keyed, client codes are not needed. For jobs, an EDI tag of *DFT must be set up in Transmitted Invoice Profile in the Central Data Base. The *DFT tag is used to pull the transaction code and work code. For nonbillable entries, key the EDI Tag setup in Transmitted Invoice Profile in the Central Data Base. This tag is used to pull in the department and account. The import always checks first to see if the information in this column is a valid job number, and if not, looks to see if it is a valid EDI tag you have created. |
Use Tax |
Optional |
4 |
The Use Tax code set up in the Tax Records option of the Data Base. |
Work Code |
Optional |
4 |
The Work Code associated with the vendor charge. |
Tran Code |
Optional |
3
|
The Transaction Code associated with the vendor charge. |
Employee |
Optional |
5 |
The code of the Employee associated with the transaction. |
G/L Description |
Optional |
30 |
The Description of the G/L Account. |
Alternate A/P Account |
Optional |
8 |
An A/P account used as an alternate. |
Invoice Remittance Description |
Optional |
30 |
The description of the Invoice Remittance Advice. |
Exchange Code |
Optional |
3 |
The code that identifies a foreign entity. |
Foreign Exchange Amount |
Optional |
15.2 |
The rate of exchange for a specified foreign entity. |
Memo Writeoff |
Optional |
1 |
Identifies line item as a job memo writeoff. Memo Writeoff Account is required if Y (yes). |
Writeoff Dept |
Optional |
2 |
The department, if applicable, to which memo writeoff amounts will be posted |
Writeoff Acct |
Optional |
8 |
The account to which memo writeoff amounts will be posted. |
Import Process
Select Export/Import|Vendor Invoice Import.
Select the type of file you want to import.
Excel Spreadsheet. (All cells must be Text Formatted Cells. Text Formatted Cells allow information to be displayed exactly as entered.)
Fixed Width Text File or .CSV file
Delimited Text (Select either Common Delimiters or Custom Delimiter)
Click items in the Optional Columns to Include area if you want to import these headers as a separate column of information. To select all optional columns, click the <Select All> button. To deselect all optional columns, click the <Select None> button.
Key the File Name you want to import or click <Browse> to display a list of files from which to choose.
Click the Next icon ![]() to load the file and display vendor invoice information.
to load the file and display vendor invoice information.
Note: Processing time is dependent upon the amount of information that is imported. Therefore, the more information that is imported the longer the processing time.
Click the Import icon ![]() to edit information and display any errors in the import file. If
errors are found, a list of errors displays. You may make corrections
here or you can click the Ignore Error check box beside the applicable
line item to ignore the errors. Also, you may delete a line by clicking
in the Delete box beside the line you want to delete then clicking
the Save icon
to edit information and display any errors in the import file. If
errors are found, a list of errors displays. You may make corrections
here or you can click the Ignore Error check box beside the applicable
line item to ignore the errors. Also, you may delete a line by clicking
in the Delete box beside the line you want to delete then clicking
the Save icon ![]() .
.
Click the Import icon again to allow the import to process. A "Successfully Imported" message displays. Also, an Import Audit Listing is generated that lists all data in the import file. This listing can be copied to a Text File if applicable.
Note: Corrections that are made on this grid do not change information that is stored in the spreadsheet used in the upload. Also, once this information is imported to Vendor Charge Entry, any further corrections must be made in Vendor Charge Entry.
Select Entering Vendor Charges from the Vendor Charge Entry folder. The following message displays: "Entries Exist that have not been processed. These are the charges that have been imported and will have a "Y" or "E" in the EDI column. Click the Search Vouchers icon to view the Vouchers in Session Listing. An "E" displays in the EDI column by each invoice if errors existed for the invoice in the import file. A "Y" displays by each invoice if no errors existed for the invoice in the import file. Select a voucher then click <Done> to display the selected invoice number in the Voucher Number field on the Prompt Screen. Click the Next icon to display the Vendor Invoice Entry Screen. Review data and correct any errors. Use the Distribution screen if you need to add sales tax, use tax, or if you want to override default billing instructions. You do not need to view or change an imported invoice with no errors unless you want to make a change.
When finished submitting each invoice, click <Post> to process invoices. This process always performs another edit of imported data to ensure no errors are posted.
Note: All errors must be corrected before invoices can be posted. Invoices may also be deleted if errors are not corrected.