Timesheet data that is loaded must include the employee number, timesheet week, row number, company/office, job number, client, division/product (if applicable), transaction code, work code, overtime code and/or filter code, hours for each day of the week that is worked, and any comments.
Note: Timesheet Data must never be imported more than once.
Timesheet data that is imported is always based on Sunday week ending dates. After timesheets are imported, a timesheet is created in AdClock for each employee listed in the import file for the week being imported. Timesheets that do not contain any errors are placed in the Submitted stage in AdClock. Conversely, timesheets that contain errors are placed in a Rejected stage in AdClock. A Timesheet Import Verification Listing is produced at the time timesheets are imported and can be used to identify errors. Open AdClock to view/correct timesheets that have been rejected.
Note: After timesheets are imported, errors must be corrected from within AdClock before timesheets can be approved for posting.
Import Date Rules
The following rule applies to import dates:
Timesheet dates must end on a Sunday for the week being imported.
Note: Processing time is dependent upon the amount of information that is imported. Therefore, the more information that is imported the longer the processing time.
Client Requirements
Before you can load timesheet data, the import file must be set up as follows:
The import file must be in one of the following formats:
Spreadsheet (All cells must be Text Formatted Cells. Text Formatted Cells allow information to be displayed exactly as entered.)
Fixed Width Text File (.CSV file)
Delimited Text.
The file must contain the following columns for information; however, some columns may be left blank. Columns must be in the following order:
1st Column: Employee Code (Required) (5 positions). The employee code must be valid and the employee cannot have a status of Inactive "I" or Incomplete "X".
2nd Column: Week (Required) (8 positions CCYYMMDD). The period ending dates for each week must always end on Sunday and must be in YYYYMMDD format.
3rd Column: Row (Required) (4 positions): The number that represents the order in which you want each row displayed. Note: You must key a value in all four positions; e.g., Row 5 would be entered as 0005.
4th Column: Company (Required) (2 positions): The Company Code to which time for this employee will be posted.
5th Column: Office (Required) (2 positions): The Office Code to which time for this employee will be posted.
6th Column: Job Number (Optional) (12 positions): The Job Number to which time for this employee will be posted.
7th Column: Client (Optional) (5 positions): The Client code to which time for this employee will be posted.
8th Column: Division (Optional) (4 positions): The client is set up by Client/Division, key the applicable Division code.
9th Column: Product (Optional) (4 positions): The client is set up by Client/Division/Product, key the applicable Product code.
10th Column: Tran Code (Optional) (3 positions): The applicable accounting Transaction Code that identifies the type of charge and how it should be processed.
11th Column: Work Code (Optional) (4 positions): The work code that represents the different type of work performed internally or externally. Work codes are attached to accounting transaction codes to establish the transaction sequence in the billing instructions.
12th Column: Overtime (Optional) (1 position): An X displays if overtime is applicable for the period being imported.
13th Column: Filter (Optional) (4 positions): The user-defined Filter code that can be used to filter information on reports.
14th thru 20th Columns: Hours (Required) (6 positions): The hours for each day of the week the employee works. Hours must be represented in whole numbers without decimals and must contain leading zeros. Example: 2 and ½ hours are keyed as 000250. Note: If hours are not worked on some days, you must key 000000 in the applicable fields; otherwise, the import will fail. Negative hours can be imported by including a negative sign (-) as one of the positions in the front of the number. Example: -1.5 hours are keyed as -00150. (6 positions)
21st thru 27th Columns: Comments (Optional) (110 positions): The comments for each day of the week. Leave blank if comments are not applicable.
Timesheet Import Process
This process allows you to load timesheet data that can then be imported to AdClock.
Select Production|Export/Import|Timesheet Import.
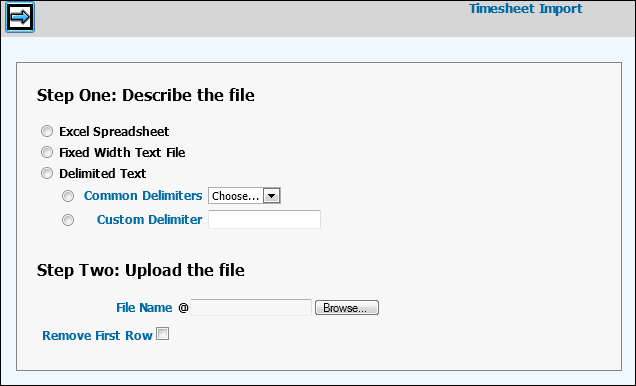
Select the type of file you want to import.
Excel Spreadsheet. (All cells must be Text Formatted Cells. Text Formatted Cells allow information to be displayed exactly as entered.)
Fixed Width Text File or .CSV file
Delimited Text (Select either Common Delimiters or Custom Delimiter)
Key the File Name you want to import or click <Browse> to display a list of files from which to choose.
Click the “Remove First Row” checkbox on the Prompt to ignore the first row of information during the upload process only if you have column headings in your file. The reason for this feature is that the first row in the file may include column headings which prevent the upload from processing until they are removed. By ignoring the first row, it eliminates the need for you to manually remove all column headings from your import file before you upload it.
Click the Next icon. The following message displays: "Importing and parsing file". Once loaded, the Timesheet Import Window displays all information that was included in the import file along with the number of rows that were loaded.
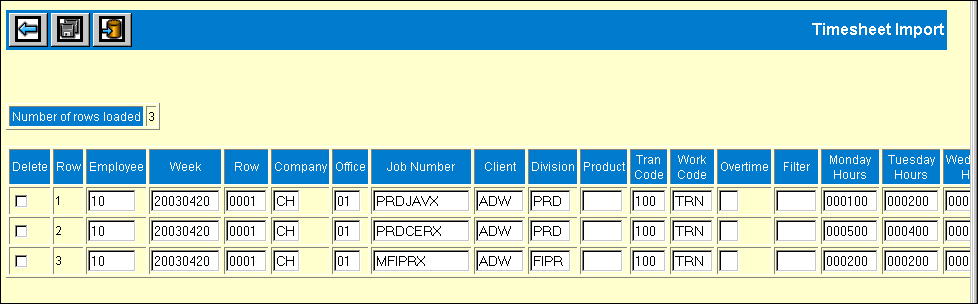
Timesheet Import Detail Window
Review information that was loaded. You may delete timesheet data that you know was loaded in error by clicking the Delete box located to the left of the employee that is in error. Also, you may correct any errors you see on this grid. Afterwards, click the Save icon.
Note: Corrections that are made on this grid do not change information that is stored in the spreadsheet used in the upload. Also, once this information is imported to AdClock, any further corrections must be made within the AdClock System. Timesheet data must never be imported more than once.
Click the Import icon to import timesheet data to AdClock and generate the Timesheet Import Verification Listing. To view the listing, click the Reports icon located on the icon bar at the top of your browser page. Example of Timesheet Import Verification Listing Without Errors. Example of Timesheet Import Verification Listing With Errors. If there were no errors in the import file, a "Successfully Imported" message displays.
If errors were encountered on any of the timesheets in the import file, an error message displays. The Timesheet Import Verification Listing can be used to identify errors in the import file.
Open AdClock. If errors were encountered on any of the timesheets in the import file, a list of rejected timesheets display.
Click <Timesheet Entry> to display the Open Time Sheet Window. This window displays the status of each timesheet that has been imported.
Select each timesheet, make corrections if applicable, then follow processing instructions found in the online Help for AdClock.
Reports
The Timesheet Import process generates a Timesheet Import Verification Listing. This listing identifies the data that was uploaded as well as lists any errors that were encountered during the import process. Use this listing to identify timesheet data that needs correcting.
Note: Errors must be corrected from within AdClock before timesheets can be approved for posting.