To enter or edit a voucher for an advance:
To reverse an advance, see Reverse Advance Entry.
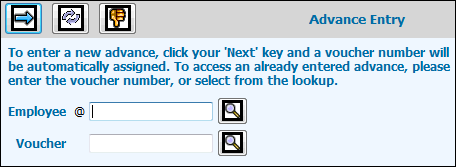
Select AdExpenseSM|Expense/Advance Entry&Inquiry|Advance Entry.
On the Advance Entry prompt window, the Employee field defaults to your employee code. To enter an advance voucher for another employee, key or select the code for that employee. You must have Alternate Employee authority for this employee in PRODUCTION.
Leave the Voucher field blank to create a new voucher using the next available voucher number. To edit an existing unsubmitted or rejected voucher, key the voucher number.
Click the Next icon ![]() to display the Advance Entry detail window.
to display the Advance Entry detail window.
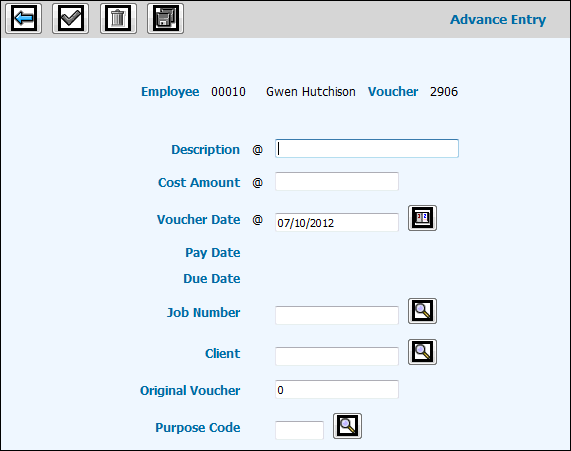
Key a Description for the advance.
Key the Cost Amount for the advance.
Accept the default of today's date, or key a different Voucher Date.
The Pay Date and Due Date are calculated based on settings in the Pay Date and Due Date Defaults for employee expenses in the Agency Profile.
To note a job for reference when applying this advance to an expense, key or select the Job Number.
To note a client on the advance for reference when applying this advance to an expense, key or select the Client code. If this field is left blank, the Client code is retrieved from the job specified above, if any.
If you are entering an advance with a negative amount to cancel a previously issued advance, key the Original Voucher number of the advance you are cancelling.
If applicable, key a Purpose Code to identify the reason for the expense on reports. Purpose codes are set up in the AdExpense Database.
Click the Save icon ![]() to save your entries.
to save your entries.
Click the Submit icon ![]() to submit the advance for approval. If the System Settings (AdExpense|Administration|System Settings)
do not display a check mark, manager approval is not required. When
the voucher is accepted by the posting process, an e-mail is sent
to you to advise you that the advance will be paid.
to submit the advance for approval. If the System Settings (AdExpense|Administration|System Settings)
do not display a check mark, manager approval is not required. When
the voucher is accepted by the posting process, an e-mail is sent
to you to advise you that the advance will be paid.
To delete an advance voucher,
follow steps 1 through 4, then click the Delete icon ![]() .
.