This option produces a report for all companies to which you are authorized with a single request. If you are only secured to one company, there is no need to make a company selection. If you have authority to multiple companies, your selection will produce a report for all of your authorized companies unless you click <Company> to limit the collection of information to only selected companies.
Also, the <Posting Company/Office> selection button allows you to select offices across companies in a single request.
Note: Whenever company consolidations are performed, the system checks the currency of each company and automatically converts amounts to the currency of the sign-on company. Any rounding differences are placed into the cross-company balancing report in your agency profile. Before currencies can be converted, the Exchange Rates Profile must be set up for each type of currency in the Central Data Base.
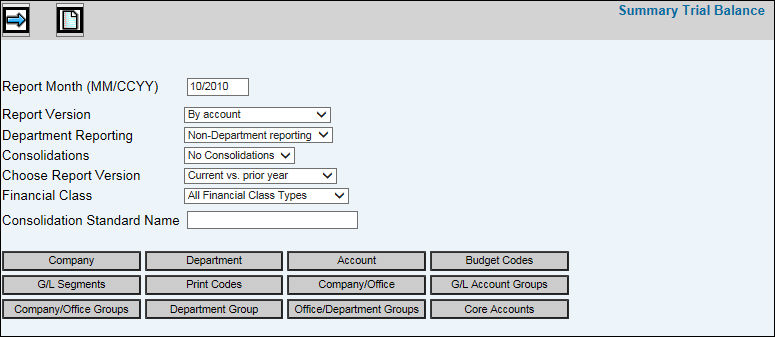
Select General Ledger|Reports|Summary Trial Balance.
Key the month of activity you want to include on the report in the Report Month field.
From the Report Version drop-down list, select by Account (prints the report in order of General Ledger account code) or by Optional Printing Codes (prints the report by print code schemes you select when clicking <Print Codes>). Optional printing codes are General Ledger print code schemes established in Data Base. Refer to the G/L Print Code Schemes Maintenance option for more information.
From the Department Reporting drop-down list, select one of the following report versions: Non-Department Reporting, By Account/Department, by Department/Account.
From the Consolidations drop-down list, select No Consolidations (does not consolidate by company or office). There will be a page break for each office within company. Select Consolidate Companies to report activity for all companies that you selected (by clicking <Company>) for consolidation. Select Consolidate Offices to report activity for all offices that you selected (by clicking <Office>) together. There will be no page break by office.
From the Choose Report Version drop-down list, select one of the following report versions: Prints current year data versus prior year data, Prints current year data versus budget data, Prints current year data versus prior year data versus budget data, Prints current year data versus two different budget's data. If budget selections are made, click <Budget Codes> and make selections from the displayed list.
Key the Consolidation Standard Name that you want to appear on the consolidated company report when consolidating by company or office.
To limit information that is collected, click any of the selection buttons and make selection(s) from the displayed list. Only information that is selected displays on the report. Click <GL Segments> to select a G/L Segment roll up summary or G/L Segment roll up summary with subtotals. Core Account Level Names/Segments are set up in the General Ledger Profile in the Production Data Base.
Click the Next icon ![]() to display the Printing
Selections Window.
to display the Printing
Selections Window.