Prepaid Expense Entry
This option allows you to enter expenses which you pay once (insurance,
auto leases, etc.) and then expense over a period of time as well as provide
for the automatic monthly journaling for items which do not get processed
through Accounts Payable. You can use this for all fixed assets if using
straight-line depreciation to automate that entire process.
In order to enter a prepaid expense, you must process a vendor invoice
in the Accounts Payable System and know the voucher number assigned to
the invoice. Also, the voucher must be processed through Process Vendor
Invoices as a house expense. Exception: Items which do not get processed
through A/P.
- Select General Ledger|Prepaid Expneses|Prepaid Expense Entry.
Prepaid
Expense Entry Prompt
- Key or select the voucher number assigned when the invoice for
this expense was entered in Accounts Payable. If you are keying a
journal entry which does not go through Accounts Payable, key your
own user-assigned voucher number. If you key a user-assigned number,
then you must click the Journal box so you can record an expense or
asset that did not arrive as a vendor invoice; this method is also
helpful when beginning this process new on the A|V system.
- From the Type drop-down list, select the type of prepaid expense.
Selections include:
- Prepaid Expense. Regular prepaid expense.
- Auto. Prepaid expense for an auto lease
- Fixed Asset. Prepaid expense for assets of a permanent or fixed
nature.
- Click in the Journal checkbox if the voucher number you keyed is
a user-assigned number and you are entering a journal for an item(s)
which does not get processed through Accounts Payable.
- If this prepaid expense is split between a portion for an auto
lease or a portion for a regular prepaid expense or fixed asset, key
the sequence number of the portion you are keying in the Sequence
Number field.
- Click the Next icon to display the Prepaid Expense Entry Window.
OR
- Click <Commit Entries> when you are finished entering prepaid
expenses to start distributing expenses based on the number of months
over which they are to be expensed. Do not commit entries that
are set up not to recur every month. Before committing entries, verify
entries by clicking the Print icon to print the Prepaid Definition
Verification Listing. Once you press <Commit Entries>, you may
no longer change the entries using this option. Instead, you must
use the Changes/Cancel Entries option.
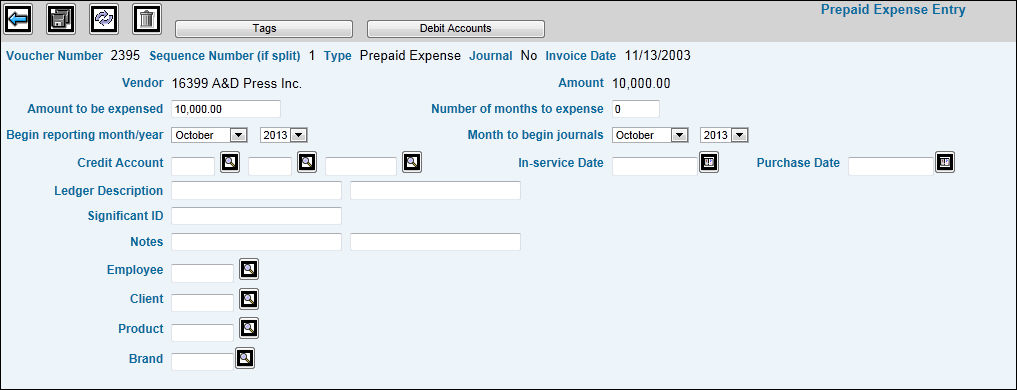
Prepaid
Expense Entry Window
- The Vendor defaults from the voucher number. If you keyed a user-defined
voucher number the Vendor field is blank. As a result, key the Vendor
associated with the expense.
- The Amount defaults from the amount of the voucher. If you keyed
a user-defined voucher number the Amount field is blank. As a result,
key the Amount of the expense.
- Key the amount you want to expense over a specified period of time
in the Amount to be Expensed field.
- Key the number of months over which to expense the amount keyed
in the Number of Months to Expense field.
- Key the month and year to begin expensing the amount keyed in the
Begin Reporting Month/Year fields.
- Key the month and year to begin recording journals in the Month
to Begin Journals fields.
- In the Credit Account fields, key the office, department (if company
is departmentalized), and G/L account code to credit for this expense
each month.
- If the prepaid expense is a fixed asset, key the date the asset
was placed in service in the In Service Date field.
- If the prepaid expense is a fixed asset, key the date the asset
was purchased in the Purchase Date field.
- Key up to two lines describing the journal entry to update the
General Ledger each time this expense is posted in the Ledger Description
fields.
- The Significant ID field is user-defined and may be used for such
things as a policy number for insurance, auto registration number
for auto leases, or asset tag number for PCs, etc.
- Key up to two lines of notes in the Notes fields which appear on
the reports but do not appear on the ledger.
- If this is an expense for an employee auto, key the employee code
in the Employee field. If left blank, the expense is assigned to the
motor pool (company fleet). If you key an employee code, the expense
prints on the employee’s expense report.
- If this expense is incurred on the client’s behalf, key the client
code in the Client field. This expense is posted to the client’s account
in Cost Accounting.
- If this expense is incurred on a specific Level2/Level3, key the
Level2 and if applicable the Level3 code.
- Click <Tags> to display a window where you key the identification
Tag number of the asset as well as the physical location of the asset.
Click the Add icon to add more rows for entry of additional debits.
Click the Save icon when finished.
Tags Window
- Click <Debit Accounts> to display a window where you can
key reversing debit entries based on the account in which the expense
was initially credited. Specify the Account and Amount you want debited
as well as the Office and Department to which accounts and amounts
will be posted. Click the Add icon to add more rows for entry of additional
debits. Click the Save icon when finished.
Debit
Account Window
- Click the Delete icon on the Expense Entry window to delete a non-committed
entry. Non-committed entries are entries not set up to recur every
month, such as a lease payment. Click <OK> on the confirm
prompt to delete the entry.