Select Export/Import|Journal Entry Import.
Select one of the following file formats:
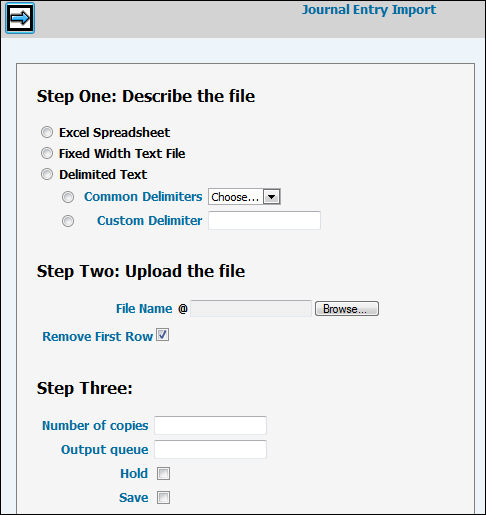
Excel Spreadsheet. (All cells must be Text Formatted Cells. Text Formatted Cells allow information to be displayed exactly as entered.)
Fixed Width Text File or .CSV file
Delimited Text (Select either Common Delimiters or Custom Delimiter)
Key the File Name you want to import or click <Browse> to display a list of files from which to choose.
Click the “Remove First Row” checkbox on the Prompt to remove the first row of information during the upload process only if you have column headings in your file. The reason for this feature is that the first row in the file may include column headings which prevent the upload from processing until they are removed. An Error will occur if you do not remove the first row. By removing the first row, it eliminates the need for you to manually remove all column headings from your import file before you upload it.
Click the Next icon to load the file and display journal entry information. If errors in the spreadsheet file are found, errors messages display at the top of the window. Correct errors on the spreadsheet then click the Next icon again to load the file and display journal entry information.
Note: Depending on how your company is installed, an error message displays ("Import cannot cross Company/Offices") if there is more than one company in the import file. Solution: Remove all but one company from the file or change the file into multiple files and re-import each.
The file layout contains the following columns of information. Columns are in the following order and must not include column headings. Decimals are implied; therefore, if you key 3400 in an amount field, the last two digits are considered the numbers that are placed to the right of the implied decimal. Note: Columns that do not include information will be filled in with blanks.
Column 1: Company (2 positions)
Column 2: Office (2 positions)
Column 3: Journal Number (8 positions) If the Journal Entry number is left blank, the system will automatically assign the next available number using the same function (<Assign Next Number>) found in the Enter Standard Journals option located in the Journal Entry folder.
Column 4: Journal Date (8 positions CCYYMMDD Format)
Column 5: G/L Account (8 positions)
Column 6: Department (2 positions)
Column 7: Period (6 positions CCYYMM format)
Column 8: Amount (15 positions, decimals are implied) Note: Negatives are not allowed.
Column 9: Debit or Credit (1 positions) Note: To indicate a Reversing Debit, replace the “D” with a “3” in the D/C field on the displayed grid. To indicate a Reversing Credit, replace the “C” with a “4” in the D/C field on the displayed grid.
Column 10: Reference Number (12 positions)
Column 11: Description (30 positions)
Column 12: Description (30 positions)
Column 13: Client (5 positions)
Column 14: Division (4 positions)
Column 15: Product (4 positions)
Column 16: Employee Code (5 positions)
Column 17: System Code (2 positions)
Column 18: Media Type Code (2 positions)
Column 19: Bank Code (4 positions)
Column 20: Job Number (12 positions)
Column 21: Contra Account (8 positions)
Column 22: Tran Code (3 positions) Note: Tran Code requires Work Code.
Column 23: Work Code (3 positions) Note: Work Code requires Tran Code.
Column 24: Corridor Code (4 positions)
Column 25 Vendor Code (10 positions)
Column 26 Voucher Number (8 positions)
Verify information in the import file. Make changes as appropriate on the grid.
When finished, click the Import icon to import journal entries into AdVault Financials. An Edit Listing is generated listing all rows of information on the grid.
Note: If an import is already in progress, an error message displays. You must wait until this import is finished processing before you can import the file.
Once the file is imported, you may maintain journals Enter Standard Journals and post journals through the Post Standard Journals option in the General Ledger Enter Standard Journals folder.