Note: You must perform the steps on this menu in reverse order when you are initially establishing your chart of accounts (i.e.; perform Maintain Ledger Profile Parameters first, Maintain Ledger Core Account Level Names second, Maintain Master Ledger Profile third, then Authorize Accounts to Offices/Departments last). After the initial setup, you should only need Authorize Accounts to Offices/Departments and Maintain Master Ledger Profile on the menu.
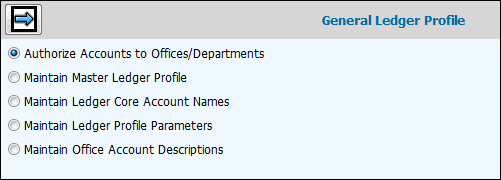
Select Financials|Data Base Maintenance|General Ledger Profile.
Select one of the following highlighted options:
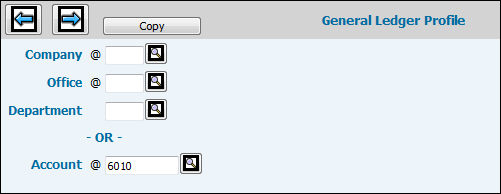
Authorize Accounts to Offices/Departments:
If this is the initial setup of your Chart of Accounts, you must first complete Maintain Ledger Profile Parameters and Maintain Ledger Core Account Level Names, respectively. Then establish your chart of accounts through Maintain Master Ledger Profile. Once the accounts are established, use this option to specify a company/office/department and authorize accounts to only the specified company/office/department or you can specify an account and authorize this account to multiple companies/offices at one time.
Click <Copy> to display the Copy Account Authorizations Window that allows you to copy company/office account authorization from one company/office to another. When finished, click Next to return to the Prompt Window.
If you did not use the Copy feature, key the Company code for which you want to authorize General Ledger accounts. If you want to specify an account and authorize this account to multiple companies/offices at one time, then leave this field blank.
Key the Office code for which you want to authorize General Ledger accounts. If you want to specify an account and authorize this account to multiple companies/offices at one time, then leave this field blank.
If your company is departmentalized, key the Department code for which you want to authorize General Ledger accounts. If you want to specify an account and authorize this account to multiple companies/offices at one time, then leave this field blank.
Key an account in the Account field to authorize a specified account to multiple companies/offices/departments. Leave the Company/Office/Department fields blank.
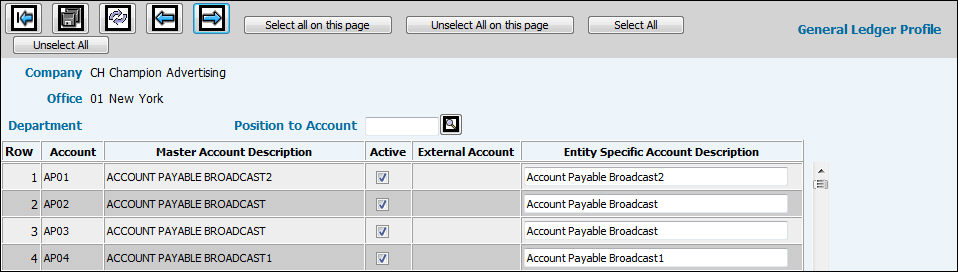
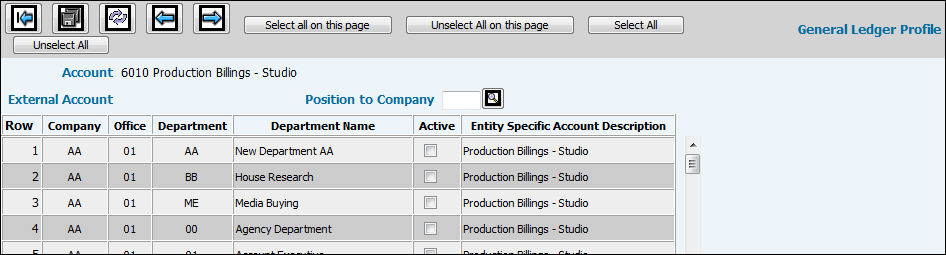
Click Next to display the Account Authorization Window. This window changes depending on your selections on the Prompt. If you keyed a company/office/department, then the window displays all accounts established through Maintain Master Ledger Profile. If you just keyed an account, then the window displays a list of all companies/offices and if applicable departments to which you can assign the specified account. No more than five companies of data display at one time for faster retrieval of information.
Authorize Company/Office/Departments to Accounts Window
Authorize Account to Companies/Offices/Departments Window
Tip: To quickly find information, press CTL+F to display a search window. Key the word/number on which you want to search in the ”Find What” field then click <Find Next>. Continue clicking <Find Next> until you find the applicable information. There is also a Match Whole Word and Match Case feature. Just click the applicable radio button. To go backwards or forward in the list, click the Up/Down radio button.
For authorizing companies/offices/departments to accounts, scroll down the list of accounts and click in the Active box for each account you want to be valid for the specified company/office/ department or click the Select All icon to make all accounts active. If you do not want to include an account for this company/office/department, leave the Active box blank.
For authorizing an account to companies/offices/departments, scroll down the list of displayed companies/offices and click the Active box in the row next to the company/office in which you want to authorize the specified account. To position the page to a particular company, key the company code in the Position to Company field and click the Recalculate icon. The page begins with the company you key. To authorize the account to the first five companies that display, click <Select All On This Page>. If you want to authorize the account to all companies/offices without having to display them, click <Select All>. To display the next five companies, click the Next icon.
The Entity Specific Account Description may be changed at a Company/Office level only and only if the account is a subaccount. To open the Description field, click the Active box then click the Save icon.
When you are finished marking all valid accounts, click Save.
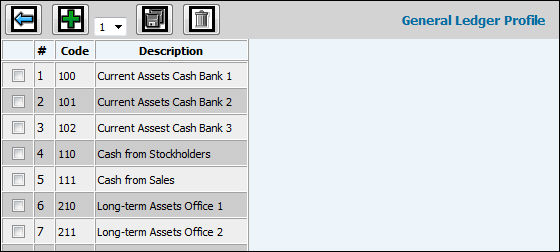
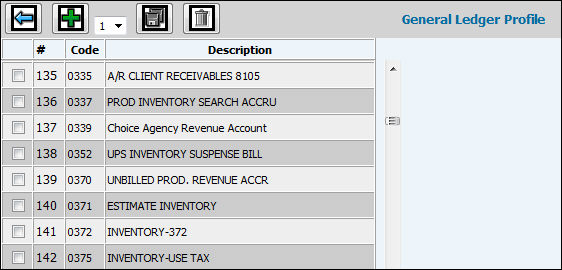
Maintain Master Ledger Profile
If this is the initial setup of your Chart of Accounts, you must first complete Maintain Ledger Profile Parameters and Maintain Ledger Core Account Level Names respectively. This option allows you to define your General Ledger Chart of Accounts. Once the accounts are established, you may then perform Authorize Accounts To Offices/Departments and select the accounts to be used by each company/office or company/office/department.
PLEASE NOTE the new field on the window where you can pick a subsidiary type for an account, if it is a subsidiary account. In future months, we will be providing you more targeted lookups for G/L account numbers based on how you make your selections here. For example, in Accounts Payable in the future, any report or window that provides an Account will limit selections to A/P accounts. This will save you time needed to scroll through or search for specific accounts.
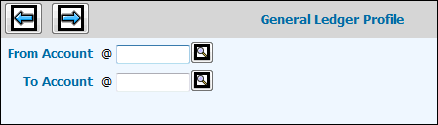
Maintain Master Ledger Profile Prompt
Click <Copy> to display the From/To Window that allows you to copy information from a preexisting account to a new account. When finished, click Next to return to the Prompt Window.
Maintain Master Ledger Profile Copy Window
If you do not want to copy information from another account, key the Account code you want to establish or maintain then click Next.
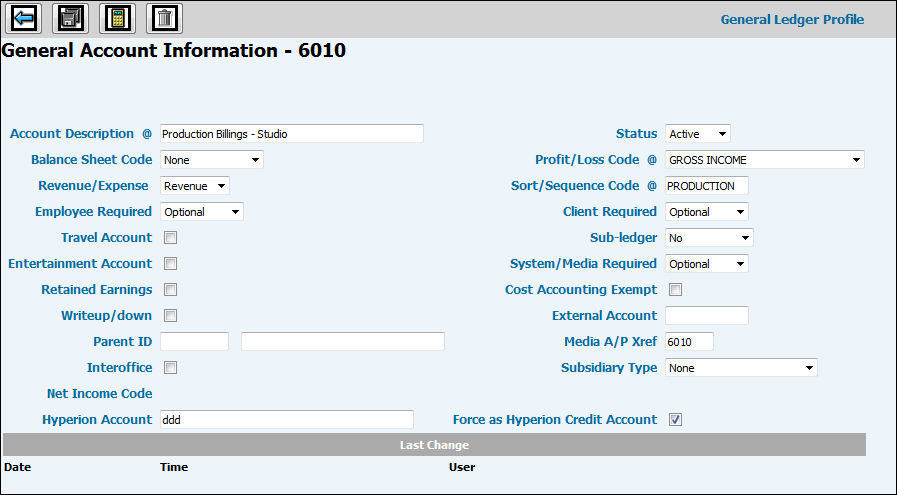
Maintain Master Ledger Profile Entry Window
If you keyed an existing account code, the fields on this window display the existing values for the account. If you keyed a new account code, and did not elect to copy field values from an existing account, the fields on this window are blank.
Key the description of the account.
From the Status drop-down list, select Active to activate the account or select Inactive to inactivate the account.
If this is a Balance Sheet account, select the applicable code from the Balance Sheet Code drop-down list.
If this is a Profit and Loss account, select the applicable code from the Profit/Loss Code drop-down list.
From the Revenue/Expense drop down list, select Revenue if the account generates revenue or select Expense if the account creates expense.
In the Sort Sequence field, key the code that represents the sequence in which you want the account sorted.
From the Employee Required drop-down list, select Yes if the employee number is required when making journal entries to this account. This field is important for employee expense tracking. Select Not Allowed if an employee number is not allowed for entries to this account. Select Optional to accept either a blank or filled employee number field.
From the Client Required drop-down list, select Yes if a client code is required for journal entries to this account or select Not Allowed, if a client code is not allowed for entries to this account. Select Optional to accept either a blank or filled client code field.
Click in the Travel Account box to indicate the account is a travel account that is included on travel and entertainment reports. Leave this box blank if this is not a Travel Account.
From the Sub Ledger drop-down list, select one of the following:
No. Manual journal entries may be made to the account. Note: Make sure the Retained Earnings box is not checked.
Yes. This is a subledger account. Manual journals are not allowed.
WIP Account. Journals may be made to this type of account but they require a job/tran/work code for journal entries.
A/R Account. Journals may be made to this type of account.
A/P Account. Journals may be made to this type of account.
Click in the Entertainment Account box to indicate the account is an entertainment account that is included on travel and entertainment reports. Leave this box blank if this is not an Entertainment Account.
From the System/Media Required drop-down list, select Yes if a System/Media code is required for journal entries to this account or select Not Allowed, if a System/Media code is not allowed for entries to this account. Select Optional to accept either a blank or filled System/Media code field.
Click the Retained Earnings box to indicate that this account is your Retained Earnings account. Leave this box blank if this is not your Retained Earnings account.
Click in the Cost Accounting Exempt box if you want an operating expense or revenue to be part of overhead rather than being considered direct items.
Click in the Writeup/Writedown box if you use write up/down accounts, and you wish the Cost Accounting reports to reflect figures exactly as shown in the General Ledger.
In the External Account field, key the external SAP account you want associated with the specified G/L account.
If reporting to a parent company, key the Parent ID number. This allows for your own internal Chart of Accounts while still satisfying your parent company’s reporting requirements. If this is the first time you are using this parent company, key the description to print on the parent’s report. If there are entries you need to make to your local books that should not appear on the parent reports, leave this field blank.
In the Media A/P Xref field, key the media account number that you want cross-referenced to the specified account number.
Click the Interoffice box to allow interoffice use of the specified account number.
From the Subsidiary Type drop-down list, select the applicable source for which you want subsidiary detail: None, Cash, A/P, A/R, WIP, Fixed Assets, A/R & A/P (Intercompany), Payables Pending.
A Net Income Code is a display only field and will show an ”R” when the account is marked as a ”rollover to retained” account. This designation would normally happen at the point of implementation. However, for our existing customers, if you want multiple accounts besides the Net Income account to rollover into the retained earnings account when closing a year, please send a note to Client Support via eHelp or to your Account Manager and we will change the designation for you. This type of account is rolled into the main retained earnings account when the fiscal year is closed through the DBLOCK menu.
Key the Hyperion Account (for corporate consolidation reporting) that is cross referenced to the specified G/L Account and if you want to force the account to be a credit account, click in the Force as Hyperion Credit Account checkbox.
To delete an account, you must first unauthorize the account using the Authorize Accounts to Offices/Departments option. Afterwards, click the Delete icon to delete the account.
Maintain Ledger Core Account Level Names
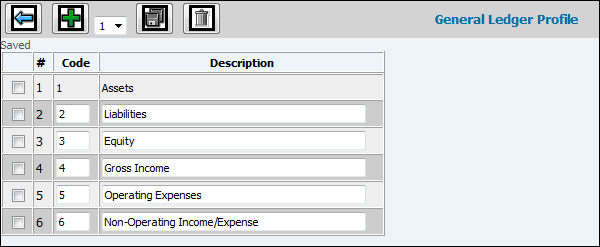
This option allows you to define level names for up to four of the first characters in your General Ledger accounts. For example, you may specify that your asset accounts begin with the character A; current assets begin with the characters AC; long-term assets begin with the characters AL, etc. You may then define further by using the next two characters also. Note: If this is the initial setup of your Chart of Accounts, you must first complete the Maintain Ledger Profile Parameters option to specify core account-level name requirements and mandatory edits for each level.
Maintain Ledger Core Account Level Names Window
Select the level of segments you want to define for your chart of accounts.
Click Next to display the window based upon your selection.
Click Add to add as many lines as needed to set up you G/L segments.
Key the Codes to define the first number in your chart of account.
Key names for the codes in the Description field.
To delete a code, click in the box to the left of each row then click Delete.
When finished, click Save.
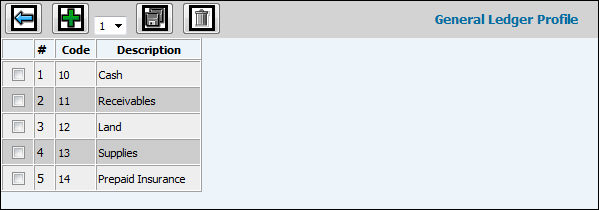
Click Add to add as many lines as needed to set up you G/L segments.
Key the Codes to define as the first two numbers in your chart of account.
Key names for the codes in the Description field.
To delete a code, click in the box to the left of each row then click Delete.
When finished, click Save.
Click Add to add as many lines as needed to set up you G/L segments.
Key the Codes to define as the first three numbers in your chart of account
Key names for the codes in the Description field.
To delete a code, click in the box to the left of each row then click Delete.
When finished, click Save.
Click Add to add as many lines as needed to set up you G/L segments.
Key the Codes to define as the first four numbers in your chart of account
Key names for the codes in the Description field.
To delete a code, click in the box to the left of each row then click Delete.
When finished, click Save.
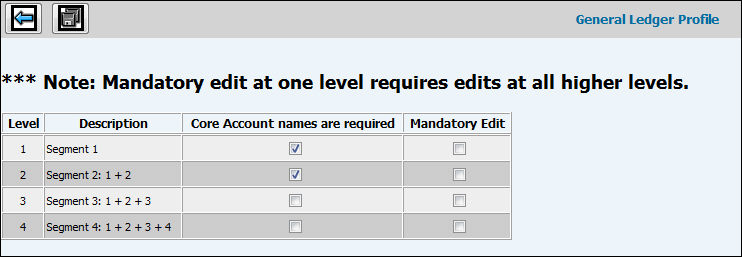
Maintain Ledger Profile Parameters
This option allows you to specify how you want to define your chart of accounts. You indicate if you want to require core account-level names for each of the four available levels of control. You also indicate if an edit is mandatory for each level. If an edit is required at one level, it is also required at all higher core levels. By specifying that an edit is required on a level, you prohibit users from setting up accounts beginning with a code or codes not established for that level.
Maintain Ledger Profile Parameters Window
Click in the Core Account Level Names Are Required box if you want to require a Core Account-Level Name be entered when setting up codes for each of the available levels. Otherwise, leave this box blank.
Click in the Mandatory Edit box if you want a Mandatory Edit on each of the levels. Otherwise, leave this box blank. If you specify that an edit is mandatory on a level, a user is prohibited from setting up an account beginning with a code or codes not yet established for that level.
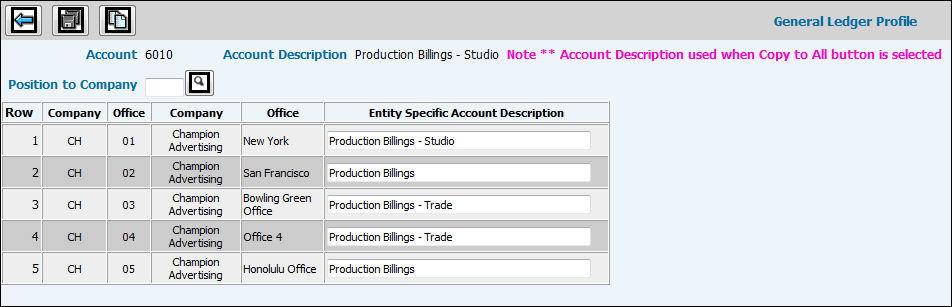
Maintain Office Account Descriptions
This option allows you to maintain G/L account descriptions at a Company/Office level. This means that you can set up different account descriptions for a specified account for designated company/offices. This option also allows you to return all company/office account descriptions back to the “Master” account description using a “Copy to All” feature.
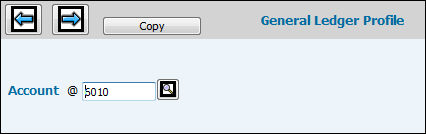
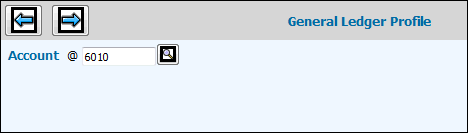
Maintain Office Account Descriptions Prompt
Key/Select the account for which you want to maintain account descriptions.
Click the Next icon to display the Maintenance window.
To change an account description, clear the applicable account description from the “Entity Specific Account Description” field then key the new description.
To return all company/office account descriptions back to the “Master” account description, click the “Copy to All” icon. The “Master” description displays in the Account Description field located at the top of the screen.
Click the Save icon when finished maintaining account descriptions.