Select Accounts Receivable|Sales Register Reports|Cumulative Reports.
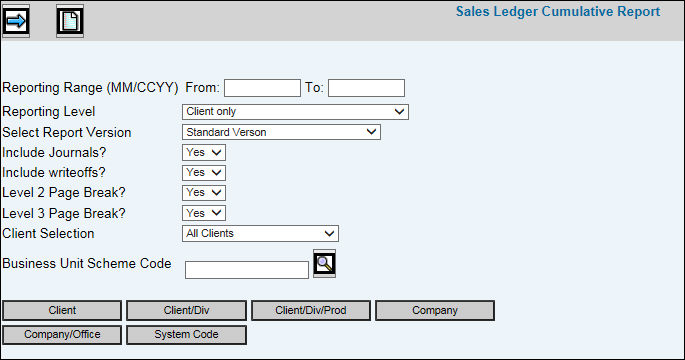
Key the Reporting Range in which you want to collect information.
Select the Reporting Level from the drop-down list. If you select a Business Unit/Scheme, you can then select only those clients within the Business Unit/Scheme on which you want to report. Select the Business Unit Reporting Level then click <Client Schemes> and select the applicable client schemes from the displayed list. If you want to report on certain clients within the selected scheme, click <Client> and select only the client(s) on which you want to report.
From the Select Report Version drop-down list, select Standard Version or select Show Purchase Journal Adjustments if you have activated the Purchase Journal feature and want to include Purchase Journals on the report. The Purchase Journal feature performs additional journals to revenue and expense account when certain out-of-pocket expenses are billed. The Purchase Journal Adjustments report has additional columns of information that show the standard results followed by adjustments to revenue and cost caused by the purchase journals.
Accept the default of Yes to include journal entries that affect revenue; otherwise, select No from the Include Journals drop-down list.
Accept the default of Yes to include write-offs; otherwise, select No from the Include Writeoffs drop-down list. Writeoffs are included in the COST column only.
Accept the default of Yes to page break the report at a client/division level; otherwise, select No from the Level 2 Page Break drop-down list.
Accept the default of Yes to page break the report at a client/division/product level; otherwise, select No from the Level 3 Page Break drop-down list.
From the Client Selection drop-down list, select All Clients, Intercompany Clients Only, or Exclude Intercompany. Information is collected for only the selected type.
To further limit information that is collected, click any of the applicable buttons and select items from a displayed list.
Click the Next icon ![]() to advance
to the Printing
Selections Window.
to advance
to the Printing
Selections Window.