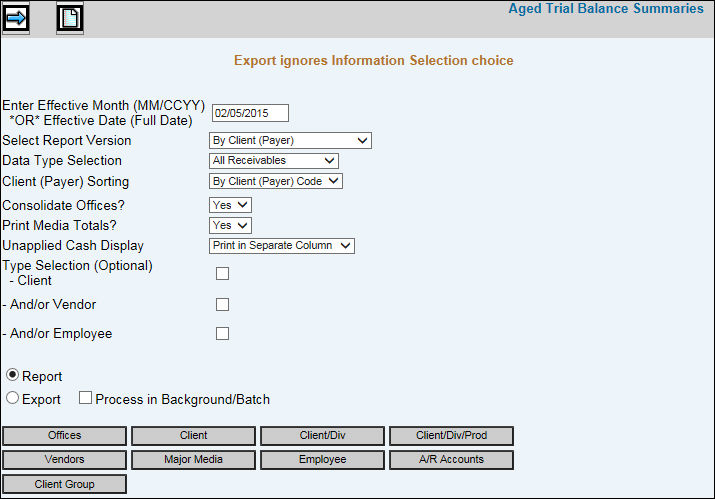
Select Accounts Receivable|Reports|Aged Trial Balance Summaries.
If you want to show each age group as a ”number of months past due,” key the month and year (MM/CCYY) you want to be reported in the Current column or if you want to show each age group as a ”number of days past due,” key the full date (MM/DD/CCYY) to age on day and year you want to be reported in the Current column. If you want a report of items billed through a certain past date, key that date in this field. This allows the system to ignore any billing performed after that date.
From the Select Report Version drop-down list, select the type of summary report you wish to print. You may only select one version. Versions include By Payer (Client/Vendor/Employee), By Ledger Account, By Account Manager (Executive), By Executive Manager, By Billing Clerk, and by Billing Type (Media Code).
From the Data Type Selection drop-down list, select All Receivables (Include all receivable accounts), Exclude Intercompany (Include all receivable accounts except intercompany accounts), or Intercompany Only (Include only intercompany receivables).
From the Client (Payer) Sort area, click to sort By Client (Payer) Code or By Client Sort Name order.
From the Aging Selection area, indicate the maximum number of days past due (or months past due) you want to appear on the report. 120+ days shows five age groups from current to ”more than 120 days old” (or ”more than 4 months old” if you entered an effective month). 180+ days shows shows seven age groups from current to ”more than 180 days old” (or ”more than 6 months old” if you entered an effective month). This setting is only possible if you are using a dot matrix printer.
From the Information Selection area, select to show the client’s phone number and the manager assigned or select to print only a single line per amount (this option saves the amount of paper that is used).
From the Period Selection drop-down list, select the receivable balance to come from either the current open status or print the summary version of the ATB from the history file.
From the Consolidate Offices area, click Yes to consolidate offices so that clients used across offices can be viewed all together. Click No to report offices individually.
From the Print Media Totals area, click Yes to print receivable amount totals by media type on the report; otherwise, click No. This field only applies if you selected to report at the client master level.
To print unapplied cash in a separate column, select Print in Separate Column from the Unapplied Cash Display drop-down list; otherwise select Include in Aging Column
Select the types of receivables you want to include. Click Client Receivables and/or Employee Receivables, and/or Vendor receivables.
To display the Printing Selections Window, click the Report button.
To export the report to a spreadsheet format, click the Export button.
To continue to work in another option or even log off while the information is being processed, click in the "Process in Background/Batch checkbox. This feature works with the Export function so make sure you click both the Export radio button as well as the "Process in Background/Batch" checkbox to process requested information in the background.
To limit information that displays in the collection, click the Selection buttons and select items from the list. Displayed lists show only clients assigned to you in User/Client Window Security. The <A/R Accounts> selection button only shows accounts that are set up as A/R accounts in the Chart of Accounts Definition Subsidiary Type.
Click the Next icon. If you selected Report, the Printing Selections Window displays. If you selected Export, the Columns to Include on Listing window displays. Select only the information you wish to include on the report then click the Next icon again to display the Processing Window.
You may click <Cancel> to cancel your request or if the report is large, you can take advantage of the <Send to Background> function which processes the request in the background so you can continue to work in other options. This function is also available on the Prompt as described above. As always, if you process in the background and your report is under 2MB in size, you will receive your report as an attachment in an email after processing is completed. If your report is over 2MB in size, your email will contain a link that will open a download window where you can save the file to a spreadsheet format.
If you do not click <Cancel> or <Process in Background>, your report is output to the browser where you will see Filter, Page Number, and Max Rows functions. Click the Next Page (down) arrow to display the next page of information on the report. Click the Previous (up) arrow to return to the previous page of information. Key a Max Row to limit the amount of rows that display on a page to the specified number. To filter information, key a valid filter in any of the blank fields located below the applicable column heading and press <Enter>. Only values that match the specified filters are displayed. When filters are applied, page numbers are no longer displayed; however, you can continue to use the Next Page feature to advance to the next page of filtered information on the report. To remove all filters, click <Clear Filters> or you may remove filters separately by highlighting a filter and clicking <Delete>. Note: Total rows are not recalculated when filtering.
Click <Export to Spreadsheet> to export your report to a spreadsheet format or click the Print icon to generate a PDF of your report. If filters are used, only the information that is filtered displays on the spreadsheet or PDF.
Note: PDF processing limits the number of rows that display on the PDF to 3,000. If you receive the message “3000 row limit reached”, use the new filter function to limit the amount of information that is collected.