The Logo Administration option and the Report Setup option in the Central Data Base are used to set up your letterhead logo and define the font face, font size, font weight, and font style for report headers, footers, and body.
Select Accounts Receivable|Database|Maintain A/R Statement Format.
Maintain A/R Statement Format Prompt
Accept the default or key the Company/Office for which you are setting up Client Statements. To set up Client Statements at a Client/Product/Brand level, key applicable codes in the Client/Product/Brand fields; otherwise, leave these fields blank.
Click the Next icon to display the Maintain A/R Statement Defaults Window.
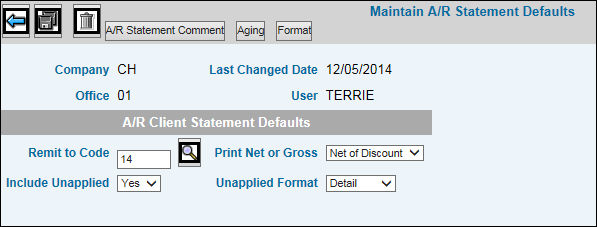
Maintain A/R Statements Defaults Window
Key the Remit to Code defined in the Central Data Base (non-browser) that contains the remittance address that should appear at the top of the statement.
From the print Net or Gross drop-down list, select Net of Discount or Gross.
From the Include Unapplied drop-down, select Yes to include unapplied cash; otherwise, select No.
If you selected to include unapplied cash, then from the Unapplied Format drop-down list, click Detail to print the check number, deposit date and amount for each check. Click Summary, to print one total line for all unapplied transactions. Also, an aging selection has been added. If you selected to Include Unapplied, then unapplied transactions print in Aging boxes located at the bottom of the statement.
From the Include All Activity drop-down list, select Yes to print all activity on monthly statements or select No to only print unpaid invoices.
Click <A/R Statement Comment> to display the A/R Statement Comment Window.
Maintain A/R Statement Comments Window
Key comments you want printed at the top of the statements for this company/office.
When finished, click the Back icon to return to the Maintain A/R Statement Defaults Window.
Click <Aging> to display the A/R Statement Aging Formats Window to set up aging detail.
Maintain A/R Statement Aging Window
From the Aging Method drop-down list, select to age by Invoice Date, Due Date, or By Period.
To print aging detail on the bottom of the statements, select Yes from the Print Aging at Bottom drop-down list.
Key the range of days in each period used in the aging process if Aging Method is set by Invoice Date or Due Date, or key the range of periods (months) if Aging Method is set By Period. All periods are optional. The From number cannot be greater than the To number, and subsequent periods cannot be less than any previous periods. The following is a further explanation of how to key these periods based on your response to the Receivables Aging Method field.
By Invoice Date. All periods should be input as days. Invoices are aged based on the difference between the invoice date and the report requested date.
By Due Date. Period 1 must be blank for this setting. It is assumed to be current and includes all invoices with a due date that is equal to or beyond the request date for the aging report. Period 2 From days must be 1. Period 2 through 5 define the number of days the due date is past the request date.
By Period. This method uses the invoice month/year to age. Key the number of periods, not days, for each of the periods. Period 1 From field must be 1.
Key the Column Heading you want used for each aging period. This is normally a period number.
When finished, click the Back icon to return to the Maintain A/R Statement Defaults Window.
Click <Format> to display the A/R Statement Row and Column Defaults Window where you specify how rows and columns of information set up.
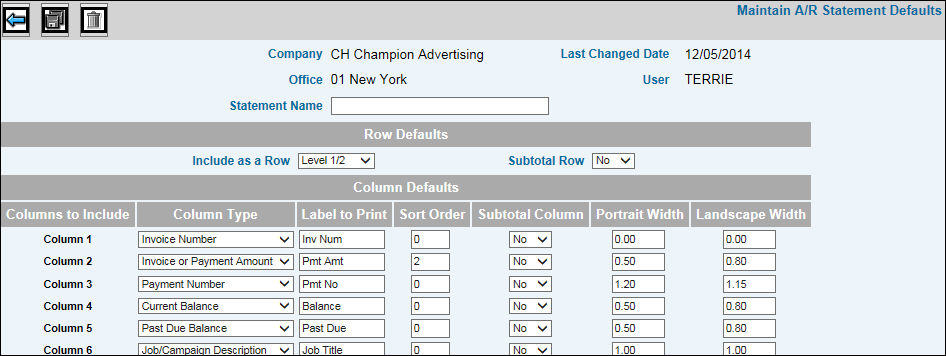
Maintain A/R Statement Format Window
Key the Client Statement Name that you want to appear on A/R statements.
From the Include as a Row drop-down list, select whether you want to include Client/Product/Brand as a row on the statements.
If you want to subtotal rows, select Yes from the Subtotal Row drop-down list.
Select all the columns you want to include on statements from the Column Type drop-down list.
Key the label you want printed on statements in the Label to Print field and the order in which you want information to sort in the Sort Order field. Error messages display if you key a sort order or select to subtotal a column that is not allowed.
Key the portrait widths for all selected columns. The total of all widths cannot exceed 8 inches.
Key the landscape width for all selected columns. The total of all widths cannot exceed 10.5 inches.
Click the Save icon when finished.