Note: If client/division or job charges need to be tracked separately, then separate vendor charge entry vouchers need to be processed for a vendor invoice.
Select Accounts Payable|Reports|Disbursement Report.
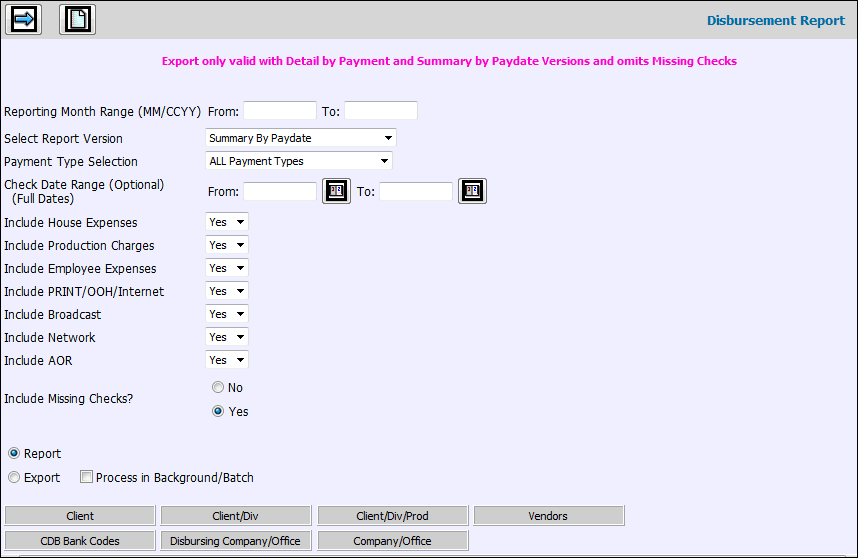
Key the Reporting Month Range in the From/To fields that allows you to collect information across multiple accounting periods . If you key a date range in the Check Date Range fields, this range must be within the Reporting Month Range you specify here.
Select the Report Version from the drop-down list. Selections include:
Detail by Payment Number. This is the traditional cash disbursement backup. Any checks not accounted for between the first check and last check of the month are reported. This report can be exported to a spreadsheet format.
Summary by Pay Date. This type of register gives you a confirmation of your daily cash outlays in summary. This report can be exported to a spreadsheet format.
Detail by Supplier. This type of register allows you to analyze unusually high outlays to suppliers.
By Ledger Document. This type of register allows you to print the complete detail backup for any summary line on your ledger related to check payments.
By A/P Account and G/L Document Number. This type of register shows the total for each document in the Check Amount column. The amount that updated the G/L is displayed in the G/L amount column. If amounts in these two columns do not match, the word ERROR displays. An ERROR may indicate that processing/posting did not occur correctly due to a system or hardware fault. This report also serves as a source to help construct supporting documentation for proof of balance between A/P account amounts and amounts that updated the G/L as they relate to disbursements. This version can be used in conjunction with the Posted Charges Report.
By Posting Company/Office and Bank. This report version gives you a listing of paid check detail by Posting Company/Office in Bank Code order then in check/payment number order. The Status (Sts) column shows the open (O) or cleared (C) status of the payment as well as the Void (V) status, if the payment was voided. The G/L Document number is also displayed for reference and identification. Totals display for each bank code with a total for each Posting Company/Office. This version is faster to run in any auditing process than reprinting audit trail reports by Document Number.
From the Payment Type Selection area, select the type by clicking the applicable payment type radio button. Selections include: All Payment Types, Checks Only, Wire Transfers Only, EPay Only (ACH), PCard Only-ALL, PCard Only Reconciled Only, PCard Only- Unreconciled Only. ( Payment information is only collected for the payment type you selected. Totals at the bottom of all reports identify the type of payment and show how much was paid by check, wire transfer, and by electronic payment.
Note: Electronic payment information is only collected for companies who use Piracle software (specializing in laser check printing) and who have been authorized to pay by electronic payment. Authorization is set up in the Common Vendor option in the Central Data Base by clicking the Pay by Electronic Payment (ACH) box.
Note: For companies who use US Bank to process vendor payments, an interface allows vendors to be paid through a credit card file transfer instead of through receipt of a printed check. Authorization is set up in the Common Vendor option in the Central Data Base by clicking the Pay by PCard File box.
To limit the amount of information that is collected by House Expenses, Production Charges, Employee Expenses, Print/OOH/Internet, Broadcast, Network, and AOR, select Yes from the drop-down list; otherwise, select No to exclude a type.
Key the from and to dates indicating the range of dates you want to include in the Check Date Range From/To fields. If you leave these fields blank, all checks for the month you specified are printed on the report. Note: This range must be within the month you specified in the Reporting Month field.
In the Include Missing Checks area, click No if you do not want to print missing checks on the Check Register; otherwise, click Yes. One check is lost in every check run which creates unused checks. Most agencies use these checks when they need to issue a manual payment within that month. Any checks not used in that month should be marked as unprocessed using the APVOID Menu to ensure the check is accounted for and has been canceled. Do not use these checks in another month because the system considers any check numbers between that particular check number and the first check number actually processed in the next month as missing. Note: When including missing checks, you must select either a <CDB Bank Code> or <Disbursing Company/Office>. If selections are not made, an error message displays. Note: Missing checks are not included when exporting to a spreadsheet format.
Click Report if you do not want to export your report to a spreadsheet format then click the Next icon to display the Printing Selections Window.
To export information to a spreadsheet format, click the Export button.
To continue to work in another option or even log off while the information is being processed, click in the "Process in Background/Batch checkbox. This feature works with the Export function so make sure you click both the Export radio button as well as the "Process in Background/Batch" checkbox to process requested information in the background.
To limit information that is collected, click any of the selection buttons and make selections from the displayed list.
Click the Next icon to display all of the possible columns of information. Select only the information you wish to include on the report then click the Next icon again to display the Processing Window.
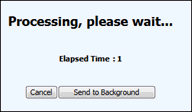
You may click <Cancel> to cancel your request or if the report is large, you can take advantage of the <Send to Background> function which processes the request in the background so you can continue to work in other options. This function is also available on the Prompt as described above. As always, if you process in the background and your report is under 2MB in size, you will receive your report as an attachment in an email after processing is completed. If your report is over 2MB in size, your email will contain a link that will open a download window where you can save the file to a spreadsheet format.
If you do not click <Cancel> or <Process in Background>, your report is output to the browser where you will see Filter, Page Number, and Max Rows functions. Click the Next Page (down) arrow to display the next page of information on the report. Click the Previous (up) arrow to return to the previous page of information. Key a Max Row to limit the amount of rows that display on a page to the specified number. To filter information, key a valid filter in any of the blank fields located below the applicable column heading and press <Enter>. Only values that match the specified filters are displayed. When filters are applied, page numbers are no longer displayed; however, you can continue to use the Next Page feature to advance to the next page of filtered information on the report. To remove all filters, click <Clear Filters> or you may remove filters separately by highlighting a filter and clicking <Delete>. Note: Total rows are not recalculated when filtering.
Click <Export to Spreadsheet> to export your report to a spreadsheet format or click the Print icon to generate a PDF of your report. If filters are used, only the information that is filtered displays on the spreadsheet or PDF.
Note: PDF processing limits the number of rows that display on the PDF to 3,000. If you receive the message “3000 row limit reached”, use the new filter function to limit the amount of information that is collected.