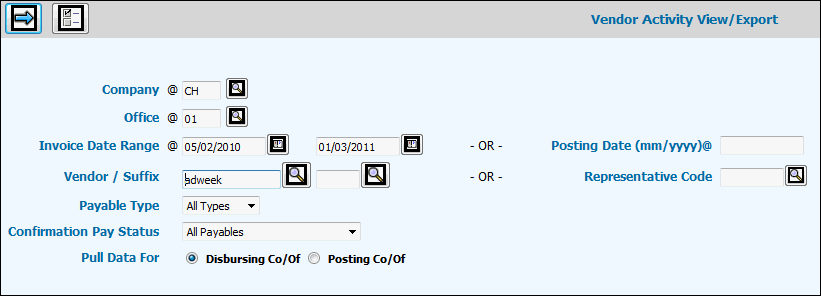
Select Financials|Accounts Payable|Inquiries|Vendor Activity View/Export.
Vendor Activity View/Export Prompt
Click <Preferences> to display a window where you may select items you want displayed as a column of information. In the left-hand box, click items you want displayed as a column of information then click the Right Arrow. Items you selected are moved to the right-hand box and will display as a column of information. To remove items, click the item in the right-hand box then click the Left Arrow. Click the Save icon to save your selections.
To collect vendor activity for a company/office other than the signon company/office, key the applicable company and office codes in the Company and Office fields. The signon Company/Office initially defaults into these fields; however, the last company/office keyed will persist until changed.
Key or select an Invoice Date Range to collect payables with an invoice date falling between these two dates. If you view/export by an Invoice Date Range, leave the Posting Date field blank. Note: The date format of the Invoice Date Range is always in the format set up for the signon Company/Office.
Key a month/year (mm/yyyy format) in the Posting Date field to view/export only posted invoices for the specified vendor. If you limit vendor activity by a Posting Date, leave the Invoice Date Range fields blank.
Key a valid Vendor code and if applicable key a Suffix if your company uses suffixes to define alternate payment addresses for a vendor. Suffixes are set up in Common Vendor.
If applicable, key a Representative Code (companies that represent publications for contract, paying, or trafficking purposes and which are used in Mediaocean Print).
From the Payable Type drop-down list, select All Types, Expense, Media, Production, or Voucher.
From the Confirmation Pay Status drop down list, select an Allocation/Release Status to allow users of Confirmation Pay to view information pertaining to the selected Allocation/Release Status. Selections include:
All Open Payables Ignore Confirmation Pay. All invoices/line items regardless of Confirmation Pay allocation/release status.
All Released (A/R, N/R, X/R). All invoices/line items that are released to be paid (Release Status of R).
Allocated/Released (A/R). Invoices/line items that are successfully applied to a client payment by Confirmation Pay (A). Invoices/line items that are released to be paid (R).
Not Allocated/Released (N/R). Invoices/line items are approved for payment but not yet applied to a client payment (N). Invoices/line items that are released to be paid (R).
Not Allocated/Not Released (N/N). Invoices/line items that are approved for payment, but not yet applied to a client payment (N). Invoices/line items that are eligible for payment, but not yet released for payment either by the allocation process or by manual selection for immediate release (N).
Suspended Not/Released (S/N). Invoices/line items that are temporarily suspended from the allocation process by the user (S). Invoices/line items that are released to be paid (R).
C/P Not Required/Released (X/R). Confirmation Pay is not required (X). Invoices/line items that are released to be paid (R).
In the Pull Data For field, click the Disbursing Company/Office radio button to view vendor activity for the invoice Disbursing Company/Office. Click the Posting Company/Office radio button to view vendor activity for the invoice Posting Company/Office.
Click the Next icon to display the Vendor Activity View/Export Window.
Vendor Activity View/Export Window
To sort information, click the column heading. Ascending/descending triangles display to help you identify a sorted column of information and the sort order of information.
To see payment detail, click the radio button located beside the applicable invoice then click <Payments> to display all payments for the selected invoice.
To view G/L distribution information for a specific invoice (debits/credits, accounts, etc), click the radio button beside the applicable invoice then click <G/L Distribution>.
To export G/L distribution information for multiple invoices, select the invoices you want to export then click the <Multi G/L Distribution Export> button. Information is processed in the background allowing you to continue working in this option or other options. After processing is completed, information is sent to you as an attachment in an email.
To export G/L distribution information for all invoices, click the <Export All G/L Distribution> button. Information is processed in the background allowing you to continue working in this option or other options. After processing is completed, information is sent to you as an attachment in an email. Note: This function limits the number of rows that can be exported to 2,000. If rows exceed 2,000, an error message is displayed.