The Calculated Rows function allows you set up calculations needed to produce summary totals. Rows act as footers beneath sections of data and can be configured to provide calculated summaries of any piece of data in that section that you wish to highlight. To make the summary stand out in the report, you can use color to highlight a calculated row.
Subtotals would combine any measures you have included on your report by adding or subtracting results. Example: In the Buy View, you could select the Calculated Rows tab, then select Estimates in the drop down box. Users could then subtotal by a measure selected, i.e., Gross Ordered to create a Sum Total by Estimate. Another example would be to select by Market, and create a Percent of Total row to determine how each market impacts the total spend amount.
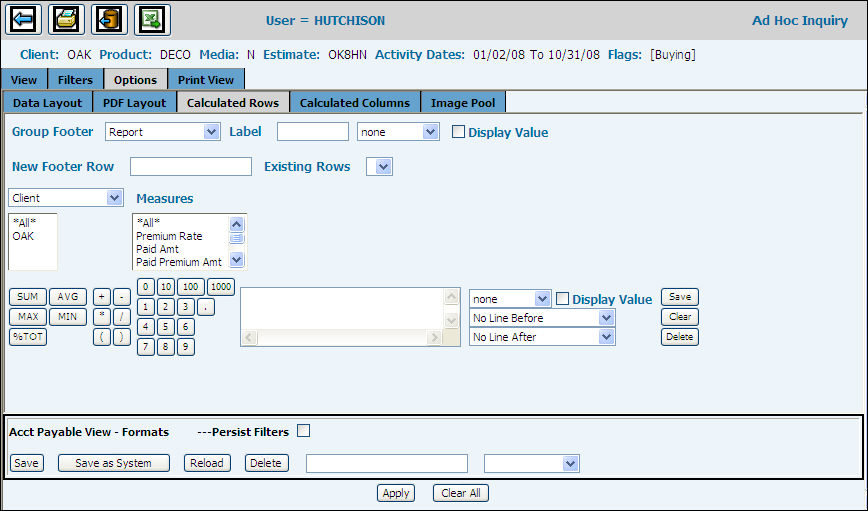
Following is a description of each field followed by the Steps to Creating Your Calculation.
Group Footer: This field is used to select the group to which you want to attach rows. This list always shows Report as the first item in the list and the remainder of items is populated based on the way your report is grouped. Changing this selection will affect Existing Rows, Group Keys Level Selection, and Keys Selection fields as described below.
Note: If the selected group level is the same as the selected group keys level, then the calculated row appears immediately after the last selected group in the calculation.
Footer Label: This field is optional and is used to insert a row (for defining a footer section) that contains the defined label.
Footer Color: This field allows you to define the background and font colors for the group footer. If none is selected, the colors use the row defaults.
Display Value: This field is also used like the Footer Label. When checked, a footer section row will be created with a label defined by the group value.
The label is a combination of the Group Value and Footer Label.
New Footer Row: This field defines the label for a newly created group row. Enter a new value into this field, define your calculation, and click the <Save> button to create a new group row. This label appears in the first column of the group row on the report.
Existing Rows: This field allows you to select and maintain rows that have already been created for the selected group level.
Footer Color: This field allows you to define the background and font colors for the new footer row. If none is selected, the colors use the row defaults.
Display Value: This field is also used like the New Footer Row label. When checked, a footer row will be created with a label defined by the group value. The label is a combination of the Group Value and New Footer Row Label.
Group Keys Level Selection: This field is used to select the data to be included in your calculation. When selecting a level, the Keys Selection box is populated with the keys for that level. Example: If you select Office from the drop-down list, a list of all offices will display in the Keys Selection box.
Keys Selection: This box is used to select the keys you want included in your calculation. Keys that display are based on the selected Group Keys Level. Select one or more keys or select *All* for all keys.
Measures Selection: This box is used to select the measures you want included in your calculation. Select one or more measures, or select *All* for all measures.
Line Break: Two Line Break functions allow you to add a line or space before and/or after totals. Just click the Line Break drop-down list and select the applicable line format from the list. The defaults are No Line Before and No Line After
Creating your calculation:
From the Options Tab, select the Calculated Rows Tab.
Key information as described for each section of the tab as described above. If you are maintaining a Footer Row, select an existing row from the drop-down list.
Select keys and measures, then select a function (<SUM>, <AVG>, etc.). To save time, you can also select your measures by double-clicking a key. Only the key you double click will show in the calculation box.
Select operators, parenthesis, and numbers to create your calculation.
To add another row, override the existing row by clicking <Clear> to clear the calculation box. Afterwards, create a new calculation.
Click the <Save> button to save your calculation.
To delete a footer row, click the <Delete> button.
After you have created your calculations, click the <Apply> button and <Save> button in the areas located at the bottom of the window; otherwise you will lose your calculated row.