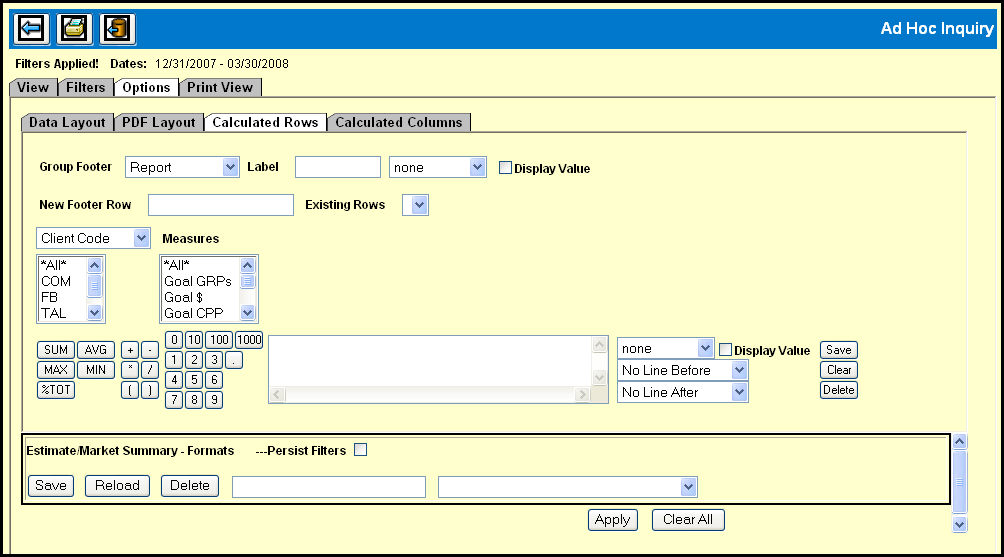
When you are creating customized reports in Ad Hoc Inquiry you have the ability to create specialized footers using the options on the Calculated Rows tab. These rows act as footers beneath sections of data and can be configured to provide calculated summaries of any piece of data in that section that you wish to highlight. To make the summary stand out in the report, you can use color to highlight a calculated row.
To create a Calculated Row:
Use the Group Footer drop down to specify the section
in the report under which you want to add your calculated row.
(Keep in mind that the items that appear in the Group Footer drop down
will depend on what item you selected on the View tab.)
Type a label in the Label text box.
Choose a highlight color scheme from the drop down list.
Select the Display Value check box, if you want to the value in the label.
Use the New Footer Row text box to designate a name for the row.
For the first Calculated Row that you create, the Existing Rows drop down list will be blank. However, when you create a subsequent Calculated Rows, the previously created rows will appear in the Existing Rows drop down list.
Choose a highlight color scheme from the drop down list.
Select the Display Value check box, if you want to the value in the label.
Use the following drop down to specify the group that is to appear below the group footer level on the report.
From the list box, select the rows to be included in the calculation.
In the Measures lists, select those items that you want to have calculated in the group footer.
Use the calculator pad to create your actual formula. As you do, the formula will display in the adjacent panel. If you make a mistake and want to start over, just click the Clear button. When you’re satisfied with your formula, click the Save button. You can use the Delete button to remove a saved formula.
Use the three drop down lists adjacent to the Footer calculations area configure custom separator rows.
From the first drop down, you can select from ten colors.
From the second drop down you can select from four line styles for the line before the calculated row.
From the third drop down you can select from four line styles for the line after the calculated row.
Click the Apply button.
Return to the View tab to see the results.
Click the Clear All button.
Type a name for your Calculated Rows configuration in the text box in the Formats section.
If you have applied filters on the Filters tab and want to save them along with your Calculated Rows configuration, select the Persist Filters check box.
Click the Save button.
Select the Calculated Rows configuration name from the drop down in the Formats section.
Click the Reload button.
Click the Apply button.
Return to the View tab to see the results.
Select the Calculated Rows configuration name from the drop down in the Formats section.
Click the Delete button.