The Time Off Request function allows you to select the days and hours on which you want to take time off then send an automatic email to your manager requesting approval. Once the request is sent, your specified date(s), hours, and transaction codes default into the applicable fields on your timesheet. Upon receipt of your automatically generated email, your manager will approve or reject the specified time following the current process. If approved, the Block Dates calendar function for companies who use Mediaocean F|P Workflow will be updated so work cannot be assigned on those approved time off dates. Conversely, if Company level dates are blocked in Workflow, time off cannot be requested for those dates in Time Off Request. All company-level blocked dates are disabled and cannot be selected.
Time Off Request Selection Window
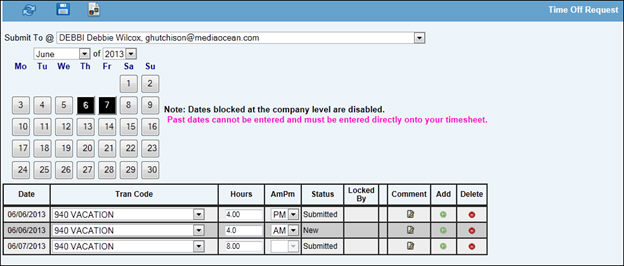
From the Submit To drop-down list, select the email address of your approving manager. Afterwards, this email address will persist in this field until changed.
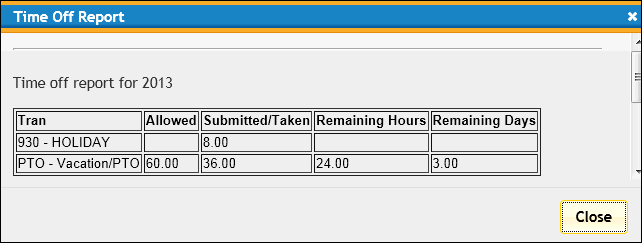
To help you schedule time off, click the Time Off Report icon to show you how many hours you are allowed by transaction code, hours that have been submitted/taken, remaining hours, and remaining days for the current year. Hours with a status of “New” will not display on the report. Click <Close> to close the window. Note: Allowed hours, remaining hours, and remaining days may not apply to all transaction codes and therefore, will not display in the applicable columns on the report. Example: Jury Duty
From the Month/Year drop down list, select the applicable Month and Year you want to take time off.
Click each day of the week (to include the current day) on which you want to take time off. Hours for past dates cannot be entered and must be entered directly onto your timesheet. If dates have been blocked at the company level, dates are disabled and time off cannot be requested. To deselect a day before submitting, click the date again. As days are clicked, rows appear at the bottom of the calendar showing Date, Tran Code, Hours, AM/PM, Status, and Comments columns. Dates are color coded to identify activity as follows:
From the Tran Code drop-down list, select the applicable time off transaction code.
For each selected day, key the number of hours you want to take off in the Hours field. This amount of time cannot exceed the maximum number of daily hours that are allowed. The Minimum amount of time is set at the discretion of your company. If requested timeoff hours do not equal the maximum number of hours allowed off, the remainder of time must be entered in Timesheet Entry, if dates have past.
To identify the time period for time off requests that are less than an employee’s daily hours, click the AM/PM drop-down list and select the applicable time period. To enable this feature, less than the employee’s daily hours must be keyed in the Hours field. Afterwards, the AM/PM drop-down list becomes available for use.
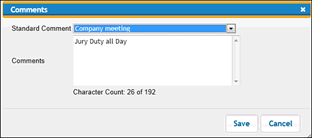
Click the Comments icon to display the Comments window. Key Comments in the Comments box, then click <Save>. Afterwards, a “C” (comments) displays in a row beside the Comments icon. Time off that has already been approved will appear as disabled. For disabled days, a “Read Only” Comments box displays when you click the Comments icon. Read Only comments cannot be changed. Comments are optional unless the selected Tran Code has been set up to require comments in Production|Admin|Tran Code Settings. If comments are not entered for a Tran Code that requires comments, an error message displays and your request cannot be saved until Comments are entered.
To add a time off row for the same date as an existing row, click the Add icon on the row with the date you want to add. This feature can be used when you need to add more time off to a partial day that has already been submitted. Key information as usual to request time off. Note: The calendar date button is disabled when more than one row with the same date exists. If you need to enable the calendar date button, delete all rows that were added using the Add feature. Note: The Add/Delete functions are not operational when requested time has been Approved or Posted. Exception: The Add function displays when requested hours are in approved status as long as approved hours do not exceed the employee's daily hour limit; otherwise, the Add/Delete functions only display when requested time shows a status of New, Submitted, or Rejected.
To delete a row, click the Delete icon on the row you want to delete. Note: You cannot delete a row with a past date or a row with time that has been approved. Remember to click the Save icon to Save all requests. Saving ensures that time off is unsubmitted when time off rows are deleted. Note: The Add/Delete functions are not operational when requested time has been Approved or Posted. The Add/Delete functions only display when requested time shows a status of New, Submitted, or Rejected.
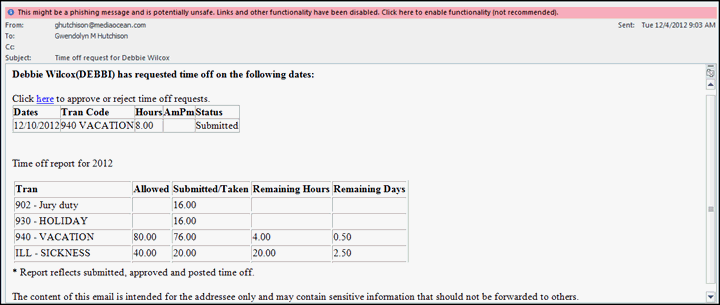
When finished, click the Save icon which submits your request for approval in an email to your selected manager. You will also receive a copy of this email. The contents of the Time Off Report is added to the email and provides additional information pertaining to the request. Also, the manager’s email contains a link to the approve/reject function. This link allows the approving manager to approve or reject employee time off requests on the fly instead of having to log directly into AdClock. The Save function also transfers selected time to Timesheet Entry with a submitted status. If changes to this time are required, they must be made in Timesheet Entry. Note: If you key more hours than allowed for a specified transaction code, an error message displays along with the Time Off Report and the request cannot be submitted until hours are adjusted.
Note: If you receive a “Phishing” message highlighted in PINK at the top of your email, right click the message and click “Enable Links and Other Functionality”.
Note: For Microsoft Outlook users only. If columns of information do not align properly in your email, adjust your font in “Composing and reading plain text messages” using the Stationery and Fonts function on the Mail Format tab.
The Approve/Reject window provides managers with the employee Time Off Report as well as the Time Off Calendar function. To open the Time Off Calendar, click the Time Off Calendar icon located on the toolbar. Having immediate access to the Time Off Calendar allows the approving manager to review all time that has been submitted by other employees so conflicts with other requested time can be avoided when approving the request. To close the Time Off Report, click <Close>. To reopen the Time Off Report, click the Time Off Report icon on the toolbar. To approve submitted time off for a particular date(s), click in the box under the green checkmark column as you are used to doing in the Approve/Reject options within AdClock. To reject submitted time off, click the checkbox under the red X column. You may also click the approve/reject checkboxes in the column heading to select/unselect all dates included on the window.
Click the Save icon to process your changes. A “Processing, please wait” message displays.
If a timesheet is locked by another user or process, a warning message is displayed indicating the lock and to try again later. Click the Refresh icon to view the current locks or if the locks have cleared, to start the approve process again.
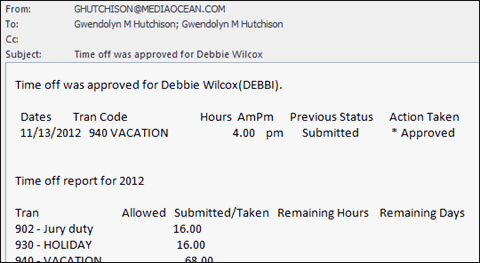
After a save completes, the status is changed from submitted to approved or rejected. Also, an email is sent to the requesting employee and approving manager displaying the time that was approved/rejected.